🧢 Beautiful ✨ Detailed πŸ’ Adorable

Baby Dandelion Amigurumi Pattern

Baby Dandelion Amigurumi Pattern
4.9β˜… Rating
5-7 Hours Time Needed
2.0K Made This
βœ‚οΈ

Intermediate Level

Ideal for those with basic crochet experience, featuring slightly more advanced stitches and techniques to expand your skills.

⏱️

Weekend Treat

Takes 5-7 hours, making it an enjoyable project to finish over a couple of days.

🧸

Cute Companion

An adorable friend to cherish, handcrafted with love to bring comfort and joy for years to come.

About This Baby Dandelion Amigurumi Pattern

This pattern teaches you how to crochet a tiny Baby Dandelion amigurumi complete with sculpted facial features and fluffy hair. It includes every round for arms, legs, head, body and step-by-step assembly instructions with photos. You will learn thread-joining, sculpting for expression, and a knotless hair attachment method to create the signature dandelion fluff.

Baby Dandelion Amigurumi Pattern crochet pattern - detailed view of completed project

Perfect for gifting or keeping as a sweet miniature companion, the finished piece has poseable limbs and delightful details. Follow the clear instructions and photos to recreate the exact look shown.

Why You'll Love This Baby Dandelion Amigurumi Pattern

I absolutely love this pattern because it captures so much personality in a tiny amigurumi figure with very simple stitches. I enjoy the sculpting steps that let me shape subtle facial expressions and the knotless hair technique that creates that whimsical fluffy look. It is satisfying to assemble and see all the parts come together into a charming character. I also love that the pattern is photo-assisted, which makes the slightly more advanced techniques easy to follow and replicate.

Baby Dandelion Amigurumi Pattern step 1 - construction progress Baby Dandelion Amigurumi Pattern step 2 - assembly progress Baby Dandelion Amigurumi Pattern step 3 - details and accessories Baby Dandelion Amigurumi Pattern step 4 - final assembly and finishing

Switch Things Up

I love how easy it is to customize this Baby Dandelion by changing hair color or yarn texture to create different personalities.

You can use mohair or fuzzy yarn for a more ethereal puff, or use bulky yarn and a larger hook to make a chunky, cuddly version.

If you want a miniature keychain, use thinner yarn and a smaller hook and attach a keyring before finishing the head.

I often switch the green rim color to a pastel or bright tone for seasonal variations like spring pastels or autumn shades.

Try embroidering different mouth shapes or eyebrow angles to change the expression from surprised to sleepy or mischievous.

I sometimes add tiny crocheted props like a leaf, acorn, or tiny flower for an extra whimsical touch.

For posable limbs, you can add a small wire armature inside the arms and legs before stuffing to allow gentle posing.

To make a set, vary the yarn weight and hair lengths so you have a family of different sized dandelion babies.

Consider felting or needle-felting small details on the body for texture, or using felted cheeks instead of powdered blush for durability.

I recommend experimenting with eye placement and then taking a photo before securing to ensure the personality looks right to you.

Common Mistakes & How to Fix Them

βœ— Skipping the stitch marker when working in continuous spirals leads to lost round counts; place a marker at the start of every round and move it each round. βœ— Forgetting to leave a tail for joints or color changes will make insertion difficult later; always leave the recommended tail length when instructed. βœ— Overstuffing the head or body causes distortion of shape and makes sculpting harder; stuff gradually and firmly but not too tightly to maintain smooth shaping. βœ— Not making holes for safety eyes can tear stitches when forcing them in; widen the hole gently with a wooden skewer or blunt scissors before inserting eyes. βœ— Not melting and securing the plastic joint leg can lead to a loose head; carefully melt the joint leg and press it to the washer as instructed to ensure a stable connection.

Baby Dandelion Amigurumi Pattern

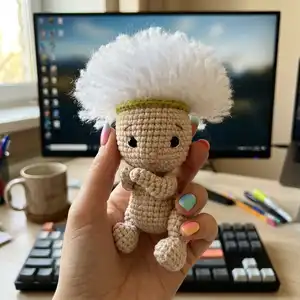
Create an adorable Baby Dandelion amigurumi with this clear, photo-assisted crochet pattern. You will make a tiny, poseable dandelion baby with fluffy hair, embroidered features, and secure thread-joined limbs. The pattern covers materials, step-by-step rounds, assembly, hair attaching, sculpting, and finishing touches so you can complete a charming handmade keepsake.

Intermediate 5-7 Hours

Materials Needed for Baby Dandelion Amigurumi Pattern

β€” Main Fabric

  • 01
    YarnArt Jeans (50g/160m, 55% cotton 45% polyacrylic) Color beige - #05 (body) approx 50g
  • 02
    YarnArt Jeans (50g/160m) Color green - #29 small amount for head rim
  • 03
    Nako Paris (100g/245m, 60% polyamide, 40% premium acrylic) Color white - #208 (hair) approx 1 skein or trimmings
  • 04
    Nako Bon Bon Classic (100g/200m, 100% acrylic) yellow - #98217 (alternative hair example in photos)

β€” Tools Required

  • 01
    Crochet hook suitable for your yarn (author used 2 mm)
  • 02
    Safety eyes 6 mm (2 pieces)
  • 03
    Plastic joints 20 mm (we will need only one for the head)
  • 04
    Lighter (to make plastic safety joints more secure)
  • 05
    Strong thread for sculpturing and thread joining
  • 06
    Scissors
  • 07
    Tapestry needle for sewing
  • 08
    Pins for positioning parts
  • 09
    Stitch marker (author uses a piece of yarn)
  • 10
    Fiberfill (stuffing)
  • 11
    Stuffing tool (author uses wooden skewers)
  • 12
    White embroidery thread (author used YarnArt Jeans #62)
  • 13
    Black or brown embroidery thread to embroider mouth and eyebrows
  • 14
    Make up blush powder/soft pastel of pink color
  • 15
    Paintbrush or make up brush/q-tip
  • 16
    Slicker brush (for fluffing hair)

Progress Tracker

0% Complete

β€” Arms :

Info :

Work with beige yarn. Do not stuf the arms.

Round 1 :

6 sc in a MR (6)

Round 2-3 :

(2 rows) 6 sc (6)

Round 4 :

inc, 5 sc (7)

Round 5 :

3 sc in 1, 2 sc, dec, 2 sc (8)

Round 6 :

(inc, 1 sc) * 2, dec, 2 sc (9)

Round 7 :

(dec, 1 sc) * 2, 2 inc, 1 sc (9)

Round 8-9 :

(2 rows) 9 sc (9)

Round 10 :

(dec, 1 sc) * 3 (6)

Info :

Cut the yarn off leaving a tail for closing the opening. Insert the yarn tail into a needle, go under the front loops of all 6 sc (p.1), tighten the thread and weave in the yarn ends. Later we will attach the arms to the body.

β€” Legs :

Info :

Work with beige yarn. Stuff as you go.

Round 1 :

Ch 6, From the 2nd ch from the hook 4 sc, 3 sc in 1, 4 sc along the other side of the chain (11)

Info :

Continue working in spirals.

Round 2 :

inc, 3 sc, 3 inc, 3 sc, inc (16)

Round 3-4 :

(2 rows) 16 sc (16)

Round 5 :

5 sc, 3 dec, 5 sc (13)

Round 6 :

dec, 2 sc, 3 dec, 1 sc, dec (8)

Round 7 :

(3 sc in 1, 3 sc) * 2 (12)

Round 8 :

inc, 1 sc, inc, 3 sc, 3 inc, 3 sc (17)

Round 9-11 :

(3 rows) 17 sc (17)

Round 12 :

1 sc, 2 dec, 3 sc, 3 dec, 3 sc (12)

Round 12 :

6 dec (6)

Info :

Cut the yarn off, close the opening, weave in the yarn end. Later we will attach the legs to the body.

β€” HEAD (part 1) :

Info :

Work with beige yarn.

Round 1 :

6 sc in a MR, do not pull the ring tight, leave about 6 mm to insert plastic joints later (p.4).

Round 2 :

6 inc (12)

Round 3 :

(inc, 1 sc) * 6 (18)

Round 4 :

(inc, 2 sc) * 6 (24)

Round 5 :

(inc, 3 sc) * 6 (30)

Round 6 :

2 sc, (inc, 4) * 5, inc, 2 sc (36)

Round 7 :

(inc, 5 sc) * 6 (42)

Round 8-16 :

(9 rows) 42 sc (42)

Info :

Cut the yarn off leaving a tail to change to green color later. Now we will neet to crochet the body and after the body is done, continue crocheting the head.

β€” BODY :

Info :

Work with beige yarn.

Round 1 :

6 sc in a MR, do not pull the ring tight, leave about 6 mm to insert plastic joints.

Round 2 :

6 inc (12)

Round 3 :

(inc, 1 sc) * 6 (18)

Round 4 :

18 sc (18)

Round 5 :

(inc, 2 sc) * 6 (24)

Info :

At this stage we connect the head to the body using a joint. Insert the joint into the space left from the MR on the head (from the inside), then pass through the MR on the body (p.5). Fix it with a washer. For a more safe attachment it is necessary to melt the leg of the joint and press it against the washer with a flat metal tool (I use tweezers or scissors) (p.6). Melt the leg only with the blue part of the fire so that the plastic does not turn black. Watch the video of the joint installation process.

Round 6-8 :

(3 rows) 24 sc (24)

Round 9 :

(inc, 3 sc) * 6 (30)

Round 10-13 :

(4 rows) 30 sc (30)

Round 14 :

(dec, 3 sc) * 6 (24)

Round 15 :

(dec, 2 sc) * 6 (18)

Info :

Stuff the body.

Round 16 :

(dec, 1 sc) * 6 (12)

Round 17 :

6 dec (6)

Info :

Cut the yarn off, close the opening, weave in the yarn end.

β€” HEAD (part 2) :

Info :

Insert the safety eyes between rows 10 and 11 with a distance of 8-9 stitches. To make it easier to insert the eyes, first make holes for them. I use a wooden skewer, insert it between the stitches and widen the hole. You can also use tweezers or blunt end scissors (you do not want to damage the stitches) (p.8). Continue crocheting with green yarn. Color change should be on the back of the head, make or undo several stitches in beige yarn if needed.

Round 17 :

42 sc FLO (p.9) (42)

Round 18 :

42 sc through the BACK LOOPS of the 16th rows (p.10) (42)

Round 19 :

(dec, 5 sc) * 6 (36)

Round 20 :

(dec, 4 sc) * 6 (30)

Round 21 :

(dec, 3 sc) * 6 (24)

Round 22 :

(dec, 2 sc) * 6 (18)

Info :

Stuff the head.

Round 23 :

(dec, 1 sc) * 6 (12)

Round 24 :

6 dec (6)

Info :

Cut the yarn off, close the opening, weave in the yarn end.

β€” Assembling :

Info :

Sculpting To sculpture eyes and mouth use a stong thread (approximately about 40 cm). Each time you insert or pull out the needle, make sure it is as close to the eye as possible. Thread the needle, insert it from the top of the head (point 1, p.12), leave a small tail about 10 cm, - pull the needle out at point 2, insert it into point 3, pull it out at point 4 - insert it into point 5, pull it out at point 6 (between rows 5 and 6), insert it into point 7, - pull it out at point 8, pull up both ends of the thread to the desired degree of tightening. Tie the ends together several times, continue: - insert the needle again at point 1, pull it out at point 2, insert it into point 9, - pull it out at point 4, insert it into point 10, pull it out at point 8. Pull up both ends, tie them together several times and weave them in. Embroider the whites of the eyes with white yarn (p.13-14).

Info :

Nose Embroider the nose using the same yarn you used for crocheting the body. Make one horizontal stitch between rows 8 and 9 (one row below the eyes) (p.15), then wrap this stitch with 5-6 stitches as shown on p.16-17. Pull the ends out at the back of the head, tie them together and weave in.

Info :

Eyebrows Emroider the eyebrows with 1 stitch (I use 2 ply embroidery thread): Pull the needle out 2 rows above the eye and insert in at the point 2 stitches to the side and one row below (p.18).

Info :

Thread joining Pin the arms between rows 5 and 6, and the legs between rows 12 and 13. You can choose a different placement, but be careful, the legs should not be too high or low. Use a strong thread (we will need about 50 cm for the arms and 50 cm for the legs). Grab several stitches from the inside of the arm (p.20), pull the needle through the body (p.21.22), grab several stitches on the inner side of the second arm (p.23), insert the needle back into the same hole on the body (p.24). Repeat these steps several times (4-5 will be enough), inserting the needle into the same holes and trying to grab the same stitches on the arms. Pull up both ends, tie them together several times and weave them in. Attach the legs using the same method.

β€” Hair :

Info :

Cut the yarn into strands of about 12 cm/4.7" long. Start with 80 strands, make more later if needed. Attach stands using knotless method (watch the video of the process). Skip one stitch each time to avoid very thick hair. Go around moving counterclockwise (p.26) until the entire green part of the head is covered. Do not skip stitches in the last row, attach strands into each stitch (p.27). Cut the hairs to the desired length (mine are about 3-4 cm/1.5"), fluff the ends with a slicker brush.

β€” Blushing :

Info :

I add blush to cheeks, nose and mouth. Add a little touch of blush and blend it well.

Info :

Congratulations Your Baby Dandelion is ready!

Assembly Instructions

  • Insert the 20 mm plastic joint into the magic ring space on the head (from the inside), then pass the joint through the MR on the body and fix it with a washer for a secure head-to-body connection.
  • For extra safety melt the leg of the joint slightly using the blue part of the flame and press it against the washer with tweezers or a flat metal tool to prevent the head from wobbling.
  • Pin the arms between rows 5 and 6 and the legs between rows 12 and 13 before sewing; adjust placement visually for symmetry then thread-join securely.
  • Thread-join the limbs using strong thread: grab several stitches from the inside of the arm, pass through the body, grab stitches of the second arm and return through the same hole; repeat 4-5 times and tie off.
  • Sculpt the eyes and mouth by passing a strong thread through the marked points as described, pull to desired tension, tie and weave ends to create subtle facial dimples.
  • Embroider the nose with the body yarn between rows 8 and 9, then wrap that stitch 5-6 times to form the nose and hide ends at the back of the head.

Important Notes

  • πŸ’‘All parts are worked in continuous spirals (without slip stitch and ch), unless noted otherwise; use a stitch marker to keep track of rounds.
  • πŸ’‘Stuff gradually and evenly; stuff body firmly but avoid overstuffing which can distort shape and make sculpting difficult.
  • πŸ’‘Pin all parts in place before sewing to ensure correct positioning and symmetry, especially arms between rows 5-6 and legs between rows 12-13.
  • πŸ’‘When melting the plastic joint leg use only the blue part of the flame to avoid burning or blackening the plastic; press immediately to the washer to secure.
  • πŸ’‘Make holes for safety eyes with a wooden skewer or blunt tool to avoid damaging stitches when inserting 6 mm safety eyes.

This little Baby Dandelion was designed to bring a smile and a bit of whimsy to your day. It combines simple crochet skills with small finishing techniques for a big personality in a tiny package. Whether you keep it as a miniature companion or gift it, it will surely delight anyone who loves handmade cuteness. 🧢🌼

You ask,

we answer.

FAQs

What size will the finished piece be?

The finished amigurumi measures approximately a few inches tall (miniature scale) when using YarnArt Jeans with a 2 mm hook; exact size depends on yarn and tension.

Can I use different yarn weights for this pattern?

Yes, but changing yarn weight will affect the final size and hair texture; choose an appropriate hook for your yarn and expect differences in proportions.

Do I need prior crochet experience for this pattern?

This pattern is rated intermediate and assumes you know single crochet, increases, decreases, working in spirals, and basic sewing; photo steps help with the more advanced assembly.

How long does this project typically take to complete?

Most crocheters complete this project in 5-7 hours, though time may vary based on experience level, hair attachment, and finishing details.