🧶 Beautiful ✨ Detailed 💝 Adorable

Baby Barefoot Sandals Pattern

Baby Barefoot Sandals Pattern
4.7★ Rating
2-3 Hours Time Needed
3.9K Made This
✂️

Beginner Friendly Level

Perfect for those just starting their crochet journey, with clear instructions and simple techniques

⏱️

Bite-Sized Project

Finishes in 2-4 hours—perfect for an afternoon of creative relaxation.

👣

Cozy Accent

A warm touch for your space that transforms ordinary corners into inviting nooks filled with handmade charm.

About This Baby Barefoot Sandals Pattern

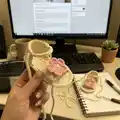
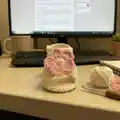
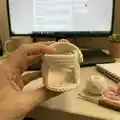
This pattern creates sweet baby barefoot sandals topped with a five-petal crocheted flower. Youll make a small triangular sandal base, add two long straps, and finish with a layered flower motif for a delicate look. The pattern includes instructions for two sizes and uses simple stitches suitable for quick projects. Perfect for baby photos, gifts, or seasonal accessories.

Baby Barefoot Sandals Pattern crochet pattern - detailed view of completed project

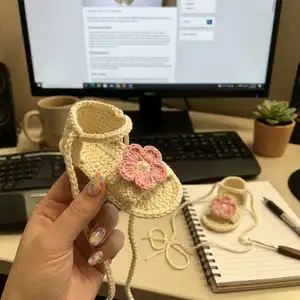
Includes detailed rounds for the base, strap instructions, and a step-by-step flower assembly. Photos and notes guide placement and finishing for neat, professional results.

Why You'll Love This Baby Barefoot Sandals Pattern

I absolutely love this pattern because it turns simple crochet stitches into a charming accessory you can finish in an afternoon. I enjoy the small, satisfying progress of creating the triangle base and seeing the flower bloom with each petal. The pattern is flexible so I can customize colors for special gifts or match outfits for photo sessions. I also appreciate how approachable it is—new crocheters can follow the clear rounds while still making something beautiful. Sharing these little sandals with friends and family always brings smiles and makes me proud of handmade gifts.

Baby Barefoot Sandals Pattern step 1 - construction progress Baby Barefoot Sandals Pattern step 2 - assembly progress Baby Barefoot Sandals Pattern step 3 - details and accessories Baby Barefoot Sandals Pattern step 4 - final assembly and finishing

Switch Things Up

I love customizing the flower colors to match seasonal outfits or special occasions; swap the center and petal colors for new looks.

You can change yarn weight and hook size to make minis for keychains or larger sandals for toddlers and kids.

I sometimes use metallic crochet thread for a subtle shimmer on the petals to make the sandals feel dressier.

Try adding a tiny button or bead to the flower center instead of slip-stitching for a different focal point.

If you want non-tie straps, crochet a shorter strap and attach a snap or button loop for easy on and off.

I often embroider small initials into the center before finishing to personalize each pair as a gift.

For a textured petal, experiment with half double crochets or popcorn stitches in place of the 5 dc petal to make bold petals.

To make a matching headband, repeat the flower motif and join several together on a chain band to fit a baby head.

I also recommend using cotton yarn for summer versions and soft acrylic for washable baby-friendly versions.

Don't be afraid to mix yarn types; a cotton flower on a soft acrylic strap looks beautiful and is practical for wear.

Common Mistakes & How to Fix Them

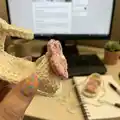
✗ Skipping the instruction to work Round 3 in the back loops only; fix this by placing your hook into the back loop of each stitch in Round 3 to form the exposed front loops for the flower. ✗ Counting the beginning chain as a stitch at the start of a round; avoid this by not counting the chain 1 or chain 3 as a stitch unless the pattern explicitly states so. ✗ Joining to the wrong point at the end of the round can distort the shape; always join to the top of the chain stitch you began the round with when instructed. ✗ Not working all stitches between brackets as a set will change petal shape; be sure to place every stitch that appears inside brackets into the same stitch as described.

Baby Barefoot Sandals Pattern

Make adorable, dainty barefoot sandals for babies and toddlers with this easy-to-follow crochet pattern. Youll create a small floral motif that ties with delicate straps — perfect for photos, gifts, or summer outfits. The pattern is versatile for two sizes and uses simple stitches to produce charming results. Follow the step-by-step rounds and finishing tips to achieve a polished, handmade look.

Beginner Friendly 2-3 Hours

Materials Needed for Baby Barefoot Sandals Pattern

— Main Fabric

  • 01
    Baby size: Fingering weight yarn, crochet thread, or embroidery floss for Color A (sandal base) — yields ~1.5 inch flower
  • 02
    Baby size: Fingering weight yarn, crochet thread, or embroidery floss for Color B (flower)
  • 03
    Toddler size: Use Worsted weight yarn for Color A and Color B with larger hook — yields ~2 inch flower
  • 04
    Featured yarns used: Knit Picks Comfy Fingering and Worsted weight yarns (small amounts of each color)

— Tools Required

  • 01
    Crochet hook size C (2.75 mm)
  • 02
    Crochet hook size D (3.25 mm)
  • 03
    Embroidery floss or crochet thread (for delicate straps and flower)
  • 04
    Scissors
  • 05
    Yarn needle for weaving in ends

Progress Tracker

0% Complete

— Materials :

Info :

Baby Size: 1.5 inches across flower. Sandal Base Color A - C or 2.75 mm hook. Fingering weight yarn, crochet thread or embroidery Floss. Flower Color B - Fingering weight yarn, crochet thread or embroidery Floss.

Info :

Toddler Size: 2 inches across flower. D or 3.25 mm hook. Color A and B are Worsted Weight yarn.

Info :

Use the same pattern for both sizes. Featured Sandals are made with Knit Picks Comfy Fingering and Worsted weight yarns.

— Abbreviations & Notes :

Info :

Abbreviations: Ch Chain. Sc Single crochet. Dc Double Crochet. Sl st Slip stitch.

Infos :

Notes: 1. Do not count the chain stitch as a stitch at the beginning of round. 2. When joining at end of round always join to the top of the chain stitch you began the round with. 3. I did not do an end of the round stitch count in this pattern because of all the chaining. I thought it might be confusing. All of our other patterns do have stitch count though. :o)

Info :

How to read pattern: A. When you see parenthesis () in the pattern they are either referring to the numbers for the larger sizes or will be around notations such as (See Note A). Note A) When you see Brackets [] in the pattern that means that you work everything in them as a set or together. B. When you see Brackets [] in the pattern that means that you work everything in them as a set or together. C. When I have a number followed by a st, that stitch needs to be worked over that number of stitches. Example: "10 sc" that is 1 sc in each of the next 10 stitches.

Info :

Gauge: ??????? I wasn't sure what to put here! We normally have gauge I just wasn't sure how to measure it for this pattern. :o)

— Base (Rounds) :

Round 1 :

With color A ch 4, join with slip stitch to 4th chain from hook to form a small ring. (See Picture A)

Round 2 :

Chain 1 (does not count as stitch) place 9 sc in ring. Join with slip stitch to the chain 1 from the beginning of round. (See Picture B) Do not turn.

Round 3 :

In this pattern when stitches are in brackets that means to put that group of stitches in the same stitch. This whole round will be worked in the back loops only of the previous round. Ch 3, starting in first stitch *[2 dc, ch 2, 2 dc], 1 dc in each of the next two stitches. Repeat from * 1 more time. [2 dc, ch 11, now working back down chain put 1 sl st in 10th chain from hook, ch 1, 2 dc back in same stitch], 1 dc in each of the next two stitches. Join with slip stitch to the top of the chain 3 that you started the round with. Do not turn.

— First strap :

Item Name (P1) :

Slip stitch in next 3 stitches. This should bring you to the middle of the first chain 2 spot. (See pictures C and D) Ch 60, Bind off!

— Second Strap :

Item Name (P1) :

Attach yarn to next chain three spot with a single crochet. (See Picture D on first page) Ch 60, Bind off!

Info :

Note: I tied the ends of my straps in a knot to kind of finish them off. You don't have to, I just thought it made them look better. :o)

— Flower :

Info :

With color B attach yarn to any one of the exposed front loops that were not worked in round 3. (See Picture E). Starting in the stitch you attached to, remember to work all stitches between brackets in the same stitch. [Ch 2, 5 dc, ch 2, sl st back to same stitch], first petal made! :o)

Round 1 :

Now skip next stitch, *[slip stitch to next stitch, Ch 2, 5 dc, ch 2, slip stitch back to same stitch], skip next stitch, repeat from * all the way around and end round by joining with a slip stitch to base of first flower petal made. You should have 5 flower petals when complete. Bind off!

— Finishing :

Info :

Using color A again attach to center of flower by pulling a loop of yarn from back to front and top stitch by slip stitching all the way around the center of the flower at the base of the petals. (See arrows in picture G)

Info :

After slip stitching around the center circle fill in the center by slip stitching across the flower's center in random stitches until the center is filled to your liking. :o) This may look ugly before it is finished but no worries! Just keep slip stitching away and fill in the holes until it is pretty. (See Picture H) Bind Off!

Info :

Weave in Ends and you are Done!

Assembly Instructions

  • Attach the flower to the triangle sandal base by centering it over the exposed front loops from Round 3 and sewing through the base loops so the flower sits flush.
  • Attach the first strap by slip stitching in the next 3 stitches at the indicated point (this brings you to the middle of the first chain-2 spot) then chain 60 and bind off; tie or knot strap ends as desired.
  • Attach the second strap by slip stitching into the next chain-3 spot on the opposite side, chain 60 and bind off to create the ankle tie; trim and finish ends or knot for a neat look.
  • Weave in all loose ends securely on the back of the flower and base so they are hidden and will not rub against the baby's skin.

Important Notes

  • 💡Use the back loops only in Round 3 to leave the front loops exposed for attaching the flower petals.
  • 💡Do not count the beginning chain as a stitch unless the pattern explicitly tells you to do so.
  • 💡Always join to the top of the chain stitch you began the round with to keep rounds aligned and even.

These sweet Baby Barefoot Sandals make perfect gifts and photo props. Handcrafted with a delicate flower and tie straps, they add charm to any outfit. Try different color combos to match seasons or special occasions. 🧶👣

You ask,

we answer.

FAQs

What size will the finished piece be?

The finished baby sandal flower measures approximately 1.5 inches across using fingering weight yarn, and about 2 inches across when made with worsted weight yarn for the toddler size.

Can I use different yarn weights for this pattern?

Yes, using a different yarn weight will change the finished size; use a smaller hook and thinner yarn for a delicate baby size or a larger hook and worsted yarn for a toddler size.

Do I need prior crochet experience for this pattern?

This pattern is beginner friendly; basic knowledge of chain, single crochet, double crochet, and slip stitch is recommended to follow the rounds and flower construction.

How long does this project typically take to complete?

Most crocheters complete a pair of these sandals in 2-3 hours, though time may vary depending on experience and customization.