🧢 Beautiful ✨ Detailed πŸ’ Adorable

Winter Is Coming Beanie Pattern

Winter Is Coming Beanie Pattern
4.9β˜… Rating
2-4 Hours Time Needed
1.3K Made This
βœ‚οΈ

Beginner Friendly Level

Perfect for those just starting their crochet journey, with clear instructions and simple techniques

⏱️

Bite-Sized Project

Finishes in 2-4 hoursβ€”perfect for an afternoon of creative relaxation.

🧣

Snug Essential

Everyday comfort with practical charm, designed for both functionality and style through changing seasons.

About This Winter Is Coming Beanie Pattern

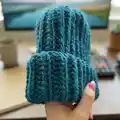
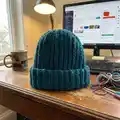
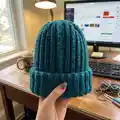
This pattern creates the Winter Is Coming Beanie β€” a crocheted cap worked flat to mimic the fisherman's rib knit. It is fully customizable to any head size and uses half double crochet worked through the back loop to form clear ribs. The pattern is beginner friendly and fast to make.

Winter Is Coming Beanie Pattern crochet pattern - detailed view of completed project

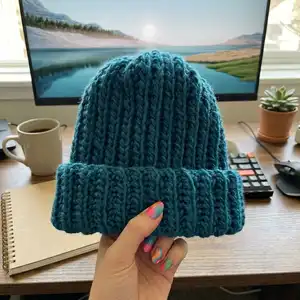
You'll need about 100 g of yarn and an 8 mm hook for the sample; adjust hook or yarn to change size and rib appearance. Clear photos and simple instructions make finishing quick and satisfying.

Why You'll Love This Winter Is Coming Beanie Pattern

I absolutely love this pattern because it recreates the classic knitted fishermans rib using a simple crochet technique that anyone can learn. I enjoy how quickly the ribs appear when working HDC through the back loop, giving a textured, cozy finish without complicated stitches. Its so easy to customise the circumference and height to fit any head, which makes it a great gift pattern. I also love that its satisfying to complete in just a few hours and produces a durable, wearable beanie every time.

Winter Is Coming Beanie Pattern step 1 - construction progress Winter Is Coming Beanie Pattern step 2 - assembly progress Winter Is Coming Beanie Pattern step 3 - details and accessories Winter Is Coming Beanie Pattern step 4 - final assembly and finishing

Switch Things Up

I love how easy it is to customise this beanie by changing yarn weight and hook size to achieve different textures and sizes.

Try a bulkier yarn with the same 8 mm hook for an even chunkier rib, or switch to a smaller hook for a denser, slimmer fit.

I often change the brim style by folding a wider cuff or leaving it unfolded for a slouchier look, depending on the wearers preference.

You can create color stripes by alternating colors every few rows to make fun, seasonal variations of this beanie.

Consider adding a pom-pom in matching or contrasting yarn for a playful finish that personalizes the hat.

If you want ear coverage, simply work more rows before joining so the finished height is longer to cover ears comfortably.

For a lined feel, crochet a second thinner beanie and sew it inside for extra warmth in very cold climates.

I sometimes embroider small motifs on the brim for a unique touch, such as initials or a tiny snowflake, which makes each hat a thoughtful gift.

To make matching sets, use the same color palette and vary yarn weights for child, teen, and adult sizes while keeping the stitch pattern consistent.

Experiment with textured yarns like boucle or tweed for a rustic, cozy finish β€” the rib still reads nicely even with novelty yarns.

Want to convert to a headband? Make a shorter width and join; youll have a thick ribbed earwarmer in minutes.

For a sustainable option, try using recycled or leftover yarns from other projects to make a colorful, eco-friendly beanie with lots of character.

Common Mistakes & How to Fix Them

βœ— Failing to measure the starting chain length accurately can lead to wrong circumference; measure the chain to reach about 35 cm (40 ch in the sample) before continuing. βœ— Skipping working HDC through the back loop will remove the rib effect; be sure to insert the hook into the back loop for every HDC row except the final joining row. βœ— Not checking width while repeating rows can make the beanie too tight or too loose; stop repeating Row 2 and Row 3 once you reach the target width (about head circumference minus 4 cm). βœ— Pulling the closing yarn too tightly or unevenly can distort the top shape; pull yarn through remaining stitches evenly, tighten gradually, and fasten to secure a neat top closure.

Winter Is Coming Beanie Pattern

Make a cosy, ribbed beanie worked flat using half double crochet in the back loop to recreate a fisherman's rib look. This beginner-friendly pattern is easy to customise for any head size and uses simple stitches for a quick, satisfying project. Follow the clear step-by-step instructions to create a warm, stylish hat you can gift or wear yourself.

Beginner Friendly 2-4 Hours

Materials Needed for Winter Is Coming Beanie Pattern

β€” Main Fabric

  • 01
    Morelfil BigBall (100 g used for sample)
  • 02
    Wool (approximately 100 gr, sample used with 100 gr of wool)

β€” Tools Required

  • 01
    Crochet hook size 8 mm
  • 02
    Yarn (100 gr recommended)
  • 03
    Scissors (not specified in PDF but required to cut yarn)
  • 04
    Tapestry/yarn needle for pulling yarn through remaining stitches and weaving ends

Progress Tracker

0% Complete

β€” Description :

Info :

Winter is coming Beanie is a crocheted cap, worked in flat, completely customisable to any size, reproducing the fisherman's rib stitch knitted with two needles.

Info :

Gauge: No gauge required; you can work adapting the shape to the head dimension. In my case the gauge was 14 lines x 20 stitches for 10x10 cm

Info :

My final dimension was: 49 cm for the circumference and 32 cm for the height. Also in this case you can adapt your dimension to the shape of your head.

β€” Materials & Tools :

Info :

Yarn: I used 100 gr of Morelfil BigBall. Materials: with a hook of 8 mm, I used 100 gr of wool.

Info :

Hook: 8 mm, I used this size, but you can use any size according to the yarn used, bigger is your hook, bigger will appear your ribs.

Info :

Techniques used: slip stitch, half double crochet.

β€” Abbreviations :

Infos :

Chain: ch. Half Double Crochet: hdc. Slip Stitch: slt.

β€” Pattern :

Info :

Lets go! Chain to reach about 35 cm, in my case 40 ch.

Info :

Lets crochet in rows, back and forth. All rows except for the last one will be made with HDC stitch made through the back loop.

Round 1 :

Row 1: 40 hdc

Round 2 :

Row 2: chain, 40 hdc though the back loop

Round 3 :

Row 3: chain, 40 hdc though the back loop

Round 4 :

Repeat *Row 2 and 3*until reach a width of 53 cm, in my case I worked 56 rows. You can adjust your width measuring the head less 4 cm.

Round 5 :

Last row: join the two sides in vertical with 40 slt. You will now have a tube. See pictures below.

Info :

Cut the yarn and pull yarn through the remaining stitches, tighten together and fasten. Your beanie is ready!

Assembly Instructions

  • After reaching the required width, join the two vertical sides by working 40 slip stitches (40 slt) along the edge to form a tube.
  • Once the tube is formed, gather the top opening by pulling the working yarn through the remaining stitches and tightening evenly to close the crown.
  • Fasten off securely after tightening the top and weave in the yarn tail with a tapestry needle to keep the closure neat.
  • Adjust the finished height by folding up the brim to form a cuff if you prefer a shorter hat or a thicker brim.
  • Measure the head circumference before finishing; you can adapt width by stopping the row repeats when the tube measures head circumference minus approximately 4 cm.

Important Notes

  • πŸ’‘Chain to reach about 35 cm as a starting measurement (40 ch in the sample) to match head circumference.
  • πŸ’‘Work all HDC rows through the back loop only to create the ribbed texture; the final joining row is worked differently.
  • πŸ’‘Adjust width by measuring the head and subtracting about 4 cm to account for stretch and fit.
  • πŸ’‘Fasten off and finish the top by pulling yarn through remaining stitches and tightening evenly to create a clean crown.

This Winter Is Coming Beanie pattern is a quick, satisfying project that recreates a knitted rib effect using crochet. Its fully customizable for any head size and works up beautifully in chunky yarn. Perfect for gifts or your own winter wardrobe β€” cosy and stylish! 🧢🧀

You ask,

we answer.

FAQs

What size will the finished piece be?

The sample beanie measured 49 cm circumference and 32 cm height using 100 g of yarn and an 8 mm hook; you can adjust size by modifying chain length and number of rows.

Can I use different yarn weights for this pattern?

Yes, you can use different yarn weights, but your finished size and rib appearance will change; choose an appropriate hook for the yarn you select and re-measure your starting chain length.

Do I need prior crochet experience for this pattern?

This pattern is rated beginner friendly and requires basic knowledge of chain, half double crochet (hdc), and slip stitch (slt); working HDC through the back loop is the main technique to learn.

How long does this project typically take to complete?

Most crocheters finish this beanie in 2-4 hours, depending on experience and speed; adjusting size or using thicker yarn may reduce or increase work time.

How do I adjust the beanie to fit different head sizes?

Measure the head circumference and create a starting chain to reach approximately the target minus stretch (about 4 cm less), then repeat rows until the fabric measures required width before joining into a tube.