About This The moonlit bralette Pattern
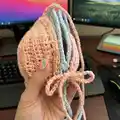
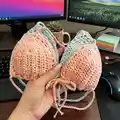
This pattern creates a comfy, textured bralette made by holding two strands of DK cotton yarn together for body and straps. It includes instructions to crochet two cups, add a decorative border, and make shoulder and bottom straps to fit. The bralette is simple, quick to make, and perfect for customizing with color or strap length.

Youll work half double crochet rows and simple border stitches to shape the cups. Suitable for makers who want a fast wearable project with clear, friendly instructions.
Why You'll Love This The moonlit bralette Pattern
I absolutely love this pattern because it transforms simple half-double crochet rows into a flattering, wearable bralette that feels luxurious to wear. I adore how holding two strands of DK cotton creates a soft, slightly chunky fabric with beautiful drape. I love that it is quick to make and highly customizable—changing colors or strap lengths instantly personalizes the piece. I also enjoy how it uses straightforward stitches so crocheters of many levels can get satisfying results. Sewing the straps in and weaving the bottom tie is one of my favorite finishing touches because it makes the bralette uniquely adjustable and comfortable.
Switch Things Up
I love to play with color when making this bralette; try using two contrasting colors held together for a marled effect or pick tonal shades for a subtle ombre look.
You can make the bralette chunkier by using a thicker yarn and a larger hook; this will create a warmer, more structured top perfect for cooler weather.
If you want a daintier or smaller version, switch to a lighter yarn and smaller hook and reduce strap chain lengths for a delicate finish.
I sometimes add a small decorative edging like picot or shell stitch along the top for a feminine touch; try adding it after the border is complete.
For extra support, consider crocheting a simple underband in a tighter gauge and attaching it under the cups before weaving in the bottom strap.
I often make matching accessories like scrunchies or headbands from leftover yarn to create a coordinated set—this uses up scraps and looks adorable.
If you want adjustability, replace the bottom chain tie with a crocheted cord threaded through the bottom loops and attach small rings for a hook-and-eye closure option.
I recommend testing strap placements and lengths before knotting them permanently; pin straps in place and try on the bralette to find the most comfortable fit.
To personalize the look, embroider small motifs or add beads to the straps for a boho-chic finish—just make sure any embellishments are secure and comfortable against skin.
I like to experiment with texture by swapping one of the two held strands for a textured or slubby yarn; it gives the fabric unique depth and interest.
Common Mistakes & How to Fix Them
✗ Holding only one strand of yarn instead of two will produce a thinner fabric and different gauge; always hold two strands together as instructed to achieve the intended texture and size.
✗ Forgetting to place a HDC in the very last chain of the previous row may cause the cup to slope or flare; be sure to place a HDC in that last chain to keep your cup straight at the bottom.
✗ Miscounting chains when shaping the top three HDC space will distort the center top of the cup; mark the middle stitch of the three and follow the HDC, HDC, CH1, HDC sequence exactly.
✗ Cutting the yarn too early after repeats can leave you short when adding the border; do not cut yarn until you have completed the repeat rows and are instructed to tie off.
✗ Making straps with inconsistent tension will cause straps to look uneven and twist when woven; keep consistent tension and measure strap lengths before finishing to ensure symmetry.