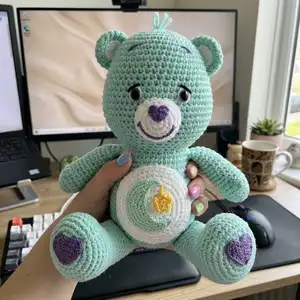
Make a classic cuddly crochet bear using this complete Basic Bear amigurumi pattern. You will learn shaping for head, body, arms, legs, ears, tummy motif placement, and finishing techniques to create a lovable handmade friend. The pattern includes color palettes, tummy symbol instructions, and step-by-step rounds so you can recreate care-bear style details with confidence.
Progress Tracker
0% Complete
— Head :
Info :
With Aluminum crochet hook and Body color yarn, ch 4; join with slip st to form a ring.
Rnd 1 :
Ch 1, 8 sc in ring; do not join, place marker (see Markers, page 31) (8)
Rnd 2 :
2 Sc in each sc around: 16 sc
Rnd 3 :
(2 Sc in next sc, sc in next sc) around: 24 sc
Rnd 4 :
Sc in next sc, 2 sc in next sc, (sc in next 2 sc, 2 sc in next sc) 7 times, sc in next sc: 32 sc
Rnd 5 :
(2 Sc in next sc, sc in next 3 sc) around: 40 sc
Rnd 6 :
(2 Sc in next sc, sc in next 19 sc) twice: 42 sc
Rnd 7 :
Sc in next 4 sc, 2 sc in next sc, sc in next 20 sc, 2 sc in next sc, sc in next 16 sc: 44 sc
Rnd 8 :
(2 Sc in next sc, sc in next 21 sc) twice: 46 sc
Rnd 9 :
Sc in next 11 sc, 2 sc in next sc, sc in next 22 sc, 2 sc in next sc, sc in next 11 sc: 48 sc
Rnd 10 :
(2 Sc in next sc, sc in next 23 sc) twice: 50 sc
Rnd 11 :
Sc in next 9 sc, 2 sc in next sc, sc in next 24 sc, 2 sc in next sc, sc in next 15 sc: 52 sc
Round :
Rnds 12 and 13: Sc in each sc around
Rnd 14 :
Sc in next 21 sc, slip st in next 2 sc, sc in next 5 sc, slip st in next 2 sc, sc in next 22 sc
Rnd 15 :
Sc in next 12 sc, place marker around last st made as cheek, (2 sc in next sc, sc in next 3 sc) twice, 2 sc in next sc, place marker around last sc made as cheek t, slip st in next 2 slip sts, sc in next 5 sc, slip st in next 2 slip sts, repeat from + to + once; sc in next 13 sc: 58 sts
Rnd 16 :
* Sc in next 15 sts, 2 sc in next sc, sc in next 4 sc, 2 sc in next sc; repeat from * once more, sc in next 16 sc: 62 sc
Rnd 17-21 :
Sc in each sc around
Info :
Place safety eyes between rounds 8-9, separated by 6 SC (or follow photo placement)
Rnd 22 :
Sc in next 15 sc, place marker around last sc made as cheek, (decrease (see Decrease, page 32), sc in next sc) 4 times, place marker around last sc made as cheek, sc in next 8 sc, place marker around last sc made as cheek, (decrease, sc in next sc) 4 times, place marker around last sc made as cheek, sc in next 15 sc: 54 sc
Rnd 23 :
Sc in next 41 sc, (decrease, sc in next sc) twice, sc in next 7 sc: 52 sc
Rnd 24 :
Decrease, (sc in next 3 sc, decrease) around: 41 sc
Rnd 25 :
Sc in next sc, (decrease, sc in next 2 sc) around; do not finish off: 31 sc
— Body :
Rnd 1 :
(2 Sc in next sc, sc in next 4 sc) 5 times, sc in next 6 sc: 36 sc
Rnd 2 :
(Sc in next 8 sc, 2 sc in next sc) around: 40 sc
Rnd 3 :
Sc in next 4 sc, 2 sc in next sc, (sc in next 9 sc, 2 sc in next sc) 3 times, sc in next 5 sc: 44 sc
Rnd 4 :
(2 Sc in next sc, sc in next 10 sc) around: 48 sc
Rnd 5 :
Sc in next 6 sc, 2 sc in next sc, (sc in next 11 sc, 2 sc in next sc) 3 times, sc in next 5 sc: 52 sc
Rnd 6 :
(Sc in next 12 sc, 2 sc in next sc) around: 56 sc
Rnd 7 :
Sc in next 4 sc, 2 sc in next sc, (sc in next 13 sc, 2 sc in next sc) 3 times, sc in next 9 sc: 60 sc
Rnd 8-19 :
Sc in each sc around
Rnd 20 :
(Decrease, sc in next 8 sc) around: 54 sc
Rnd 21 :
Sc in next 4 sc, decrease, (sc in next 7 sc, decrease) 5 times, sc in next 3 sc: 48 sc
Info :
Stuff Head firmly with polyester fiberfill, adding extra stuffing to cheek areas defined by markers to round cheeks. Stuff neck and Body firmly.
Info :
Add stuffing as needed as Body is completed; however, do not add too much because bottom of Body should be flat so bear can sit.
Rnd 22 :
(Decrease, sc in next 6 sc) around: 42 sc
Rnd 23 :
Sc in next 3 sc, decrease, (sc in next 5 sc, decrease) 5 times, sc in next 2 sc: 36 sc
Rnd 24 :
(Decrease, sc in next 4 sc) around: 30 sc
Rnd 25 :
Sc in next 2 sc, decrease, (sc in next 3 sc, decrease) 5 times, sc in next sc: 24 sc
Rnd 26 :
(Decrease, sc in next 2 sc) around: 18 sc
Rnd 27 :
(Sc in next sc, decrease) around: 12 sc
Rnd 28 :
Decrease around; slip st in next sc, finish off leaving a long end for sewing
— Neck Shaping :
Info :
Thread yarn needle with cut ends of a doubled strand of Body color yarn. Wrap yarn around neck; thread needle through loop formed by doubled thread. Pull tightly around neck to shape. Wrap yarn around neck a couple of times and pull tight to firmly shape neck indentation. Secure with small stitches and hide ends.
— Muzzle :
Info :
With Aluminum crochet hook and White yarn, ch 4; join with slip st to form a ring.
Rnd 1 :
Ch 1, 8 sc in ring; do not join, place marker (8)
Rnd 2 :
2 Sc in each sc around: 16 sc
Rnd 3 :
(2 Sc in next sc, sc in next sc) around: 24 sc
Rnd 4 :
(2 Sc in next sc, sc in next 5 sc) around: 28 sc
Rnd 5 :
Sc in each sc around
Rnd 6 :
Slip st in next sc, sc in next 21 sc, slip st in next sc, leave remaining 5 sc unworked; finish off leaving a long end for sewing
Info :
Using photo as a guide, sew Muzzle to center of face between cheeks and having 5 unworked sc at center top, stuffing firmly with polyester fiberfill before closing.
— Tummy :
Info :
With Aluminum crochet hook and White yarn, ch 4; join with slip st to form a ring.
Rnd 1-5 :
Work same as Head, page 6: 40 sc
Rnd 6 :
(2 Sc in next sc, sc in next 4 sc) around: 48 sc
Rnd 7 :
Sc in next 3 sc, 2 sc in next sc, (sc in next 5 sc, 2 sc in next sc) 7 times, sc in next 2 sc: 56 sc
Rnd 8 :
(Sc in next 6 sc, 2 sc in next sc) around: 64 sc
Rnd 9 :
Sc in each sc around; slip st in next sc, finish off leaving a long end for sewing
Info :
Using photo as a guide for placement, sew Tummy centered over front of Body as shown, adding a small amount of polyester fiberfill before closing.
— Ear :
Item Name (Inside) :
Row 1 (Right side): With Aluminum crochet hook and White yarn, ch 2, 3 sc in second ch from hook.
Row 2 :
Ch 1, turn; 2 sc in each sc across: 6 sc
Row 3 :
Ch 1, turn; 2 sc in first sc, sc in next sc, (2 sc in next sc, sc in next sc) twice; finish off: 9 sc
Item Name (Outside) :
With Aluminum crochet hook and Body color yarn, work same as Inside; do not finish off.
Joining :
With wrong sides together, Inside facing, and working through both thicknesses, 2 sc in first sc, (sc in next sc, 2 sc in next sc) across; finish off leaving a long end for sewing.
Info :
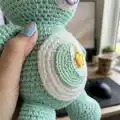
Using photo as a guide for placement, sew Ears in place curving Ears slightly to front.
— Arm (Make 2) :
Info :
With Aluminum crochet hook and Body color yarn, ch 4; join with slip st to form a ring.
Rnd 1 :
Ch 1, 8 sc in ring; do not join, place marker (8)
Rnd 2 :
2 Sc in each sc around: 16 sc
Rnd 3 :
Sc in each sc around, ch 5 (thumb), sc in side of last sc made: 17 sc
Rnd 4 :
Sc in each sc and in each ch around: 22 sc
Rnd 5 :
Sc in each sc around
Rnd 6 :
Sc in next 16 sc, decrease 3 times: 19 sc
Rnd 7 :
Decrease, sc in next 6 sc, decrease, sc in next 9 sc: 17 sc
Rnd 8-17 :
Sc in each sc around
Info :
Finish off leaving a long end for sewing. Sew opening on Rnd 3 closed. Stuff bottom half of Arm firmly and top of Arm lightly with polyester fiberfill. Flatten Rnd 17, with thumb toward side; sew opening closed. Using photo as a guide for placement (page 3), sew Arms to sides of Body.
— Left Leg :
Rnd 1 :
With Aluminum crochet hook and Body color yarn, ch 2, 7 sc in second ch from hook; do not join, place marker
Rnd 2 :
2 Sc in each sc around: 14 sc
Rnd 3 :
(2 Sc in next sc, sc in next sc) around: 21 sc
Rnd 4 :
Sc in next sc, 2 sc in next sc, (sc in next 2 sc, 2 sc in next sc) 6 times, sc in next sc: 28 sc
Rnd 5 :
(2 Sc in next sc, sc in next 3 sc) around: 35 sc
Rnd 6-11 :
Sc in each sc around
Rnd 12 :
Decrease 10 times (front of foot), sc in next 15 sc: 25 sc
Rnd 13-20 :
Sc in each sc around
Info :
Begin working in rows.
Row 1 :
Sc in next 8 sc, slip st in next sc, leave remaining 16 sc unworked: 9 sts
Row 2 :
Ch 1, turn; skip first slip st, sc in next 12 sc, slip st in next sc: 13 sts
Info :
Begin working in rounds.
Rnd 1 :
Ch 1, turn; skip first slip st, sc in next 12 sc, sc in same sc on Rnd 20 as next slip st, sc in last 11 sc; join with slip st to first sc, finish off leaving a long end for sewing
Info :
Stuff bottom half of Leg firmly and top half of Leg lightly with polyester fiberfill.
— Right Leg :
Info :
Rnds 1-20: Work same as Left Leg. Finish off. Begin working in rows.
Row 1 :
Skip next 8 sc; join Body color yarn with sc in next sc (see Joining With Sc, page 32); sc in next 7 sc, slip st in next sc: 9 sts
Info :
Complete same as Left Leg.
Info :
Toe Shaping: To shape toes, thread yarn needle with cut ends of a doubled strand of Body color yarn. Using photo as a guide for stitch placement, insert needle through sole at first toe position and go straight through foot and out instep, pulling yarn through until loop protrudes from foot. Bring yarn over top of foot to form toes and insert needle through loop; pull tightly. Insert needle back through foot on outside of loop to secure and bring needle out at second toe on sole. Bring thread over foot and insert needle through instep and go straight through foot and out sole at same point; pull tightly. Take a couple of very small stitches to secure; insert needle inside the foot and push it out the bottom so the yarn does not show; cut the end close to the foot. Use tip of needle to pull stuffing into toe areas and shape foot.
— Tail :
Info :
With Aluminum crochet hook, Body color yarn, and leaving a long end for sewing, ch 10; join with slip st to form a ring.
Rnd 1 :
Ch 1, sc in each ch around; do not join, place marker: 10 sc
Rnd 2-5 :
Sc in each sc around
Rnd 6 :
Decrease around; finish off leaving a long end for sewing: 5 sc
Info :
Thread yarn needle with long end and weave yarn through remaining sc on Rnd 6, pull tightly and secure end. Sew Tail to center back of Body.
— Head Tuft :
Info :
Pull centers of three 6" strands of Body color yarn through center top of head; insert ends through loop formed, pull firmly. Trim strands at an angle; separate plies of yarn.
— Foot Pad (Make 2) :
Info :
With Steel crochet hook and Details color thread, ch 4.
Row 1 :
(Right side): Sc in second ch from hook and in last 2 chs: 3 sc
Note :
Loop a short piece of yarn around any stitch to mark Row 1 as right side.
Row 2 :
Ch 1, turn; 2 sc in first sc, sc in next sc, 2 sc in last sc: 5 sc
Rows 3-5 :
Ch 1, turn; 2 sc in first sc, sc in next sc and in each sc across to last sc, 2 sc in last sc: 11 sc
Rows 6-8 :
Ch 1, turn; sc in each sc across; do not finish off
FIRST SIDE :
Row 1: Ch 1, turn; sc in first 5 sc, leave remaining 6 sc unworked: 5 sc
Row 2 :
Ch 1, turn; skip first sc, sc in next sc, decrease, leave remaining sc unworked: 2 sc
Row 3 :
Ch 1, turn; skip first sc, sc in last sc; finish off
SECOND SIDE :
Row 1: With right side facing, skip next sc on Row 8 and join Details color thread with sc in next sc; sc in last 4 sc: 5 sc
Rows 2 and 3 :
Work same as First Side; do not finish off
EDGING :
Ch 1, do not turn; sc in end of each row across; working in free loops of beginning ch (Fig. 1, page 32), skip first ch; 3 sc in next ch, skip next ch; sc in end of each row across; sc in end of next 2 rows, slip st in skipped sc on Row 8; sc in end of next 2 rows and in next sc on Row 3 of Second Side; join with slip st to first sc, finish off leaving a long end for sewing.
Info :
Using photo as a guide for placement, sew Foot Pad to each Foot.
— Heart :
Info :
(Make one with Details color thread for nose and one with Red thread to place on hip.) With Steel crochet hook, ch 4.
Row 1 :
(Right side): Sc in second ch from hook and in last 2 chs: 3 sc
Row 2 :
Ch 1, turn; 2 sc in first sc, sc in next sc, 2 sc in last sc: 5 sc
Row 3 :
Ch 1, turn; 2 sc in first sc, sc in next 3 sc, 2 sc in last sc: 7 sc
Row 4-6 :
Ch 1, turn; sc in each sc across; do not finish off: 7 sc
FIRST SIDE :
Row 1: Ch 1, turn; sc in first 3 sc: 3 sc
Row 2 :
Ch 1, turn; skip first sc, sc in last 2 sc; finish off: 2 sc
SECOND SIDE :
Row 1: With right side facing, skip next sc on Row 6 and join thread with sc in next sc; sc in last 2 sc: 3 sc
Row 2 :
Ch 1, turn; skip first sc, sc in last 2 sc; do not finish off
EDGING :
Ch 1, turn; sc in first 2 sc and in end of each row across; working in free loops of beginning ch, skip first ch, 3 sc in next ch, skip next ch; sc in end of each row across; sc in first 2 sc on Row 2 of First Side and in end of next 2 rows; slip st in skipped sc on Row 6; sc in end of next 2 rows; join with slip st to first sc; finish off leaving a long end for sewing.
Info :
Using photos as a guide for placement, sew Nose to Muzzle (page 8) and Red Heart to hip.
— Grumpy Bear's Mouth :
Info :
Using photo as a guide for placement (page 27) and 2 strands of Details color thread, make straight stitch mouth.
— Mouth (For all other bears) :
Info :
With Steel crochet hook and Details color thread, ch 20, sc in second ch from hook and in each ch across; finish off.
— Finishing :
Info :
Using photo as a guide for placement, sew Mouth to Muzzle. With 2 strands of Details color thread, make straight stitch eyebrows. Trace Eye patterns onto tracing paper; cut out. Use patterns to cut pieces as follows: White - cut 2 from White felt; Iris - cut 2 from Details color felt; Pupil - cut 2 from Black felt; Eyelashes - cut 2 from Black felt. Using photo as a guide for placement (page 8), glue Whites to Head; glue Irises to Whites; glue Pupils to Irises; glue Eyelashes to Whites.
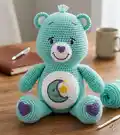
— Tummy Symbols (Bedtime Bear's Moon) :
Info :
Materials (for Moon): Bedspread Weight Cotton Thread (size 10): Aqua - 50 yards (45.5 meters); Dk Blue - 10 yards (9 meters); Yellow - 2 yards (2 meters); Dk Yellow - 2 yards (2 meters). Steel crochet hook, size 7 (1.65 mm).
MOON Row 1 :
With Aqua, ch 2, 3 sc in second ch from hook
Row 2 :
(Right side): Ch 1, turn; 2 sc in each sc across: 6 sc
Note :
Loop a short piece of thread around any stitch to mark Row 2 as right side.
Row 3 :
Ch 1, turn; 2 sc in first sc, sc in next sc, (2 sc in next sc, sc in next sc) twice: 9 sc
Row 4 :
Ch 1, turn; 2 sc in first sc, sc in next 2 sc, (2 sc in next sc, sc in next 2 sc) twice: 12 sc
Row 5 :
Ch 1, turn; 2 sc in first sc, sc in next 3 sc, (2 sc in next sc, sc in next 3 sc) twice: 15 sc
Row 6 :
Ch 2, turn; sc in second ch from hook, (2 sc in next sc, sc in next 4 sc) twice, 2 sc in next sc, sc in next 3 sc, 2 sc in last sc: 20 sc
Row 7 :
Ch 2, turn; sc in second ch from hook, (2 sc in next sc, sc in next 5 sc) 3 times, sc in next 3 sc, 2 sc in last sc: 25 sc
Row 8 :
Ch 1, turn; 2 sc in first sc, sc in next sc, sc in next 4 sc, (2 sc in next sc, sc in next 4 sc) across: 30 sc
Row 9 :
Ch 1, turn; 2 sc in first sc, sc in each sc across to last sc, 2 sc in last sc: 32 sc
Row 10 :
Ch 3, turn; sc in second ch from hook and in last ch, (2 sc in next sc, sc in next 7 sc) across: 38 sc
Edging :
Ch 4, do not turn; sc in second ch from hook and in last 2 chs; working in ends of rows, skip first row, sc in next 6 rows, 2 hdc in next row (lip made), skip next row, (slip st, ch 2, 3 dc) in next row, sc in next row (nose made), sc in each row across, slip st in next ch; finish off.
Trim :
With right side facing, join Dk Blue with sc in first sc on Row 10; (sc in next 12 sc, 2 sc in next sc) twice, sc in next 11 sc and in next 3 chs, 3 sc in next ch, ch 3, sc in second ch from hook and in last ch; sc in next 27 sts, ch 3, sc in second ch from hook and in last ch; join with slip st to first sc; finish off leaving end for sewing.
Info :
Using photo as a guide for placement and two strands Dk Blue, add facial features.
STAR :
With Yellow, ch 5; join with slip st to form ring. Rnd 1 (Right side): Ch 1, * (sc, ch 1, dc) in ring, ch 1; repeat from * 4 times more; join with slip st to first sc, finish off: 10 sts and 10 chs.
Rnd 2 :
With right side facing, join Dk Yellow with sc in any dc; ch 1, sc in same st and in next ch, working around next sc, slip st in ring, sc in next ch, * (sc, ch 1, sc) in next dc, sc in next ch, ch 1, sc in next dc, sc in next ch, working around next sc, slip st in ring, sc in next ch; repeat from * around; join with slip st to first sc, finish off leaving end for sewing.
This Basic Bear pattern makes a charming, customizable amigurumi friend you can handcraft from start to finish. Choose your favorite color palette and add tiny thread-made tummy symbols for personality and charm. Whether you make one for a gift or to keep, each bear is a little piece of handmade joy. 🧶🧸