🧢 Beautiful ✨ Detailed πŸ’ Adorable

The Bowling Llama Amigurumi Pattern

The Bowling Llama Amigurumi Pattern
4.9β˜… Rating
5-7 Hours Time Needed
2.4K Made This
βœ‚οΈ

Intermediate Level

Ideal for those with basic crochet experience, featuring slightly more advanced stitches and techniques to expand your skills.

⏱️

Weekend Treat

Takes 5-7 hours, making it an enjoyable project to finish over a couple of days.

🧸

Cute Companion

An adorable friend to cherish, handcrafted with love to bring comfort and joy for years to come.

About This The Bowling Llama Amigurumi Pattern

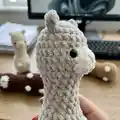
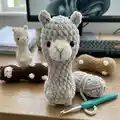
This pattern creates a small bowling-themed llama amigurumi with an integrated no-sew construction for the head and body. It includes step-by-step rounds with photos and video links to help you master the bobble stitch and color changes. The finished toy is soft, tactile, and designed to stand upright with an optional pad for stability.

The Bowling Llama Amigurumi Pattern crochet pattern - detailed view of completed project

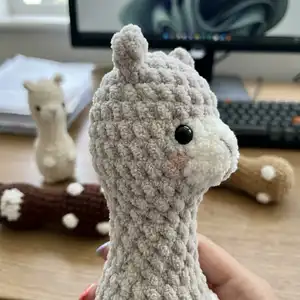
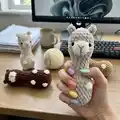
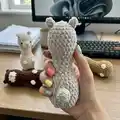
Youll work with chunky velvet-style yarn and simple shaping techniques to create the llama and a matching bowling ball. The pattern includes detailed placement notes for eyes, nose embroidery, and finishing tips.

Why You'll Love This The Bowling Llama Amigurumi Pattern

I absolutely love this pattern because it turns simple stitches into a character full of personality. I enjoy how the no-sew construction keeps assembly quick and neat, making it satisfying to finish. The bobble stitch spots and soft velvet yarn give the llama a delightful texture that children and adults will love. I also appreciate that the pattern includes photo and video support, which makes the trickier techniques approachable and fun.

The Bowling Llama Amigurumi Pattern step 1 - construction progress The Bowling Llama Amigurumi Pattern step 2 - assembly progress The Bowling Llama Amigurumi Pattern step 3 - details and accessories The Bowling Llama Amigurumi Pattern step 4 - final assembly and finishing

Switch Things Up

I love how easily this pattern adapts to color experiments; swap the main cream for pastel pinks or blues to create a themed set for a nursery.

Try using a thicker bulky yarn and a larger hook to make a chunky, squishy version that doubles as a soft toy for toddlers.

Make minis by using a finer yarn and smaller hook to create keychain-sized llamas that are perfect for gifts and party favors.

Switch the bobble spot color to create patterns like polka dots, hearts or even numbers for a playful personalized set.

I sometimes embroider little accessories like a scarf or bow using leftover yarn to give each llama its own personality.

For a more realistic look, use a slightly darker yarn for the muzzle area and blend colors with slip-stitch joins for subtle shading.

Consider adding tiny felt details or safety-stitched accessories like a tiny blanket or pompom to make each character unique.

If you want a posable toy, insert a thin wire armature into the neck before final stuffing, but take care to cover wire ends safely inside the stuffing.

Use metallic or variegated yarn for the bowling ball to create a fun contrasting prop that stands out next to the llama.

I recommend making a few practice bobble stitches on a swatch before adding them to your piece so youre confident in placement and tension.

Common Mistakes & How to Fix Them

βœ— Skipping stitch markers during rounds with increases and decreases can cause uneven shaping; use a stitch marker at the start of each round and move it as you work to maintain consistent shaping. βœ— Forgetting to stuff gradually leads to lumps or a misshapen body; stuff small amounts at a time and shape as you go, especially before doing final decreases. βœ— Not practicing the bobble stitch or color changes will make your spots look messy; practice the bobble and color change techniques on a swatch before adding them to the toy. βœ— Pulling the yarn tail too tight when closing the final stitches can distort the shape; weave the tail through the front loops evenly and pull gently, adjusting stuffing as needed to keep the shape smooth. βœ— Using a hook that is too large with the bulky velvet yarn creates loose stitches where stuffing can escape; use the recommended 4mm hook and maintain firm tension to keep stitches tight.

The Bowling Llama Amigurumi Pattern

Make an adorable bowling-themed llama amigurumi with this friendly, photo-supported pattern. Youll crochet a no-sew llama with integrated ears, snout, and legs plus a matching bowling ball. The pattern uses chunky velvet-style yarn and introduces bobble stitches and color changes for a soft, tactile finish. Perfect as a handmade gift or nursery toy you can proudly display.

Intermediate 5-7 Hours

Materials Needed for The Bowling Llama Amigurumi Pattern

β€” Main Fabric

  • 01
    Chunky velvet-style yarn size 4-5mm (e.g. Himalaya Velvet, Himalaya Dolphin Baby) - cream color for main body
  • 02
    Chunky velvet-style yarn size 4-5mm - white yarn for snout, ears, and spots
  • 03
    Chunky velvet-style yarn size 4-5mm - gray yarn for bowling ball base
  • 04
    Chunky velvet-style yarn size 4-5mm - yellow yarn for bowling ball accent
  • 05
    Additional small amounts of contrast colors for cheeks and nose embroidery

β€” Tools Required

  • 01
    Crochet hook size 4mm
  • 02
    6mm toy safety eyes (2 pieces)
  • 03
    Needle for sewing and embroidery
  • 04
    Toy stuffing (fiberfill)
  • 05
    Stitch marker
  • 06
    Scissors
  • 07
    Yarn needle for weaving in ends
  • 08
    Optional: small pad (plastic or milk bottle piece) 2cm radius to flatten the bottom

Progress Tracker

0% Complete

β€” Head & Body :

Info :

As this Llama is crocheted as a no-sew project, the legs, nose, and ears are integrated into the body and head, without separate parts. The ears are in round 2, the snout in rounds 6-8, and the legs in rounds 12 and 23.

Info :

Start in cream yarn. (Note: Use cream yarn in black word, white yarn in pink word)

Round 1 :

8sc in MR [8]

Round 2 :

2inc, (ch 4, skip 2 ch from the hook, slst in next 2 ch), inc in next st of the base, 3inc, (ch 4, skip 2 ch from the hook, slst in next 2 ch), inc in next st of the base, inc [16]

Round 3 :

(3sc, inc) x 4 [20]

Round 4 :

20sc [20]

Round 5 :

20sc [20]

Round 6 :

8sc, 4inc, 8sc [24]

Round 7 :

8sc, 8sc, 8sc [24]

Round 8 :

8sc, 4dec, 8sc [20]

Round 9 :

20sc [20]

Round 10 :

sc, dec, (2sc, dec) x 4, sc [15]

Round 11-14 :

15sc [15]

Info :

Stuff the head firmly with fiberfill.

Round 15 :

(2sc, inc) x 5 [20]

Round 16 :

(4sc, inc) x 4 [24]

Round 17 :

24sc [24]

Round 18 :

11sc, bo4, 4sc, bo4, 7sc [24]

Round 19-22 :

24sc [24]

Round 23 :

11sc, bo4, 5sc, bo4, 6sc [24]

Round 24 :

24sc [24]

Round 25 :

(sc, dec) x 8 [16]

Info :

Stuff the body firmly with fiberfill.

Info :

Optional: You can insert a pad, 2cm in radius, made from plastic or a milk bottle, inside the llama to flatten its bottom. This will enable your llama to stand upright on its own.

Round 26 :

8dec [8]

Info :

Fasten off, leaving the yarn tail. Using the yarn needle, weave the yarn tail through the front loop of each remaining stitch and pull it tight to close.

Info :

Insert the 6mm safety eyes between rounds 6 and 7, 8 stitches apart. Embroider the nose with brown threads. Use powder blush for the nose and the cheeks.

Infos :

Video tutorials: - How to crochet the Llama's head (from rnd 1 to 3): https://youtu.be/l8HahbG62SI - How to embroider the Llama's face: https://youtu.be/cqKbExxDB-8

β€” Bowling Ball :

Info :

Start in gray yarn. (Note: Use yellow yarn in orange word, gray yarn in black word)

Round 1 :

8sc in MR [8]

Round 2 :

8inc [16]

Round 3 :

(sc, inc) x 2, (sc, inc) x 6 [24]

Round 4 :

(2sc, inc) x 3, (2sc, inc) x 3, (2sc, inc) x 2 [32]

Round 5 :

32sc [32]

Round 6 :

(3sc, inc) x 8 [40]

Round 7-12 :

40sc [40]

Round 13 :

(3sc, dec) x 8 [32]

Round 14 :

32sc [32]

Round 15 :

(2sc, dec) x 2 + (2sc, dec) x 3 + (2sc, dec) x 3 [24]

Round 16 :

(sc, dec) x 6 + (sc, dec) x 2 [16]

Info :

Stuff the ball firmly with fiberfill.

Round 17 :

8dec [8]

Info :

Fasten off, leaving the yarn tail. Using the yarn needle, weave the yarn tail through the front loop of each remaining stitch and pull it tight to close.

Info :

How to weave in the yarn end on a stuffed piece: https://youtu.be/amYifc37uSs

Assembly Instructions

  • Insert the 6mm safety eyes between rounds 6 and 7, spacing them 8 stitches apart to achieve proper facial placement.
  • Embroider the nose with brown thread centered on the snout area between rounds 6-8, and add powder blush to the nose and cheeks for a soft finish.
  • Sew the yarn tail through the front loop of each remaining stitch after final decreases, then pull tight and weave in the end securely so the opening is closed.
  • If you want the llama to stand upright, insert an optional pad (approx. 2cm radius) made from plastic or a trimmed milk bottle inside the bottom before final stuffing to flatten the base.
  • Attach any decorative white spots (crocheted bobbles or small circles) to the body with a yarn needle, spacing them evenly as shown in photos for a balanced look.

Important Notes

  • πŸ’‘Make the invisible decrease stitches to have a better result and neater shaping on visible areas of the llama.
  • πŸ’‘Add toy stuffing according to the instruction of each part and stuff gradually to achieve even shape and avoid lumps.
  • πŸ’‘Stitches should be close together so that when the finished toy is stuffed, the stuffing does not come out through gaps in the stitches.
  • πŸ’‘The pattern includes color change techniques, bobble stitch technique and the X stitch technique for single crochet; practice these to ensure the finished product resembles the pattern.

Thank you for making The Bowling Llama β€” what a delightful handmade companion youve created! This little set brings soft texture and playful charm to nurseries and playrooms. Keep experimenting with colors and spots to make a whole herd of unique llamas. 🧢🧸

You ask,

we answer.

FAQs

What size will the finished piece be?

The finished toy is approximately 15cm (about 5.9 inches) high when using the recommended chunky velvet-style yarn and a 4mm hook.

Can I use different yarn weights for this pattern?

Yes, you can use different yarn weights, but this will change the finished size; adjust your hook accordingly and expect differences in texture and firmness.

Do I need prior crochet experience for this pattern?

This pattern is rated intermediate because it uses bobble stitches, color changes, and integrated shaping; basic knowledge of single crochet, increases, decreases, and magic ring is recommended.

How long does this project typically take to complete?

Most crocheters complete the llama and bowling ball set in about 5-7 hours, depending on experience and the time spent on embroidery and finishing.