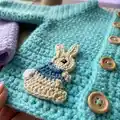
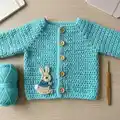
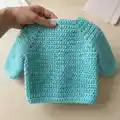
Make a sweet, practical baby cardigan worked in one piece from the top down. This pattern is perfect for customizing with fun appliques or keeping simple for everyday wear. Clear instructions are included for multiple sizes from preemie to 3-4 years so you can make the perfect fit. Enjoy a satisfying, quick-to-knit project with professional finishing tips.
Progress Tracker
0% Complete
— Pattern notes and pictures :
Info :
* Working in first stitch the ch1 does not count as a stitch, ch1 and sc in the first stitch*
Info :
Dividing for armholes
Info :
Sc the required amount of stitches for the front, skip required amount of stitches, (this will form the first armhole), work the required amount of stitches for the back, skip the required amount of stitches to form the second armhole, sc to the end.
Info :
How to measure the sleeves and length
Info :
Sleeves: Start in the first unworked stitch. Place extra stitches under the arm to get the right amount (this prevents a gap under the arm)
— Button/Buttonhole Bands All sizes :
Info :
Continuing from body, change to 3mm hook
Item Name (Button band) :
Row 1: ch1, 1 sc in the same, sc 1 in each row up to the top. Turn
Row 2 :
Ch1, sc in the same, sc in each stitch back to bottom. Turn
Row 3 :
Ch1, sc in the same, sc in each stitch back to top.
Item Name (Buttonhole band) :
Row 1: With the right side facing, join yarn to the top of the left hand side of the front edge, ch1, 1 sc in the same, 1 sc in each row. Turn
Info :
Mark out where you want the button holes, on the next row ch1 and skip the one where the markers are.
Row 2 :
Buttonhole row, Ch1, sc in the same, sc all but ch1 and skip where the markers are to create the buttonholes. Turn
Row 3 :
Ch1, sc in the same and sc in all, including the chains.
Info :
Fasten off and sew your buttons on to match the button holes and weave in all ends.
— Adding a shell Edging :
Info :
Complete the cardigan and button bands as normal.
Info :
The Shell edging requires multiples of 6 stitches + 1. I included 3 stitches at the edging at each side, if you don't have this do a row of single crochet (double UK) first and add stitches to get the right amount.
Info :
With the right side facing, join yarn to the bottom right of the cardigan.
Row 1 :
Ch1, sc in the same, *skip 2, 5 dc in the next, skip 2, sc in the next* repeat to the end.
Info :
Ch1 and sc in the same, skip the rest of the button band and 5 dc in the first stitch of the cardigan bottom. At the end do the last shell in the last stitch of the cardigan and sc at the end of the button band.
— Adding a ruffle Edging :
Info :
You could also add a ruffle edging by completing the cardigan and button bands as normal.
Info :
Then join yarn to the bottom right of the cardigan, ch1, dc in the same, 3 dc in each stitch to the last then dc in the last. Fasten off and sew in the ends.
— Preemie 4-6lb :
Info :
With a 4mm hook Ch39
Row 1 :
sc in 2nd ch from hook, sc 4, [3 sc] in the next, sc 6, [3 sc] in the next, sc 12, [3 sc] in the next, sc 6, [3 sc] in the next, sc 5. (46) Turn
Row 2 :
ch1, sc in the same, sc to end. (46) Turn
Row 3 :
ch1, sc in the same, sc 5, [3 sc] in the next, sc 8, [3 sc] in the next, sc 14, [3 sc] in the next, sc 8, [3 sc] in the next, sc 6. (54) Turn
Row 4 :
ch1, sc in the same, sc to end. (54) Turn
Row 5 :
ch1, sc in the same, sc 6, [3 sc] in the next, sc 10, [3 sc] in the next, sc 16, [3 sc] in the next, sc 10, [3 sc] in the next, sc 7. (62) Turn
Row 6 :
ch1, sc in the same, sc to end. (62) Turn
Row 7 :
ch1, sc in the same, sc 7, [3 sc] in the next, sc 12, [3 sc] in the next, sc 18, [3 sc] in the next, sc 12, [3 sc] in the next, sc 8. (70) Turn
Row 8 :
ch1, sc in the same, sc to end. (70) Turn
Row 9 :
ch1, sc in the same, sc 8, [3 sc] in the next, sc 14, [3 sc] in the next, sc 20, [3 sc] in the next, sc 14, [3 sc] in next, sc 9. (78) Turn
Row 10 :
ch1, sc in the same, sc to end. (78) Turn
Row 11 :
ch1, sc in the same, sc 9, [3 sc] in the next, sc 16, [3 sc] in the next, sc 22, [3 sc] in the next, sc 16, [3 sc] in the next, sc 10. (86) Turn
Row 12 :
ch1, sc in the same, sc to end. (86) Turn
Row 13 :
(Divide for arm holes) ch1, sc in the same, sc 10, [3 sc] in the next, skip 18, [3 sc] in the next, sc 24, [3 sc] in the next, skip 18, [3 sc] in the next, sc 11. (58) Turn
Row 14 :
ch1, sc in the same, sc to end. (58) Turn
Info :
Repeat Row 14 until work measures approx 7" from the shoulder, ending with an even row.
Info :
Continue to button band on page 4.
— Sleeves :
Row 1 :
With the wrong side facing join yarn to the first un-worked sc under the arm, ch1, sc in the same, sc 21, slst to first. (22) Turn
Rows 2-9 :
ch1, sc all, slst to first. (22) Turn
Row 10 :
ch1, dec, sc to end, slst to first. (21) Turn
Row 11 :
ch1, sc all, slst to first. (21) Turn
Row 12 :
ch1, dec, sc to end, slst to first. (20) Turn
Row 13 :
ch1, sc all, slst to first. (20) Turn
Row 14 :
ch1, dec, sc to end, slst to first. (19) Turn
Row 15 :
ch1, sc all, slst to first. (19) Turn
Info :
Repeat row 15 until the sleeve measures 7" from the shoulder.
Info :
Fasten off and repeat for the other sleeve.
— Newborn :
Info :
With a 4mm hook Ch43
Row 1 :
sc in 2nd ch from hook, sc 4, [3 sc] in the next, sc 8, [3 sc] in the next, sc 12, [3 sc] in the next, sc 8, [3 sc] in the next, sc 5. (50) Turn
Row 2 :
ch1, sc in the same, sc to end. (50) Turn
Row 3 :
ch1, sc in the same, sc 5, [3 sc] in the next, sc 10, [3 sc] in the next, sc 14, [3 sc] in the next, sc 10, [3 sc] in the next, sc 6. (58) Turn
Row 4 :
ch1, sc in the same, sc to end. (58) Turn
Row 5 :
ch1, sc in the same, sc 6, [3 sc] in the next, sc 12, [3 sc] in the next, sc 16, [3 sc] in the next, sc 12, [3 sc] in the next, sc 7. (66) Turn
Row 6 :
ch1, sc in the same, sc to end. (66) Turn
Row 7 :
ch1, sc in the same, sc 7, [3 sc] in the next, sc 14, [3 sc] in the next, sc 18, [3 sc] in the next, sc 14, [3 sc] in the next, sc 8. (74) Turn
Row 8 :
ch1, sc in the same, sc to end. (74) Turn
Row 9 :
ch1, sc in the same, sc 8, [3 sc] in the next, sc 16, [3 sc] in the next, sc 20, [3 sc] in the next, sc 16, [3 sc] in the next, sc 9. (82) Turn
Row 10 :
ch1, sc in the same, sc to end. (82) Turn
Row 11 :
ch1, sc in the same, sc 9, [3 sc] in the next, sc 18, [3 sc] in the next, sc 22, [3 sc] in the next, sc 18, [3 sc] in the next, sc 10. (90) Turn
Row 12 :
ch1, sc in the same, sc to end. (90) Turn
Row 13 :
ch1, sc in the same, sc 10, [3 sc] in the next, sc 20, [3 sc] in the next, sc 24, [3 sc] in the next, sc 20, [3 sc] in the next, sc 11. (98) Turn
Row 14 :
ch1, sc in the same, sc to end. (98) Turn
Row 15 :
(Divide for arm holes) ch1, sc in the same, sc 11, [3 sc] in the next, skip 22, [3 sc] in the next, sc 26, [3 sc] in the next, skip 22, [3 sc] in the next, sc 12. (62) Turn
Row 16 :
ch1, sc in the same, sc to end. (62) Turn
Info :
Repeat Row 16 until work measures approx 8" from the shoulder, ending with an even row.
Info :
Continue to button band on page 4.
— Sleeves :
Row 1 :
With the wrong side facing join yarn to the first un-worked sc under the arm, ch1, sc in the same, sc 25, slst to first. (26) Turn
Rows 2-9 :
ch1, sc all, slst to first. (26) Turn
Row 10 :
ch1, dec, sc to end, slst to first. (25) Turn
Rows 11 :
ch1, sc all, slst to first. (25) Turn
Row 12 :
ch1, dec, sc to end, slst to first. (24) Turn
Rows 13 :
ch1, sc all, slst to first. (24) Turn
Row 14 :
ch1, dec, sc to end, slst to first. (23) Turn
Row 15 :
ch1, sc all, slst to first. (23) Turn
Row 16 :
ch1, dec, sc to end, slst to first. (22) Turn
Row 17 :
ch1, dec, sc to end, slst to first. (21) Turn
Row 18 :
ch1, sc all, slst to first. (21) Turn
Info :
Repeat row 18 until the sleeve measures 8" from the shoulder.
Info :
Fasten off and repeat for the other sleeve.
— 0-3 months :
Info :
With a 4mm hook Ch47
Row 1 :
sc in 2nd ch from hook, sc 5, [3 sc] in the next, sc 8, [3 sc] in the next, sc 14, 3 sc in the next, sc 8, [3 sc] in the next, sc 6. (54) Turn
Row 2 :
ch1, sc in the same, sc to end. (54) Turn
Row 3 :
ch1, sc in the same, sc 6, [3 sc] in the next, sc 10, [3 sc] in the next, sc 16, [3 sc] in the next, sc 10, 3 sc in next, sc 7. (62) Turn
Row 4 :
ch1, sc in the same, sc to end. (62) Turn
Row 5 :
ch1, sc in the same, sc 7, [3 sc] in the next, sc 12, [3 sc] in the next, sc 18, [3 sc] in the next, sc 12, [3 sc] in the next, sc 8. (70) Turn
Row 6 :
ch1, sc in the same, sc to end. (70) Turn
Row 7 :
ch1, sc in the same, sc 8, [3 sc] in the next, sc 14, [3 sc] in the next, sc 20, [3 sc] in the next, sc 14, [3 sc] in the next, sc 9. (78) Turn
Row 8 :
ch1, sc in the same, sc to end. (78) Turn
Row 9 :
ch1, sc in the same, sc 9, [3 sc] in the next, sc 16, [3 sc] in the next, sc 22, [3 sc] in the next, sc 16, [3 sc] in the next, sc 10. (86) Turn
Row 10 :
ch1, sc in the same, sc to end. (86) Turn
Row 11 :
ch1, sc in the same, sc 10, [3 sc] in the next, sc 18, [3 sc] in the next, sc 24, [3 sc] in the next, sc 18, [3 sc] in the next, sc 11. (94) Turn
Row 12 :
ch1, sc in the same, sc to end. (94) Turn
Row 13 :
ch1, sc in the same, sc 11, [3 sc] in the next, sc 20, [3 sc] in the next, sc 26, [3 sc] in the next, sc 20, [3 sc] in the next, sc 12. (102) Turn
Row 14 :
ch1, sc in the same, sc to end. (102) Turn
Row 15 :
ch1, sc in the same, sc 12, [3 sc] in the next, sc 22, [3 sc] in the next, sc 28, [3 sc] in the next, sc 22, [3 sc] in the next, sc 13. (110) Turn
Row 16 :
ch1, sc in the same, sc to end. (110) Turn
Info :
Repeat Row 16 until work measures approx 9" from the shoulder, ending with an even row.
— 3-6 months :
Info :
With a 4mm hook Ch51
Row 1 :
sc in 2nd ch from hook, sc 6, [3 sc] in the next, sc 8, [3 sc] in the next, sc 16, [3 sc] in the next, sc 8, [3 sc] in the next, sc 7. (58) Turn
Row 2 :
ch1, sc in the same, sc to end. (58) Turn
Row 3 :
ch1, sc in the same, sc 7, [3 sc] in the next, sc 10, [3 sc] in the next, sc 18, [3 sc] in the next, sc 10, [3 sc] in the next, sc 8. (66) Turn
Row 4 :
ch1, sc in the same, sc to end. (66) Turn
Row 5 :
ch1, sc in the same, sc 8, [3 sc] in the next, sc 12, [3 sc] in the next, sc 20, [3 sc] in the next, sc 12, [3 sc] in the next, sc 9. (74) Turn
Row 6 :
ch1, sc in the same, sc to end. (74) Turn
Row 7 :
ch1, sc in the same, sc 9, [3 sc] in the next, sc 14, [3 sc] in the next, sc 22, [3 sc] in the next, sc 14, [3 sc] in the next, sc 10. (82) Turn
Row 8 :
ch1, sc in the same, sc to end. (82) Turn
Row 9 :
ch1, sc in the same, sc 10, [3 sc] in the next, sc 16, [3 sc] in the next, sc 24, [3 sc] in the next, sc 16, [3 sc] in the next, sc 11. (90) Turn
Row 10 :
ch1, sc in the same, sc to end. (90) Turn
Row 11 :
ch1, sc in the same, sc 11, [3 sc] in the next, sc 18, [3 sc] in the next, sc 26, [3 sc] in the next, sc 18, [3 sc] in the next, sc 12. (98) Turn
Row 12 :
ch1, sc in the same, sc to end. (98) Turn
Row 13 :
ch1, sc in the same, sc 12, [3 sc] in the next, sc 20, [3 sc] in the next, sc 28, [3 sc] in the next, sc 20, [3 sc] in the next, sc 13. (106) Turn
Row 14 :
ch1, sc in the same, sc to end. (106) Turn
Row 15 :
ch1, sc in the same, sc 13, [3 sc] in the next, sc 22, [3 sc] in the next, sc 30, [3 sc] in the next, sc 22, 3 sc in next, sc 14. (114) Turn
Row 16 :
ch1, sc in the same, sc to end. (114) Turn
Row 17 :
ch1, sc in the same, sc 14, [3 sc] in the next, sc 24, [3 sc] in the next, sc 32, [3 sc] in the next, sc 24, [3 sc] in the next, sc 15. (122) Turn
Row 18 :
(Divide for Armholes) ch1, sc in the same, sc in next 15, [3 sc] in the next, skip 26, [3 sc] in the next, sc 34, [3 sc] in the next, skip 26, [3 sc] in the next, sc 16. (78) Turn
Row 19 :
ch1, sc in the same, sc to end. (78) Turn
Info :
Repeat Row 19 until work measures approx 10" from the shoulder, ending with an even row.
Info :
Continue to button band on page 4.
— Sleeves :
Row 1 :
With wrong side facing, join yarn to the first un-worked sc under the arm, ch1, sc in the same, sc 28, slst to first. (30) Turn
Rows 2-10 :
ch1, sc all, slst to first. (30) Turn
Row 11 :
ch1, dec, sc to end, slst to first. (29) Turn
Row 12 :
ch1, sc all, slst to first. (29) Turn
Row 13 :
ch1, dec, sc to end, slst to first. (28) Turn
Row 14 :
ch1, sc all, slst to first. (28) Turn
Row 15 :
ch1, dec, sc to end, slst to first. (27) Turn
Row 16 :
ch1, sc all slst to first. (27) Turn
Row 17 :
ch1, dec, sc to end, slst to first. (26) Turn
Row 18 :
ch1, dec, sc to end, slst to first. (25) Turn
Row 19 :
ch1, sc all, slst to first. (25) Turn
Row 20-21 :
ch1, sc to end, slst to first. (28) Turn
Info :
Repeat row 23 until the sleeve measures 13.5" from the shoulder. Fasten off and repeat for the other sleeve.
— Size 3-4 Years :
Info :
Using a 4mm hook Ch 64
Row 1 :
sc in 2nd ch from hook, sc 9, [3 sc] in the next, sc 9, [3 sc] in the next, sc 21, [3 sc] in the next, sc 9, [3 sc] in the next, sc 10. (71) Turn
Row 2 :
ch1, sc in the same, sc to end. (71) Turn
Row 3 :
ch1, sc in the same, sc 10, [3 sc] in the next, sc 11, [3 sc] in the next, sc 23, [3 sc] in the next, sc 11, [3 sc] in the next, sc 11. (79) Turn
Row 4 :
ch1, sc in the same, sc to end. (79) Turn
Row 5 :
ch1, sc in the same, sc 11, [3 sc] in the next, sc 13, [3 sc] in the next, sc 25, [3 sc] in the next, sc 13, [3 sc] in the next, sc 12. (87) Turn
Row 6 :
ch1, sc in the same, sc to end. (87) Turn
Row 7 :
ch1, sc in the same, sc 12, [3 sc] in the next, sc 15, [3 sc] in the next, sc 27, [3 sc] in the next, sc 15, [3 sc] in the next, sc 13. (95) Turn
Row 8 :
ch1, sc in the same, sc to end. (95) Turn
Row 9 :
ch1, sc in the same, sc 13, [3 sc] in the next, sc 17, [3 sc] in the next, sc 29, [3 sc] in the next, sc 17, [3 sc] in the next, sc 14. (103) Turn
Row 10 :
ch1, sc in the same, sc to end. (103) Turn
Row 11 :
ch1, sc in the same, sc 14, [3 sc] in the next, sc 19, [3 sc] in the next, sc 31, [3 sc] in the next, sc 19, [3 sc] in the next, sc 15. (111) Turn
Row 12 :
ch1, sc in the same, sc to end. (111) Turn
Row 13 :
ch1, sc in the same, sc 15, [3 sc] in the next, sc 21, [3 sc] in the next, sc 33, [3 sc] in the next, sc 21, [3 sc] in the next, sc 16. (119) Turn
Row 14 :
ch1, sc in the same, sc to end. (119)
Row 15 :
ch1, sc in the same, sc 16, [3 sc] in the next, sc 23, [3 sc] in the next, sc 35, [3 sc] in the next, sc 23, [3 sc] in the next, sc 17. (127) Turn
Row 16 :
ch1, sc in the same, sc to end. (127) Turn
This Simple Playdays Cardigan is a joy to make and perfect for gifting or keeping as a handmade essential. The top-down construction allows for easy fitting and personalization with fun appliques or pretty edgings. Whether you choose a scalloped shell or playful ruffle, each cardigan finishes with charming detail and care. 🧶✨💖