About This Niahs Balloon Dog Amigurumi Pattern
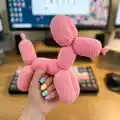
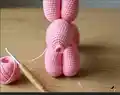
This pattern creates a charming balloon dog amigurumi crocheted as one long segmented balloon tube and then shaped into a dog. You will crochet bumps (balloon segments) in spirals, stuff them, and sew joints together to form legs, body, neck and head. The finished piece measures approximately 20 cm tall and about 23 cm from tail to nose, depending on yarn and tension.

The instructions are written in single crochet with clear rounds and stitch counts provided. Suitable for crocheters who can work in the round and follow basic increases and decreases.
Why You'll Love This Niahs Balloon Dog Amigurumi Pattern
I absolutely love this pattern because it transforms simple single crochet stitches into a playful, sculptural balloon dog with so much personality. The design is clever yet approachable — you make one continuous balloon tube and then shape it, which feels really satisfying. I enjoy how the piece is lightweight and customizable in any color to match your style or home decor. It is also a quick project that yields a striking, handmade gift everyone notices.
Switch Things Up
I love how simple changes make a huge difference: switch the cotton 8/4 yarn to a soft acrylic for a plumper, cuddly version.
Use a thinner thread and smaller hook to make a mini keychain-sized balloon dog for bags and gifts.
I sometimes embroider small features on the head for extra personality, like tiny eyes or a mouth with contrasting yarn.
Try using variegated or ombre yarn to create a colorful segmented effect that mimics metallic balloons.
For a display set, make several in graduated sizes and mount them on a shelf for a playful arrangement.
I often alter the segment lengths slightly to make legs longer or shorter depending on the pose I want the dog to have.
If you want a posable figure, consider inserting thin wire into the neck or legs before stuffing to allow shaping and gentle posing.
Experiment with different stuffing levels: firmer stuffing keeps the shape crisp, while softer stuffing gives a more squishy toy feel.
I recommend finishing the nose opening by tying a small knot on the outside if you want an exposed spiral look like a real balloon knot.
You can also combine yarn colors at segment joins to create collars, patterns, or banded segments for a more stylized look.
Common Mistakes & How to Fix Them
✗ Not checking the gauge can make your finished dog much larger or smaller than expected; measure 10 cm = 24 sc and adjust hook size if needed.
✗ Forgetting to stuff gradually causes lumps and uneven segments; add stuffing little by little and shape each bump before closing.
✗ Skipping the instruction to work in spirals will create visible seams; work continuously in spirals and mark your starting stitch if needed.
✗ Missing the places to sew joints will make assembly awkward; follow the joint numbering pictures and sew the specified joint numbers together for correct shape.
✗ Pulling the yarn too tight when closing small ends can distort the shape; gently close and weave ends neatly without over-tightening to preserve form.