🧶 Beautiful ✨ Detailed 💝 Adorable

Bunny Bag Pattern

Bunny Bag Pattern
4.0★ Rating
2-4 Hours Time Needed
2.2K Made This
✂️

Beginner Friendly Level

Perfect for those just starting their crochet journey, with clear instructions and simple techniques

⏱️

Bite-Sized Project

Finishes in 2-4 hours—perfect for an afternoon of creative relaxation.

Stylish Touch

An elegant detail to elevate any look, combining traditional techniques with contemporary design sensibilities.

About This Bunny Bag Pattern

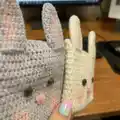
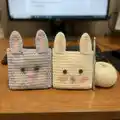
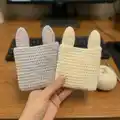
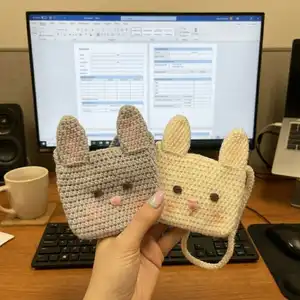
This pattern creates an adorable bunny-shaped shoulder bag using basic half double crochet stitches and simple shaping. You will crochet the bag body, a tiny closure flap, two ears, small embroidered facial details, and a cord strap using a cord technique. The instructions include photos, a helpful YouTube link for the cord method, and finishing tips for neat assembly. No lining is required, but optional makeup blush is suggested for removable cheek coloring.

Bunny Bag Pattern crochet pattern - detailed view of completed project

Perfect for beginners looking to make a small accessory with sweet character. The pattern includes exact stitch counts, round instructions, and assembly guidance for reliable results.

Why You'll Love This Bunny Bag Pattern

I absolutely love this pattern because it transforms simple stitches into a charming, wearable accessory that feels special. I enjoy how quickly the bag comes together, letting you finish a cute project in just a few hours. The cord technique for the strap is one of my favorite tricks for neat, durable straps that look handmade and professional. I also love that you can personalize the face with embroidery or makeup blush to create many different expressions and styles.

Bunny Bag Pattern step 1 - construction progress Bunny Bag Pattern step 2 - assembly progress Bunny Bag Pattern step 3 - details and accessories Bunny Bag Pattern step 4 - final assembly and finishing

Switch Things Up

I love how easy it is to customize this pattern with color changes—switch the main cream to pastel pink or mint for a different vibe.

You can make the bag larger or smaller by using a different yarn weight and adjusting the starting chain; a bulky yarn with bigger hooks will make a chunky tote version.

I sometimes add a fabric lining for extra durability; cut a small lining to match the bag interior and hand-sew it in before attaching the strap.

If you want a removable strap, attach small buttons or loops instead of sewing the cord permanently so you can swap straps easily.

I often change the ear shape by increasing fewer rounds for short ears or more rounds for long floppy ears to give different personalities.

Try embroidering alternate facial expressions—curved smiles, sleepy eyes, or tiny freckles—to create unique characters from the same base pattern.

I suggest using contrasting yarn for the ear inner color; crochet a small inner ear in pink and sew it onto the ear front for a two-tone look.

Make a mini version for keychains by using thinner yarn and a smaller hook, then shorten the strap and add a keyring instead of a full cord strap.

For a sturdier, more structured bag, carry two strands of yarn together when crocheting the body to give the fabric more body and durability.

I sometimes embellish with a tiny bow or felt heart sewn below one ear to make the bag extra gift-ready and charming.

Common Mistakes & How to Fix Them

✗ Skipping the slip stitch at the end of rounds will make your joined rounds inconsistent; always finish each round with a slst and start the next round with ch2 to keep edges neat. ✗ Not counting chains and turning correctly can distort the bag shape; remember that chains at the beginning are not counted as hdc and count your stitches after each round to ensure the proper stitch count. ✗ Sewing ears incorrectly will make them floppy or asymmetrical; sew the ear back loops to the back loop and the front to the front loop and pin both sides evenly before securing. ✗ Pulling the cord strap too tight during sewing can pucker the bag top; leave even tension when sewing and fasten the strap across two rows of ears to reinforce without pulling the fabric. ✗ Using overly heavy stuffing or overstuffing for decorative elements can stretch the fabric and distort shape; use no or minimal stuffing for flat pieces and add small amounts gradually when needed.

Bunny Bag Pattern

Make a sweet bunny shoulder bag with this easy-to-follow crochet pattern. You will create a small, wearable bunny bag complete with ears, a cord strap, embroidered face, and a tiny closure flap. The pattern is written step-by-step with photos and a video link to guide you through the cord technique. Perfect for gifting or a fun weekend make, this pattern helps you build neat shaping and finishing skills while keeping the project small and satisfying.

Beginner Friendly 2-4 Hours

Materials Needed for Bunny Bag Pattern

— Main Fabric

  • 01
    Alize Cotton Gold Pratica yarn - Color 63 Cream - 220m/100gr (or different brand yarn of the same thickness)
  • 02
    Small amount of Catania brand pink yarn for nose and cheek coloring (or equivalent)
  • 03
    Small amount of Catania brand brown yarn for eyes (or equivalent)

— Tools Required

  • 01
    Crochet hook size 3.0mm
  • 02
    Crochet hook size 3.5mm
  • 03
    Crochet hook size 2.2mm
  • 04
    Wooden button (small)
  • 05
    Needle for sewing/embroidery
  • 06
    Scissors
  • 07
    Yarn needle for weaving and sewing
  • 08
    Stitch markers (optional but useful)
  • 09
    Powder crayon or powder blush for cheek and ear coloring (optional)
  • 10
    Photos and YouTube video link for cord technique reference

Progress Tracker

0% Complete

— Bunny Body :

Info :

Make a slst at the end of each round and begin with ch2 at the beginnings new round. With cream color yarn and 3mm hook;

Round 1 :

Ch22, turn back and starting from 3rd; 1- 19hdc, into same st; 4hdc, Continue with otherside 18hdc, into last st; 3hdc (44)

Round 2 :

(20hdc, 2hdcinc)*2 (48)

Round 3-14 :

(12 rounds) 48hdc (48)

Info :

Fasten off and cut the yarn.

— Closure Piece :

Info :

Now we're going to crochet a tiny closure piece for the bag. Make a slst at the end of each round and begin with ch2 at the beginnings new round.

Info :

Count back at the finishing point and add yarn to the 15th stitch.

Round 1-6 :

(6 rounds) 8hdc

Round 7 :

2hdc, ch3 (skip 3sts) starting from 4th; 3hdc

Info :

Now sew a wooden button on the back. Now you can close your bag whenever you want

— Bunny Ears :

Info :

Make 2 of them. With cream color yarn and 3mm hook; Make a slst at the end of each round and begin with ch2 at the beginnings new round.

Round 1 :

Into MR 6hdc (6)

Round 2 :

(2hdc,1hdcinc)*2 (8)

Round 3 :

(3hdc,1hdcinc)*2 (10)

Round 4 :

(1hdc,1hdcinc)*5 (15)

Round 5-10 :

(6 rounds) 15hdc (15)

Info :

Fasten off with a slst and cut the yarn long for sewing.

Info :

Fasten the ears to the 7 loops on both sides of the tiny flap in the middle of the bag. Sew the back of the ear to the back loop and the front to the front loop. You can get support from the photos.

— Bag Strap :

Info :

With cream color yarn and 3.5mm hook; I crocheted with the cord technique -> When starting, leave enough yarn for sewing.

Round 1 :

Ch2, skip first st and crochet 1sc. Rotate the cord and crochet 1sc into the loop I showed in the photo. Turn it again and from two loops insert your hook under them, crochet 1sc. We will do the same until we reach 85cm in length.

Info :

You can get support from photos.

Info :

My friend's youtube video will help you with this. Link is here. https://youtu.be/9VfL0iB7308

Info :

Sew the strap just side the ears. Don't cut the yarn! Sew the strap with two rows of ears and fasten them together. This way the ears will not fall off.

— Bunny Eyes :

Info :

Make 2 of them. With brown color yarn and 2.2mm hook;

Round 1 :

Into MR 6sc

Info :

Fasten off and cut the yarn long for sewing. Count from top to bottom. Sew the eyes to the 7th row with a distance of 7hdc

— Nose :

Info :

Embroider a tiny nose as in the photo with pink yarn and needle.

Info :

Finally, you can color the cheeks and ears if you want. I used make-up blush because I didn't want it to be permanent.

Assembly Instructions

  • Sew the tiny closure piece to the top center back of the bag so the flap folds over and the wooden button secures it.
  • Fasten the ears to the 7 loops on both sides of the tiny flap in the middle of the bag, sewing the back of each ear to the back loop and the front of each ear to the front loop for symmetry.
  • Sew the strap beside the ears, using the same yarn tail without cutting; fasten the strap with two rows of stitches across the ears to reinforce and prevent them from falling off.
  • Attach the two embroidered or crocheted eyes by sewing them to the 7th row from the top, leaving a spacing of 7 hdc between them.
  • Sew the small embroidered pink nose centered between the eyes and slightly lower, using a needle and pink yarn to create the tiny triangular nose as shown.
  • Sew on the wooden button to the back of the bag aligned with the closure flap so it fits through the ch3 gap to close securely.

Important Notes

  • 💡Chains at the beginning of rounds won't be counted as hdc, so follow stitch counts carefully when starting rounds.
  • 💡It can be useful to use a stitch marker or a different colored yarn to mark the beginning of each round for accurate counting and alignment.
  • 💡The bag measures approximately 11cm (4.33 inch) length and 13cm (5.11 inch) width if you use the same materials and hook sizes (except ears).
  • 💡Make a slip stitch at the end of each round and begin the next round with ch2 to keep edges even and neat.
  • 💡When sewing ears and strap, pin and align pieces first and use even tension to avoid puckering or distortion.

This sweet Bunny Bag pattern brings a tiny, wearable friend to life with simple stitches and lovely finishing details. It is perfect for gifting, play, or adding a handmade accent to your little ones outfits. Make one in classic cream or switch to bright colors for a playful twist. 🐰🧶

You ask,

we answer.

FAQs

What size will the finished piece be?

The finished bag measures approximately 11 cm in length and 13 cm in width when made with the recommended yarn and hook sizes.

Can I use different yarn weights for this pattern?

Yes, but changing yarn weight will alter the final size; use an appropriate hook for your yarn and be aware that thicker yarn will produce a chunkier bag while thinner yarn makes a smaller one.

Do I need prior crochet experience for this pattern?

This pattern is beginner friendly, but basic familiarity with half double crochet, single crochet, magic ring, and simple sewing is recommended for best results.

How long does this project typically take to complete?

Most crocheters finish this small bag in about 2-4 hours, though time may vary depending on experience, customization, and how much sewing or embroidery you add.