🧢 Beautiful ✨ Detailed πŸ’ Adorable

Molly Boho Bag Pattern

Molly Boho Bag Pattern
4.8β˜… Rating
5-7 Hours Time Needed
3.7K Made This
βœ‚οΈ

Intermediate Level

Ideal for those with basic crochet experience, featuring slightly more advanced stitches and techniques to expand your skills.

⏱️

Weekend Treat

Takes 5-7 hours, making it an enjoyable project to finish over a couple of days.

✨

Stylish Touch

An elegant detail to elevate any look, combining traditional techniques with contemporary design sensibilities.

About This Molly Boho Bag Pattern

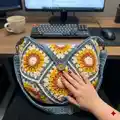
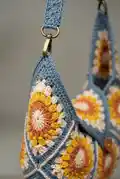
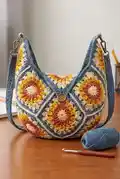
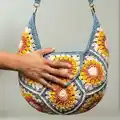
This pattern teaches you how to make the Molly Boho Bag from individual decorative squares using DK yarn. Each square is worked in 5 rows featuring clusters, puff-style stitches and a final bordering round to create a boho motif. The instructions include layout, joining, edging, buttonhole and a strap pattern so you can finish the bag as shown.

Molly Boho Bag Pattern crochet pattern - detailed view of completed project

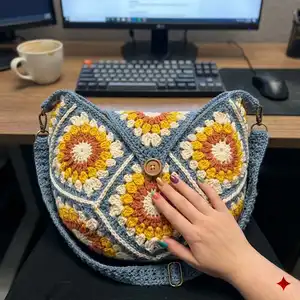
Youll make 11 squares and join them into a structured 3D bag, add a flap and strap hardware, and finish with a button. The pattern is ideal for playing with color combinations and using scrap yarn.

Why You'll Love This Molly Boho Bag Pattern

I absolutely love this pattern because it combines playful colorwork with tactile cluster and puff stitch textures that look complicated but are very achievable. I enjoy the way each square becomes a tiny canvas for color and how joining them transforms the flat pieces into a sculpted 3D bag. The strap design is both sturdy and attractive, and sewing on hardware lets you personalize the final look. Making multiple squares is meditative for me; I can listen to a podcast and slowly build the bag while experimenting with different colorways.

Molly Boho Bag Pattern step 1 - construction progress Molly Boho Bag Pattern step 2 - assembly progress Molly Boho Bag Pattern step 3 - details and accessories Molly Boho Bag Pattern step 4 - final assembly and finishing

Switch Things Up

I love how easy it is to customize the colour palette for this bag; I often switch to autumnal tones for a warm vibe or bright pastels for a fun summer version.

I sometimes make larger or smaller versions by changing yarn weight and hook size β€” bulky yarn with a bigger hook gives a chunky bag, while lighter yarn and smaller hooks create a petite clutch.

I add embroidered details or buttons to alter the personality of the bag; a carved wooden button gives a rustic look while a bright resin button makes it playful.

Try using variegated DK yarn for one or two rows in the square to introduce subtle tonal shifts without changing yarn every round.

I often replace the crocheted strap with a leather strap and use the provided bag hooks to clip it on for a mixed-material finish that is very sturdy.

To make a market tote, increase the number of squares and add a fabric lining for shape and durability β€” I always recommend sewing in a lining for heavier use.

If you prefer a minimalist look, join squares with a matching colour and use an invisible mattress stitch instead of single crochet for the seam.

For a festival-ready look, add tassels or pom-poms to the lower corners β€” theyre simple to make and add lots of movement.

I sometimes stiffen the flap slightly with a small interfacing insert or a lining to help it hold its shape when closed.

Finally, experiment with the strap width and bead-row pattern: making the strap narrower or wider affects how the bag sits on your shoulder, so I recommend testing different widths before finishing the ends.

Common Mistakes & How to Fix Them

βœ— Skipping the magic ring closure on row 1 can leave a loose hole in the centre; always pull the magic circle closed and secure with a slip stitch before moving to the next round. βœ— Failing to count clusters on row 2 or row 3 will create uneven stitch counts and misaligned corners; count after each round to ensure you have 16 clusters and correct cluster stitch loops. βœ— Not switching hook sizes for the strap foundation row can make the foundation too loose or sloppy; use a slightly smaller hook for the foundation chain to keep it neat and even. βœ— Joining squares without placing them back to back can make the join bulky and uneven; place squares back to back and single crochet into the back loop only for a tidy seam and uniform edge. βœ— Overstretching the chain loops for the buttonhole will make the hole too large and unstable; follow the pattern chain count and secure the chain loop with slip stitches and single crochet reinforcement.

Molly Boho Bag Pattern

Create a charming boho-style bag made from colorful DK yarn squares. This pattern guides you through crocheting layered cluster and puff stitches to form decorative granny-style squares, joining them into a 3D bag with a sturdy strap and hardware. Youll enjoy mixing colors and experimenting with placement to make a unique bag you can wear with pride.

Intermediate 5-7 Hours

Materials Needed for Molly Boho Bag Pattern

β€” Main Fabric

  • 01
    DK weight yarn (4ply) - 1-5 colours (sample photographed used 4 colours with the cream colour repeated twice)
  • 02
    Use small amounts of each colour per square (squares are worked in 5 rows so plan yarn allocation accordingly)
  • 03
    Scrap DK yarn can be used to make each square unique; quantities depend on color usage and size but typically 25-100g per colour

β€” Tools Required

  • 01
    Crochet hook size 6mm (J)
  • 02
    Crochet hook size 5mm (H)
  • 03
    Tapestry or sewing needle for sewing in ends and attaching hardware
  • 04
    Small sewing needle for attaching bag clips
  • 05
    Scissors
  • 06
    Bag hooks (hardware) or strap clips
  • 07
    Stitch markers

Progress Tracker

0% Complete

β€” Notes :

Info :

This bag is made of squares with 5 rows, you can use from 1-5 colours to make these bags, the one I have photographed in this pattern has used 4 colours with the cream one repeated twice. This bag is a really fun way to experiment with colorways and I have also made this bag using up just scrap yarn so each square is different and its really pretty, have fun with it and make it your own.

Info :

I have included a strap pattern that requires hardware of bag hooks, these can be purchased on ebay or amazon and come in a variety of colours. You may prefer to attach your handle directly to the bag or alternatively purchase a ready made handle, all of which look great so go with your preference.

β€” Square :

Row 1 :

Using the 6mm J hook Magic Ring, Chain 3 (counts as first stitch) Double crochet 15 stitches more (16 stitches total)

Row 1 :

Pull magic circle closed, slip stitch into first stitch

Row 2 :

Change Colour Chain 2 (counts as first stitch) Cluster stitch into each stitch (16 total) Slip stitch closed

Row 2 :

Cluster stitch... Start a Double crochet but only pull through the first loop leaving the second loop on the hook, yarn over and double crochet into same stitch and only pull through the first loops ending up with 3 loops on the hook (for the first cluster, the following clusters will have 4 loops on the hook), pull through all 3 loops and chain 1. 3 stitches per cluster, 16 clusters total

Row 3 :

Change colour, Chain 2, As before cluster stitches but this time its 4 stitches per cluster and chain 2 between each. Slip stitch closed

Row 4 :

Change Colour, Chain 2 (counts as first Double), 1.Double crochet 3 times into the same stitch. 2. Half Double crochet 3 times into the next stitch. 3. Double crochet 3 times into the next stitch. 4. Treble crochet 3 times into the next stitch 5. Chain 1 Treble crochet 3 times into the same stitch as the first set of trebles creating a corner.

Row 4 :

Repeat 1-5 all around.

Row 5 :

Change Colour, Chain 2 (counts as first Double stitch), Double crochet 3 times into each stitch.

Row 5 :

Once you get to the corner Double crochet 3 times, chain 1, Double crochet 3 times again into the same corner stitch, continue round

Info :

You need to make 11 of these squares

β€” Layout & Joining :

Info :

Start with 8 of the 11 squares and lay them out like this (refer to layout image). Its time to start to stitch the squares together.

Info :

Using Single crochet in the back stitch only of the squares. I find placing the squares back to back helps this. I have used a contrasting colour but you can use the same colour if you don't want it to be as visible.

Info :

Fold in half. You now need to stitch the bag along these lines. The bag will start to take on its 3D shape and not sit flat anymore.

Info :

Now you add 2 more squares at the top corners, these will be folded in half.

Info :

The last Square will need a little manipulation again adding to the 3D shape of the final bag, Stitch it to the back of the bag so it can be folded over the front (this will be the flap).

Info :

Now all the squares are joined Single crochet around the whole of the edge of the bag. Once you reach the point of the flap chain 8 and slip stitch back into the same stitch.

Info :

Continue Single crochet around until you reach each corner (marked with yellow stars on the picture). Chain 5 and slip stitch into the same stitch.

Info :

Single crochet around again and add 8 stitches into the chain loop for the button hole and 5 stitches into the chain loops at the sides of the bag.

β€” Finishing & Button :

Info :

Choose your button and pick the best spot to place it on your bag, stitch it on.

β€” Strap :

Strap (P1) :

Using a size 5mm H hook Start by making a row of Single crochet foundation chain. Make this row as long as you like in multiples of 2, I have done 100 stitches. Going down a hook size for the foundation row helps to keep it neat and tidy.

Strap (P1) :

Going back to the 6mm J hook, chain 1, Turn work, Single crochet along the whole row. Chain 4 , turn work

Strap Row :

Skip 1 stitch and Double crochet. This row is a bead stitch row so you are going to essentially be doing a sideways puff stitch onto the Double crochet you have just made.

Strap Row :

Loop over the hook 4 times before pulling the working yarn through and chain 1, Skip 1, Double crochet, Bead stitch, Skip 1.... continue. On the last stitch leave it as a Double.

Strap Row :

Chain 1, Turn work Single crochet into each stitch along. One on top of each bead and one between as shown.

Strap Row :

Single crochet twice into the last stitch space, chain 1 and turn work. Single crochet along every stitch, chain 1 and turn work, repeat for a third time. Cut and weave in your ends.

Strap (P1) :

Take a needle and length of yarn and simply sew your bag clips to the ends of your strap. Clip it to your bag and wear with pride!

Assembly Instructions

  • Lay out 8 of the 11 finished squares in the pattern shown in the layout photo to form the base and sides of the bag before stitching to check placement.
  • Join squares by placing two squares back-to-back and single crochet through the back loop only across the seam; continue joining all squares in the layout to form the flat assembly.
  • Fold the joined piece in half and stitch the side seams indicated so the bag takes on its 3D curved shape; add the two top corner squares folded in half and stitch them in place.
  • Stitch the final square to the back top of the bag to form the flap so it can fold over the front, then single crochet around the entire bag edge to neaten.
  • When edging reaches the flap apex chain 8 and slip stitch to the same stitch to form the flap point; continue edging and create corners by chaining 5 and slip stitching to secure.
  • Create the buttonhole by adding 8 stitches into the chain loop during the edging round and later secure a button on the front in the best fitting position.
  • Sew the strap clips securely to the strap ends with a sewing needle and yarn, then attach clips to the bag hardware or sew the strap directly to the bag as preferred.

Important Notes

  • πŸ’‘Use stitch markers and place squares back to back when joining to keep seams even and make joining easier.
  • πŸ’‘Go down one hook size for the foundation row of the strap to keep the foundation neat and reduce stretchiness.
  • πŸ’‘Choose whether to use matching or contrasting joining yarnβ€”contrasting makes the join visible and decorative, matching keeps it subtle.
  • πŸ’‘Make 11 squares in total; assemble 8 as the main layout then add 2 folded corner squares and 1 manipulated flap square.
  • πŸ’‘Weave in ends as you go to avoid large finishing sessions and keep each square tidy before joining.

This Molly Boho Bag pattern invites you to play with colour, texture and joyful stitches to create a wearable piece of art. Each square becomes a tiny medallion that, when joined, forms a beautifully sculpted 3D bag youll be proud to carry. Try different colourways or use scrap DK yarn for a charming, upcycled look. 🧢✨

You ask,

we answer.

FAQs

What size will the finished bag be?

Finished size will vary with yarn and tension; using DK yarn and the specified hook sizes the sample bag measures approximately a medium crossbody size (estimate 30-35cm wide) - adjust by changing the number of squares or yarn weight.

Can I use other yarn weights for this pattern?

Yes, you can substitute yarn weights but this will change the final size; if using thicker yarn use larger hooks and fewer squares, and adapt strap length accordingly.

Do I need to know cluster and bead stitches beforehand?

Basic knowledge of double crochet, treble and cluster techniques is helpful; the pattern explains how to form clusters and the bead/puff style stitch step-by-step.

How many squares do I need to make?

You need to make 11 squares in total: 8 for the main body layout, 2 folded at the top corners and 1 final manipulated square that becomes the flap.

Can I attach a ready-made strap instead of crocheting one?

Yes, the pattern includes hardware-friendly instructions; you may attach a ready-made handle or sew the strap directly to the bag according to your preference.