🧢 Beautiful ✨ Detailed πŸ’ Adorable

Brighten Your Day Crochet Rainbow Stuffie Amigurumi Pattern

Brighten Your Day Crochet Rainbow Stuffie Amigurumi Pattern
4.0β˜… Rating
2-4 Hours Time Needed
1.4K Made This
βœ‚οΈ

Beginner Friendly Level

Perfect for those just starting their crochet journey, with clear instructions and simple techniques

⏱️

Bite-Sized Project

Finishes in 2-4 hoursβ€”perfect for an afternoon of creative relaxation.

🧸

Cute Companion

An adorable friend to cherish, handcrafted with love to bring comfort and joy for years to come.

About This Brighten Your Day Crochet Rainbow Stuffie Amigurumi Pattern

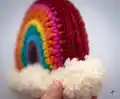
This pattern creates a charming, stuffed crochet rainbow finished with four fluffy pom-pom clouds along the base. It is worked in two identical single crochet arch pieces that are seamed together and lightly stuffed for shape. The pattern uses simple color changes to build the rainbow stripes and a flat slip stitch join method to create a neat seam.

Brighten Your Day Crochet Rainbow Stuffie Amigurumi Pattern crochet pattern - detailed view of completed project

Ideal for quick handmade gifts, nursery decor, or cheerful accents around the home. The design uses bulky yarn and a large hook for a soft, squishy finish that is fast to make.

Why You'll Love This Brighten Your Day Crochet Rainbow Stuffie Amigurumi Pattern

I absolutely love this pattern because it turns a few simple stitches into a delightful, colorful keepsake that makes people smile. I enjoy how quickly each rainbow works up β€” it is satisfying to finish one in an afternoon. The color-striping is playful and easy to customize, so I often make sets in different palettes to match rooms or themes. Sewing the pom-pom clouds is my favorite finishing step because it adds a soft, tactile element that brings the whole piece to life. Sharing these bright little rainbows feels like sending a tiny dose of happiness to someone who needs it.

Brighten Your Day Crochet Rainbow Stuffie Amigurumi Pattern step 1 - construction progress Brighten Your Day Crochet Rainbow Stuffie Amigurumi Pattern step 2 - assembly progress Brighten Your Day Crochet Rainbow Stuffie Amigurumi Pattern step 3 - details and accessories Brighten Your Day Crochet Rainbow Stuffie Amigurumi Pattern step 4 - final assembly and finishing

Switch Things Up

I love how easy it is to customize the rainbow colors; swap the contrast shades to match nursery decor or seasonal palettes.

To make a larger rainbow, I change to a larger hook and a chunkier bulky yarn; conversely, use a smaller hook and lighter yarn for a mini version.

I often add embroidered eyes or a tiny smile to turn the rainbow into a character for kids or a whimsical gift.

Try substituting one or two stripes with variegated yarn for a marbled color effect that adds instant texture and interest.

If you want a hangable ornament, I make a small loop at the top with a length of yarn before seaming to create a simple hanger.

Mix textures by using a fluffy boucle or faux-fur yarn for the cloud pom-poms to make them extra plush and tactile.

I sometimes create a garland by making multiple mini rainbows and joining them with a chain or ribbon for party decor.

Want a modern look? Use monochrome shades of greys and whites or a tonal gradient for a sophisticated decor piece.

For a baby-safe version, avoid small attachments and sew pom-poms securely or use felted pom-poms to reduce loose fibers.

I also like making matching sets in different sizesβ€”one large display rainbow with two small keychain-sized versions makes a delightful gift trio.

Common Mistakes & How to Fix Them

βœ— Skipping the color-change method can cause loose or messy joins; work to the last two loops, yarn over with new color, pull through two loops to complete the stitch and continue neatly. βœ— Not aligning stripes when seaming can leave mismatched arcs; pin or align rows carefully before sewing and use the flat slip stitch join method where recommended for a neat seam. βœ— Overstuffing the rainbow will distort the arch shape and make seams hard to close; stuff gradually, checking the shape as you go and use small amounts until you reach the desired firmness. βœ— Forgetting to break and join yarn per row will cause bulky joins and extra tails; follow the pattern's 'Join' and 'Break' instructions for each row and weave in ends as you go for a clean finish. βœ— Trimming pom-poms unevenly produces lopsided clouds; cut loops at both ends and trim slowly to a smooth round shape, rotating the pom-pom to keep it even.

Brighten Your Day Crochet Rainbow Stuffie Amigurumi Pattern

Make a cheerful crochet rainbow stuffie to brighten any room or gift. This easy pattern guides you through simple single crochet shaping and colorful stripe changes to create a lovely puffed rainbow with fluffy pom-pom clouds. You will love how quickly this little project comes together and how charming it looks displayed or gifted. Perfect for making multiples in different colorways to spread a little joy.

Beginner Friendly 2-4 Hours

Materials Needed for Brighten Your Day Crochet Rainbow Stuffie Amigurumi Pattern

β€” Main Fabric

  • 01
    Bernat Softee Chunky Yarn #6 Bulky Yarn, 3.5 oz [100 g] / 108 yds [99 m] main skein
  • 02
    Contrast A - Dark Mauve (28323) 1 ball or 7 yds [7 m]
  • 03
    Contrast B - Ultra Blue (28742) 1 ball or 4 yds [4 m]
  • 04
    Contrast C - Emerald (28200) 1 ball or 6 yds [6 m]
  • 05
    Contrast D - Glowing Gold (28607) 1 ball or 6 yds [6 m]
  • 06
    Contrast E - Pumpkin (28630) 1 ball or 8 yds [8 m]
  • 07
    Contrast F - Hot Pink (28416) 1 ball or 9 yds [9 m]
  • 08
    Contrast G - Wine (28532) 1 ball or 21 yds [20 m]
  • 09
    Contrast H - Natural (28008) 1 ball or 21 yds [20 m]

β€” Tools Required

  • 01
    US J/10 (6 mm) crochet hook or size needed to obtain gauge
  • 02
    Stuffing (polyester fiberfill)
  • 03
    Scissors
  • 04
    Yarn needle for sewing and weaving ends
  • 05
    2" [5 cm] piece of cardboard for making pom-poms
  • 06
    Stitch markers (optional)

Progress Tracker

0% Complete

β€” Pattern Instructions :

Info :

A cute little rainbow to brighten your day! This colorful stuffie is worked in two simply shaped single crochet stitch pieces that are seamed together and stuffed before fluffy pom-pom clouds are attached across the bottom.

Info :

Note: To change color, work to last 2 loops on hook, yoh with new color. Pull through 2 loops on hook to complete st and proceed in new color.

Item - Front and Back (make alike) :

With A, ch 8.

Round 1 :

(RS). 1 sc in 2nd ch from hook (counts as ch 1. 1 sc). 1 sc in next ch. 2 sc in next ch. 1 sc in next ch. 2 sc in next ch. 1 sc in each of last 2 ch. Turn. (9 sc).

Round 2 :

Ch 1. 1 sc in each of first 2 sc. 2 sc in each of next 5 sc. 1 sc in each of last 2 sc. Join B. Break A. Turn. (14 sc).

Round 3 :

With B, ch 1. 1 sc in each sc across. Join C. Break B. Turn.

Round 4 :

With C, ch 1. 1 sc in each of first 3 sc. 2 sc in next sc. 1 sc in next sc. 2 sc in next sc. 1 sc in each of next 2 sc. 2 sc in next sc. 1 sc in each of last 3 sc. Join D. Break C. Turn. (18 sc).

Round 5 :

With D, ch 1. 1 sc in each of first 5 sc. 2 sc in next sc. 1 sc in next sc. 2 sc in next sc. 1 sc in each of next 2 sc. 2 sc in next sc. 1 sc in next sc. 2 sc in next sc. 1 sc in each of next 5 sc. Join E. Break D. Turn. (22 sc).

Round 6 :

With E, ch 1. 1 sc in each of first 4 sc. 2 sc in next sc. (1 sc in next sc. 2 sc in next sc) 3 times. (2 sc in next sc. 1 sc in next sc) 4 times. 1 sc in each of last 3 sc. Join F. Break E. Turn. (30 sc).

Round 7 :

With F, ch 1. 1 sc in each sc across. Join G. Break F. Turn.

Round 8 :

With G, ch 1. 1 sc in each of first 10 sc. (2 sc in next sc. 1 sc in next sc) twice. 2 sc in each of next 2 sc. (1 sc in next sc. 2 sc in next sc) twice. 1 sc in each of last 10 sc. Turn. (36 sc).

Round 9 :

Ch 1. 1 sc in each sc across. Fasten off.

Info :

Flat Slip Stitch Join Method = With RS facing, insert hook into back loop only of first stitch on one side of seam and into back loop only of first stitch on other side of seam. With working yarn behind both pieces, pull up a loop through back loops and loop on hook to slip stitch the seams together. Repeat for each set of stitches along seam.

Round - Finishing :

With WS facing each other, sew Front and Back tog using appropriate color while aligning stripes and leaving a small opening for stuffing. Stuff stuffie, making sure to maintain Rainbow shape. Sew opening closed.

Info :

Note: To sew the inner arc of Rainbow closed, I used a strand of A and a flat slip stitch join method across. To seam top arc of Rainbow closed, I used a strand of G and flat slip stitch join method across. To sew the bottoms of the Rainbow closed, I used a strand of yarn (any shade) and sewed them together.

Item - 2" [5 cm] Pom-Poms (make 4) :

Wind yarn around 2" [5 cm] piece of cardboard 40 times. Tie tightly in the middle and leave a long end for attaching to Rainbow. Cut loops at both ends and trim to smooth round shape.

Round - Pom-Pom Attachment :

Using long ends, sew 2 pom-poms evenly across each bottom of Rainbow (as shown in photo).

Assembly Instructions

  • Sew the Front and Back pieces together with WS facing, aligning each colored stripe so the arc pattern matches across seams.
  • Leave a small opening when seaming to insert stuffing, then stuff the rainbow to maintain a natural curved shape and sew the opening closed securely.
  • For the inner arc seam, use a strand of Contrast A and the flat slip stitch join method across to create a neat finish.
  • For the top arc seam, use a strand of Contrast G and the flat slip stitch join method to close the top cleanly before finishing the base.
  • Make four 2" [5 cm] pom-poms, leave long tails, and sew two pom-poms evenly across the bottom of each rainbow using the long ends for a secure attachment.

Important Notes

  • πŸ’‘Use the flat slip stitch join method with RS facing to create a flat, neat seam for the inner and top arcs.
  • πŸ’‘Align color stripes precisely when seaming so the rainbow arcs match and the finished piece looks symmetrical.
  • πŸ’‘Leave a small opening for stuffing, stuff gradually to preserve the rainbow curve, and then sew the opening closed securely.
  • πŸ’‘Trim pom-poms evenly and shape them into smooth rounds before sewing so clouds look full and uniform.

This little rainbow stuffie is designed to bring color and happiness into any space and is perfect as a quick handmade gift. Make a set in coordinating shades to brighten a nursery or to tuck into a gift box for a friend. Enjoy the soft textures, fun color changes, and the satisfying finish of the fluffy pom-pom clouds. 🧢🌈✨

You ask,

we answer.

FAQs

What size will the finished piece be?

The finished rainbow measures approximately 7" [18 cm] wide x 6" [15 cm] tall using the recommended yarn and hook size.

Can I use different yarn weights for this pattern?

Yes, you can use different yarn weights, but this will change the finished size; adjust your hook accordingly and test a gauge swatch to maintain proportions.

Do I need prior crochet experience for this pattern?

This pattern is beginner friendly and uses basic single crochet stitches, but familiarity with color changes and simple seaming will be helpful.

How long does this project typically take to complete?

Most crocheters finish this project in 2-4 hours, though time may vary depending on experience level and how many rainbows you make.