About This Mini Crossbody Bag Pattern
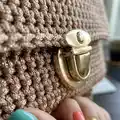
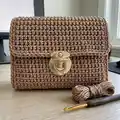
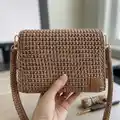
This pattern creates a compact, structured mini crossbody bag worked in single crochet using macrame cord. It includes instructions for the main rectangular panel, two side pieces, assembly with slip stitches, placement of hardware, and an optional crocheted handle. Ideal for a clean, minimalist bag finished with a metal lock and swivel clasps.
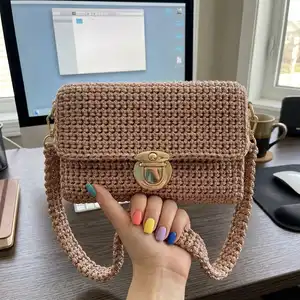
Step-by-step photos and video references are provided to guide the assembly and joining techniques. The finished bag measures approximately 18.5 x 11 x 4 cm with a handle length around 70 cm using the given materials.
Why You'll Love This Mini Crossbody Bag Pattern
I absolutely love this pattern because it turns simple single crochet into a refined, wearable accessory that looks far more complex than it is. The use of 2mm macrame cord gives the bag a clean structure and a premium finish that holds shape beautifully. I enjoy how the joining with slip stitches creates crisp edges without bulky seams, and the hardware elevates the finished piece instantly. It is satisfying to make from start to finish and makes a lovely gift or a polished everyday bag for yourself.
Switch Things Up
I love how easy it is to customize this mini crossbody bag by changing the color of the macrame cord; try a bold color for a statement bag or neutrals for a classic look.
You can make the bag larger or smaller by adjusting the number of foundation chains and the number of rows; increasing the chain by multiples will widen the bag while adding rows lengthens it.
I often line my bags with a lightweight fabric to give extra structure and protect small items; sew a simple fabric lining and slip it into the bag before attaching hardware.
Try adding an internal pocket by crocheting a small rectangle and sewing it inside the main panel before assembly for phone or card storage.
Use different hardware finishes like antique brass, silver, or black to completely change the bag's vibe and match your wardrobe.
For a softer handle, crochet the handle with a thinner cord and double it, or cover a leather strap with a crocheted sleeve for a mixed-material look.
If you prefer a sling style, lengthen the handle by increasing the number of handle rows and test the length on your shoulder before finishing.
Embellish the flap with a decorative button or embroidered motif for a personalized touch that stands out.
I also sometimes add piping around the flap edge by crocheting a contrasting ridge to highlight the bag outline and make the flap pop visually.
Don’t be afraid to combine different stitch textures for the flap or bottom panel to create subtle design contrasts while keeping the main body simple.
Common Mistakes & How to Fix Them
✗ Making a foundation chain that is too tight; leave a longer tail and use a slightly looser tension on the foundation chain so the first row is not overstretched.
✗ Inserting the hook in the wrong loop for the main pattern; be sure to insert into the back loop of the current row and the back loop of the previous row as shown to achieve the textured fabric.
✗ Failing to measure gauge and rows which results in incorrect bag dimensions; steam and shape the fabric and measure the length/width after straightening to match the pattern size.
✗ Joining the side pieces inaccurately which leaves uneven corners; mark the bottom and sides with stitch markers and align corners carefully before slip-stitch joining.
✗ Cutting the working yarn too early during assembly; do not cut the working yarn until you have crocheted slip stitches from the main part to the corner and to the middle of the flap to ensure continuous joining.