🧶 Beautiful ✨ Detailed 💝 Adorable

Holiday Lights Amigurumi Pattern

Holiday Lights Amigurumi Pattern
4.4★ Rating
2-3 Hours Time Needed
2.9K Made This
✂️

Beginner Friendly Level

Perfect for those just starting their crochet journey, with clear instructions and simple techniques

⏱️

Bite-Sized Project

Finishes in 2-4 hours—perfect for an afternoon of creative relaxation.

🎁

Tiny Treasure

Small, sweet, and gift-worthy creations that fit perfectly in the palm of your hand with detailed charm.

About This Holiday Lights Amigurumi Pattern

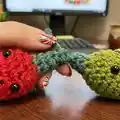
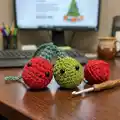
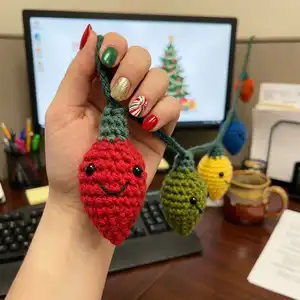
This pattern creates charming amigurumi holiday light bulbs that string together to make a festive garland. Each bulb is crocheted in the round with simple increases and decreases, finished with an optional green cap. Optional safety eyes and embroidered smiles add personality to each bulb.

Holiday Lights Amigurumi Pattern crochet pattern - detailed view of completed project

Quick and beginner-friendly, these bulbs are perfect for using leftover worsted yarn and making a set in an afternoon. The pattern includes full round-by-round instructions and notes on stringing them into a garland.

Why You'll Love This Holiday Lights Amigurumi Pattern

I absolutely love this pattern because it transforms small amounts of yarn into a cheerful holiday decoration that brightens any space. I enjoy how fast each bulb works up—theyre perfect for mindful, satisfying crocheting in short sessions. I love offering simple but sweet facial details, so I often add safety eyes or embroidery to give each bulb its own personality. I also appreciate that you can make a whole garland from scraps, which feels both economical and eco-friendly. Making these bulbs always puts me in a festive mood and they make lovely handmade gifts.

Holiday Lights Amigurumi Pattern step 1 - construction progress Holiday Lights Amigurumi Pattern step 2 - assembly progress Holiday Lights Amigurumi Pattern step 3 - details and accessories Holiday Lights Amigurumi Pattern step 4 - final assembly and finishing

Switch Things Up

I love changing up the colors to match different seasons; try pastels for spring wreaths or metallic yarn for a glamorous holiday garland.

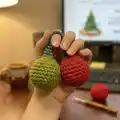
I sometimes make miniature keychain bulbs by using sport weight yarn and a smaller hook for tiny, portable versions.

I often experiment with facial expressions by varying eye placement or embroidering different mouths to give each bulb a unique personality.

I like to add a little sparkle by holding a strand of metallic or glitter yarn with the main yarn to create festive shimmery bulbs.

I sometimes make the cap larger by adding an extra round in green yarn so the bulb can be looped directly onto thinner string or ribbon.

I recommend trying different spacing on the chain; I often place bulbs closer together for a dense look or spread them farther apart for a subtle accent.

I also enjoy sewing on small beads or sequins to mimic lit bulbs for a non-electrical decorative option.

I occasionally swap safety eyes for embroidered eyes to make these safe for small children or to achieve a softer aesthetic.

I like assembling a mixed garland by alternating sizes—larger bulbs made with bulky yarn interspersed with smaller worsted versions create visual interest.

I sometimes mount a single bulb onto a wrapped ornament or gift tag to turn it into a holiday keepsake that doubles as a decoration.

I recommend trying cotton yarn for a crisp stitch definition, or acrylic for durability—each fiber gives a different finish that I enjoy exploring.

I love combining these bulbs with other amigurumi ornaments to make a coordinated set—mixing stars, mini trees, and bulbs always pleases gift recipients.

Common Mistakes & How to Fix Them

✗ Skipping the magic ring and starting with chains can leave a hole at the tip of the bulb; use a 3-stitch magic ring as instructed to create a neat, closed tip. ✗ Failing to count increases and decreases during shaping will distort the bulb shape; count after each round and mark the start of rounds to ensure correct stitch counts. ✗ Stuffing too early or too much can create lumps and make closing difficult; stuff gradually as you decrease and use small amounts to maintain an even shape. ✗ Attaching safety eyes after stuffing or in the wrong position can misplace facial features; place safety eyes before stuffing and check spacing between rounds for a balanced look. ✗ Not weaving in ends securely can cause unraveling after handling; leave a longer tail when finishing and weave it through multiple stitches before trimming.

Holiday Lights Amigurumi Pattern

Create a cheerful string of tiny amigurumi holiday light bulbs that brighten any room or gift. This pattern is perfect for using scrap yarn and making quick, adorable decorations for your home. Youll love how fast each bulb comes together and how customizable they are. Make a whole garland to hang on the mantle, tree, or give as a handmade present.

Beginner Friendly 2-3 Hours

Materials Needed for Holiday Lights Amigurumi Pattern

— Main Fabric

  • 01
    Worsted weight yarn (#4) in desired colors - small amounts per bulb (use scraps or 10-50g per color depending on how many bulbs you make)
  • 02
    Green worsted weight yarn for caps - small quantity for multiple bulbs
  • 03
    Polyfil stuffing - small amount per bulb (approx 5-10g per bulb)
  • 04
    Black embroidery thread (optional) - small amount for mouths or facial details
  • 05
    Safety eyes (optional) - small sizes like 6mm, 2 per bulb if used

— Tools Required

  • 01
    Crochet hook size G (G hook) - approximately 4.0mm
  • 02
    Polyfil stuffing
  • 03
    Darning/tapestry needle for sewing and weaving in ends
  • 04
    Safety eyes (optional)
  • 05
    Black embroidery thread (optional)
  • 06
    Scissors

Progress Tracker

0% Complete

— Directions :

Info :

Make a 3 stitch magic ring

Row 1 :

Inc around (6)

Row 2 :

*sc 2, inc 1. Repeat from * (8)

Row 3 :

*sc 1, inc 1. Repeat from * (12)

Row 4 :

*sc 2, inc 1. Repeat from * (16)

Row 5 :

*sc 3, inc 1. Repeat from * (20)

Row 6-8 :

sc around (20)

Row 9 :

*sc 3, dec 1. Repeat from * (16)

Row 10 :

*sc 2, dec 1. Repeat from * (12)

Info :

Attach safety eyes if desired. Stuff with Polyfil.

Row 11 :

dec around (6)

Row 12 :

switch to green yarn, sc around (6)

Row 13 :

sc around (6)

Info :

Break off yarn, weave in ends. Embroider eyes and mouth if desired.

Info :

To string together bulbs, begin a chain with desired color and chain through the top of a bulb every 10 inches or spaced however far apart you wish.

Assembly Instructions

  • Attach safety eyes before stuffing the bulb: insert eyes between the desired rounds, then secure the back washers before stuffing.
  • Stuff each bulb with Polyfil gradually, filling evenly to maintain the bulb shape and avoid lumps before completing decreases.
  • After completing Row 13, break off yarn and weave in ends securely; embroider eyes and mouth after ends are woven if desired.
  • To string bulbs, begin a chain in the desired garland color and thread the chain through the top (green cap) of each bulb, spacing about every 10 inches or as desired.
  • Position bulbs evenly along the chain and knot or secure each bulb in place if you want them to remain fixed rather than sliding.

Important Notes

  • 💡Place safety eyes before stuffing and closing the bulb to make secure attachment and correct placement easier.
  • 💡Stuff bulbs gradually during decreases to maintain smooth shaping and avoid visible lumps or gaps in the finished piece.
  • 💡Switch to the green yarn for the cap at Row 12 as instructed to create a neat top for stringing and a finished look.
  • 💡Weave in ends neatly and trim close to the work to avoid loose tails; secure embroidered details on the inside with a knot.
  • 💡Plan your spacing before stringing the garland by laying out bulbs and measuring approximately every 10 inches or your preferred spacing.

These adorable amigurumi holiday lights are a cheerful and easy way to add handmade charm to your home this season. Make a whole garland from scrap yarn or create a small set to gift to friends and family. Quick to crochet and endlessly customizable, theyre sure to bring smiles and festive warmth. 🎁🧶✨

You ask,

we answer.

FAQs

What size will the finished piece be?

Each finished bulb measures approximately 2-3 inches tall when using worsted weight yarn and a G (4.0mm) hook; overall garland length depends on how many bulbs you make and spacing.

Can I use different yarn weights for this pattern?

Yes, you can use different yarn weights, but the bulb size will change; use an appropriate hook for your yarn and note that heavier yarn will make chunkier bulbs while lighter yarn makes smaller bulbs.

Do I need prior crochet experience for this pattern?

No—this pattern is beginner friendly and uses basic stitches (single crochet, increases, and decreases) along with a magic ring; basic familiarity with these techniques will help you follow the rounds.

How long does this project typically take to complete?

Most crocheters can make a set of bulbs in 2-3 hours depending on how many bulbs you create, your speed, and how much finishing (eyes, embroidery, stringing) you choose to add.