🧢 Beautiful ✨ Detailed πŸ’ Adorable

Hulk Amigurumi Pattern

Hulk Amigurumi Pattern
4.1β˜… Rating
2-4 Hours Time Needed
2.9K Made This
βœ‚οΈ

Beginner Friendly Level

Perfect for those just starting their crochet journey, with clear instructions and simple techniques

⏱️

Bite-Sized Project

Finishes in 2-4 hoursβ€”perfect for an afternoon of creative relaxation.

🧸

Cute Companion

An adorable friend to cherish, handcrafted with love to bring comfort and joy for years to come.

About This Hulk Amigurumi Pattern

This pattern teaches you how to crochet a small Hulk-inspired amigurumi complete with head, body, arms, and legs. It features simple shaping, color changes for hair and shorts, and embroidered eyebrow details. The instructions are concise and written for continuous spiral crochet, making assembly straightforward and enjoyable.

Hulk Amigurumi Pattern crochet pattern - detailed view of completed project

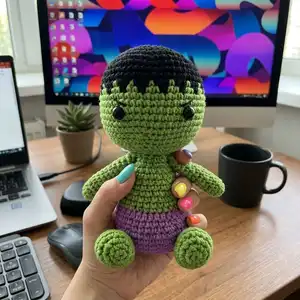
The finished toy measures approximately 13 cm tall using the suggested materials and hook. You will find full round-by-round directions, stuffing tips, and finishing instructions included.

Why You'll Love This Hulk Amigurumi Pattern

I absolutely love this pattern because it turns simple stitches into a charming little character with personality. I enjoy the quick color-change technique for the hair that gives the amigurumi such a playful look. The piece is compact, making it perfect for gifts or small decor, and it works up fast so you get instant satisfaction. I take pride in sharing patterns that are beginner-friendly yet fun to customize.

Hulk Amigurumi Pattern step 1 - construction progress Hulk Amigurumi Pattern step 2 - assembly progress Hulk Amigurumi Pattern step 3 - details and accessories Hulk Amigurumi Pattern step 4 - final assembly and finishing

Switch Things Up

I love how easy it is to customize this pattern by changing colors; try pastel greens and lavenders for a softer look.

I sometimes make a mini version by using fingering weight yarn and a smaller hook to create keychain-sized pals.

To make a chunkier, cuddlier toy, I use bulky yarn and a larger hook for a faster, squishier finish.

I often add embroidered mouths or felt accessories like tiny shorts or capes to give each doll a unique personality.

Try embroidering different eyebrow shapes to change the expression from fierce to friendly β€” placement really alters character.

For posability, I like to add a short piece of wire inside the arms so they can be slightly posed after sewing.

I recommend experimenting with eye sizes; smaller eyes give a cuter look while larger eyes make the doll more expressive.

You can create a family by adjusting yarn weights and colors to produce matching siblings or themed sets.

I also vary the stuffing density: firmer stuffing makes the toy stand better, while softer stuffing gives a plush, cuddly feel.

Finally, I like to attach a small loop at the top of the head to transform the finished amigurumi into an ornament or keychain.

Common Mistakes & How to Fix Them

βœ— Skipping a stitch marker when working in continuous spiral can cause you to lose the start of round; place and move a stitch marker at the beginning of every round to keep your count correct. βœ— Stuffing too much at once will create lumps and distort shaping; stuff gradually during crocheting and shape with small amounts of fiberfill to maintain smooth curves. βœ— Not changing colors cleanly at the yarn-over can leave visible knots or loose ends; loop the new color over your hook and pull through both loops to secure a neat color change. βœ— Crocheting too loosely will let stuffing show through the stitches; maintain a firm, consistent tension so the fabric is dense and the filling is not visible. βœ— Forgetting to align openings before sewing can make limbs sit unevenly; press openings, align 3 stitches side by side, pin into place, and then sew securely for symmetry.

Hulk Amigurumi Pattern

Make a cute, pocket-sized Hulk amigurumi with this easy-to-follow crochet pattern. You will enjoy simple rounds, clear shaping, and fun color changes to create a mini green hero. Perfect for gifting or keeping as a playful handmade decoration. Suitable for crocheters with basic skills who want a quick, satisfying project.

Beginner Friendly 2-4 Hours

Materials Needed for Hulk Amigurumi Pattern

β€” Main Fabric

  • 01
    YarnArt Jeans yarn - Green (main body color) - amount as needed
  • 02
    YarnArt Jeans yarn - Purple (shorts) - amount as needed
  • 03
    YarnArt Jeans yarn - Black (hair) - amount as needed
  • 04
    8 mm black safety eyes (2 pieces)
  • 05
    Toy filler / polyester stuffing for head and body

β€” Tools Required

  • 01
    Crochet hook Clover Soft Touch 2.00 mm (or hook suitable for your yarn)
  • 02
    8 mm black safety eyes (2 pieces)
  • 03
    Scissors
  • 04
    Tapestry needle for sewing and weaving ends
  • 05
    Pins for assembly
  • 06
    Stitch marker
  • 07
    Black thin thread for embroidering eyebrows

Progress Tracker

0% Complete

β€” General Info :

Info :

Skill level -easy. Pattern does not contain crochet tutorials! You should have basic crochet skills. Approx.13cm (about 5.1 inches) tall using the materials stated in the pattern. You may use any size yarn for this amigurumi, just make sure to use the hook size suggestion on the yarn label. Use safety eyes that are a suitable size for the yarn you are using.

β€” Materials :

Infos :

The hook suitable under your yarn. I have Clover Soft Touch 2.00 mm. Yarn: green, purple and black colors. I used Β«YarnArtJeansΒ» yarn. 8 mm black safety eyes. Toys filler. Black thin thread (eyebrows). Scissors. Tapestry needle. Pins. Stitch marker.

β€” Terms Used :

Infos :

MR - magic ring. sc-single crochet. ch-chain stitch. slst-slip stitch. blo-through back loops only. inc-increase (stitch 2 times into the next stitch). dec -invisible decrease (crochet 2 sc together using invisible method). hdc -half double crochet. (...)xn -repeat instructions in brackets n times. R -round. Change colors in crochet. Loop your new yarn color over your hook. Crochet your new yarn color back through the two loops on your hook.

β€” Notes :

Infos :

-Crochet continuously in a spiral, unless otherwise specified. -In order to not lose track of the number of worked stitches in each round, use a stitch marker to mark the beginning of each round -a thin thread of contrasting color. -Crochet tightly enough so the filler is not visible through the holes between loops. -Tightly and gradually fill all the details of the toy in the process of crocheting. -Size of the finished toy can vary depending on the materials used, the density of crocheting and filling, etc.

β€” Body + head :

Info :

Stuff body and head firmly, stuffing as you go. Start working with purple yarn.

Round 1 :

6 scMR (6)

Round 2 :

6 inc(12)

Round 3 :

(1 sc, inc)x6 (18)

Round 4 :

(2 sc, inc)x6 (24)

Round 5 :

(3 sc, inc)x6 (30)

Round 6 :

(4 sc, inc)x6 (36)

Round 7 :

(5 sc, inc)x6 (42)

Round 8-10 :

42 sc (3 rounds) (42)

Round 11 :

(5 sc, dec)x6 (36)

Round 12 :

36 sc (36)

Round 13 :

36 hdc (36)

Info :

Continue on with green.

Round 14 :

(4 sc, dec)x6 (30)

Round 15 :

30 sc (30)

Round 16 :

(13 sc, dec)x2 (28)

Round 17 :

28 sc (28)

Round 18 :

(12 sc, dec)x2 (26)

Round 19 :

26 sc (26)

Round 20 :

(11 sc, dec)x2 (24)

Round 21 :

24 sc (24)

Round 22 :

(2 sc, dec)x6 (18)

Round 23 :

18 sc (18)Cut the yarn.

Info :

Stuff the body firmly.

β€” Arm x2 :

Info :

Crochet withgreen.

Round 1 :

6 sc MR(6)

Round 2 :

(2 sc, inc)x2 (8)

Round 3-8 :

8 sc (8)

Info :

Stuff only half of the arms.

Round 9-13 :

8 sc (8)

Info :

Do not stuff of the arms. This way the arm doesn't stick out too much after sewing it to the body. Press the opening with your fingers, aligning 3 stitches side by side. Break the yarn and leave a long tail to sew arms to body.

β€” Head :

Info :

Crochet with black yarn.

Round 1 :

6 sc MR(6)

Round 2 :

6 inc(12)

Round 3 :

(1 sc, inc)x6 (18)

Round 4 :

(2 sc, inc)x6 (24)

Round 5 :

(3 sc, inc)x6 (30)

Round 6 :

(4 sc, inc)x6 (36)

Round 7 :

(5 sc, inc)x6 (42)

Round 8 :

(6 sc, inc)x6 (48)

Round 9 :

(7 sc, inc)x6 (54)

Round 10-11 :

54 sc (2 rounds)(54)

Info :

In the next 12 and 13 rounds we will alternate green and black colors.

Round 12 :

(green 1 sc, black 2 sc)x18 (54)

Round 13 :

(green 2 sc, black 1 sc)x18 (54)

Info :

Continue on with green.

Round 14-19 :

54 sc (6 rounds)(54)

Round 20 :

(7 sc, dec)x6 (48)

Round 21 :

(6 sc, dec)x6 (42)

Info :

Place safety eyes between rounds 16 and 17, 11 stapart.

Round 22 :

(5 sc, dec)x6 (36)

Round 23 :

(4 sc, dec)x6 (30)

Round 24 :

(3 sc, dec)x6 (24)

Info :

Start to stuff the head.

Round 25 :

(2 sc, dec)x6 (18)

Round 26 :

Only through back loops, (1 sc, dec)x6 (12)

Round 27 :

6 dec. Leave the thread for sewing.

β€” Leg x2 :

Info :

Start working with green yarn.

Round 1 :

6 sc MR(6)

Round 2 :

6 inc(12)

Round 3 :

inc, 3 sc, 3 inc, 3 sc, 2 inc(18)

Round 4 :

7 sc, 3 inc, 8 sc (21)

Round 5 :

Only through back loops, 21 sc (21)

Round 6 :

7 sc, 3 dec, 8 sc (18)

Round 7 :

4 sc, 4 dec, 6 sc (14)

Round 8 :

2 sc, 4 dec, 4 sc (10)

Round 9 :

(3 sc, dec)x2 (8)

Info :

Stuff only half of the legs.

Round 10-15 :

8 sc(6 rounds) (8)

Round 16 :

Only 5 sc. Do not stuff of the legs. Press the opening with your fingers, aligning 3 stitches side by side. Break the yarn and leave a long tail.

β€” Finishing :

Info :

Sew the head to the body. Sew the legs to the body. Sew the arms to the body symmetrically. Embroider eyebrows.

Assembly Instructions

  • Attach head to body by sewing the head opening to the neck area using the long tail left after finishing the head, making sure the hairline aligns with the top rounds of the body.
  • Position safety eyes between rounds 16 and 17 of the head, 11 stitches apart, then secure and tighten before stuffing further.
  • Sew the arms to the sides of the body symmetrically, pressing the arm opening and aligning 3 stitches side by side before sewing to ensure a neat, low-profile seam.
  • Sew the legs to the bottom of the body evenly spaced so the doll can sit or stand; use pins to mark placement before sewing to confirm symmetry.
  • Embroider eyebrows with black thin thread, using reference photos to position them above the eyes for the correct expression.

Important Notes

  • πŸ’‘Use a stitch marker to mark the beginning of every round when working in a spiral so you do not lose count.
  • πŸ’‘Stuff gradually and firmly while shaping the head and body; overstuffing can distort your amigurumi.
  • πŸ’‘Change colors by looping the new yarn over the hook and pulling through both loops for a neat color change and secure join.
  • πŸ’‘When finishing limbs, press the opening with your fingers and align three stitches side by side before sewing for a tidy attachment.

This tiny green hero is full of charm and handmade character. It works up quickly and is delightful to gift or collect. Customize colors, expressiveness, or make a whole set of heroes to display. 🧢 Crafted with care and easy to personalize! ✨

You ask,

we answer.

FAQs

What size will the finished piece be?

The finished amigurumi measures approximately 13 cm tall when using the recommended yarn (YarnArt Jeans) and a 2.00 mm hook.

Can I use different yarn weights for this pattern?

Yes, you can use different yarn weights, but this will affect the final size. Use an appropriate hook for your yarn and adjust safety eye size accordingly.

Do I need prior crochet experience for this pattern?

This pattern is rated beginner friendly, so basic knowledge of single crochet, increases, decreases, and working in the round is recommended.

How long does this project typically take to complete?

Most crocheters finish this project in about 2-4 hours depending on experience and assembly time.

How should I place the safety eyes?

Place the safety eyes between rounds 16 and 17 of the head, spaced about 11 stitches apart, then secure them before finishing stuffing.