🧶 Beautiful ✨ Detailed 💝 Adorable

Giraffe Bookmark Amigurumi Pattern

Giraffe Bookmark Amigurumi Pattern
4.8★ Rating
5-7 Hours Time Needed
3.9K Made This
✂️

Intermediate Level

Ideal for those with basic crochet experience, featuring slightly more advanced stitches and techniques to expand your skills.

⏱️

Weekend Treat

Takes 5-7 hours, making it an enjoyable project to finish over a couple of days.

🎁

Tiny Treasure

Small, sweet, and gift-worthy creations that fit perfectly in the palm of your hand with detailed charm.

About This Giraffe Bookmark Amigurumi Pattern

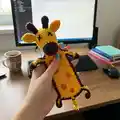
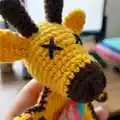
This pattern creates a cute giraffe bookmark, crocheted in the round with color changes and small shaped parts. It combines simple amigurumi shaping with fun details like embroidered eyes, horns, ears and painted spots. You'll end up with a slim, 20 cm handmade bookmark that's perfect for gifting or keeping for yourself.

Giraffe Bookmark Amigurumi Pattern crochet pattern - detailed view of completed project

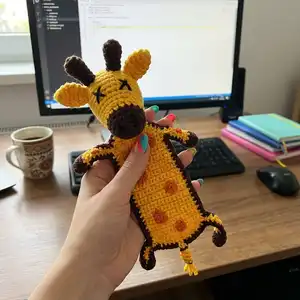
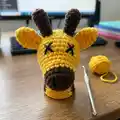
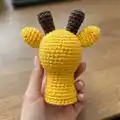
Clear round-by-round instructions guide you through each step, including head shaping, body, legs, ears and horns. The pattern is created for YarnArt Jeans yarn and a 2.5 mm hook for a firm, neat finish.

Why You'll Love This Giraffe Bookmark Amigurumi Pattern

I absolutely love this pattern because it turns a simple crochet motif into a tiny, character-filled bookmark that brings joy when you open a book. I enjoy the playful shaping and color changes that give the giraffe its personality while still being quick and satisfying to make. The project is a wonderful way to use small amounts of yarn and practice joining, colorwork, and finishing skills. I also appreciate how customizable it is—switching colors or adding tiny accessories makes each bookmark unique.

Giraffe Bookmark Amigurumi Pattern step 1 - construction progress Giraffe Bookmark Amigurumi Pattern step 2 - assembly progress Giraffe Bookmark Amigurumi Pattern step 3 - details and accessories Giraffe Bookmark Amigurumi Pattern step 4 - final assembly and finishing

Switch Things Up

I love customizing this pattern by changing the color palette to match seasonal themes; try pastel colors for a spring look or deep autumn shades for a cozy feel.

I sometimes use a thicker yarn and a larger hook to make a chunky, oversized bookmark that doubles as a small plush toy.

If I want a tiny keychain version, I switch to finer yarn and a smaller hook, and I reduce the body length by several rounds.

I often add tiny embroidered spots or beads for extra texture and character on the giraffe's body.

For a safer toy for children, I prefer embroidering the eyes and nose firmly instead of using plastic safety eyes, as the pattern recommends black thread embroidery.

I also experiment with different edge finishes, like slip-stitch borders in contrast colors, to make the silhouette pop against the book pages.

Sometimes I add a small ribbon loop at the top so the bookmark can be hung or attached to a planner or bag.

To make the giraffe more posable, I will insert a short length of thin wire into the legs before stuffing so they can be shaped.

I like to make matching sets by creating several bookmarks with varied spot patterns and gifting them as a bundle.

Embroidering different facial expressions—happy, sleepy, surprised—really personalizes each giraffe and gives them unique personalities.

Common Mistakes & How to Fix Them

✗ Not counting stitches after every round leads to incorrect shaping and mismatched parts; always count your stitches after each round to ensure your piece matches the pattern. ✗ Skipping the color change at the indicated round can leave visible seams or uneven color transitions; change color exactly where noted and carry yarn neatly or weave in ends as you go. ✗ Overstuffing the head or body makes the piece too bulky and can distort shaping; stuff gradually, using small amounts to keep a smooth shape and avoid lumps. ✗ Sewing parts without pinning first can cause misaligned placement of ears or horns; pin pieces in position and check symmetry before sewing securely. ✗ Working with inconsistent tension results in uneven rows and size variations; keep a steady, moderate tension throughout and practice any stitches you find loose or tight before continuing. ✗ Forgetting to embroider the eyes before final assembly can be difficult once parts are attached; embroider facial details early when the head is easy to handle and adjust.

Giraffe Bookmark Amigurumi Pattern

Create a charming giraffe bookmark that slips into your books with a smile. This pattern guides you step-by-step through crocheting a compact, stuffed giraffe using YarnArt Jeans, perfect as a unique gift or personal keepsake. You will enjoy color changes, small shaping details, and simple finishing touches that bring personality to your finished piece.

Intermediate 5-7 Hours

Materials Needed for Giraffe Bookmark Amigurumi Pattern

— Main Fabric

  • 01
    YarnArt Jeans - yellow (main color) - small amount (as required for bookmark)
  • 02
    YarnArt Jeans - brown (contrast color) - small amount for nose, edges and horns
  • 03
    Small amount of black yarn or thread for embroidered eyes and nose
  • 04
    Silicone filler ball (kulka silikonowa) for stuffing head section

— Tools Required

  • 01
    Crochet hook size 2.5 mm
  • 02
    Scissors
  • 03
    Yarn needle for sewing and weaving ends
  • 04
    Black thread or yarn for embroidery
  • 05
    Stitch markers (recommended)
  • 06
    Pins for positioning parts
  • 07
    Small stuffing or silicone filler (kulka silikonowa)

Progress Tracker

0% Complete

— Materiały :

Info :

Włóczka: YarnArt Jeans Szydełko 2,5. Wypełnienie: kulka silikonowa. Wysokość: 20 cm.

— Objaśnienia :

Infos :

MG – magiczne koło ch - oczko sc – półsłupek dc – słupek inc – 2 (pół)słupki w jedno oczko (rozszerzanie) dec – 2 (pół)słupki przerabiane razem (zwężanie) blo – półsłupki w tylną część oczka poprzedniego rzędu

— Mordka :

Round 1 :

6sc w MG (6)

Round 2 :

(inc) – powtórz 6 razy (12)

Round 3 :

(1sc, inc) - powtórz 6 razy (18)

Round 4-5 :

18sc (18) (2 rzędy)

Info :

Zmieniamy kolor na żółty

Round 6-8 :

18sc (18) (2 rzędy)

Round 9 :

(2sc, inc) - powtórz 6 razy (24)

Round 10-16 :

24sc (24) (7 rzędów)

Round 17 :

(2sc, dec) - powtórz 6 razy (18) wypełnić

Round 18 :

(1sc, dec) - powtórz 6 razy (12)

Round 19 :

Składamy głowę na pół, łączymy oba brzegi: 1ch, 6sc (7)

Round 20 :

1ch, inc, 5sc, inc (9)

Round 21 :

1ch, 9sc (9)

Round 22 :

1ch, inc, 7sc, inc (11)

Round 23 :

1ch, 11sc (11)

Round 24 :

1ch, inc, 9sc, inc (13)

Round 25 :

1ch, 13sc (13)

Round 26 :

1ch, inc, 11sc, inc (15)

— Tułów :

Round 27 :

1ch, 15sc (15)

Round 28 :

1ch, 15sc (15)

Info :

Tutaj robimy zakręcone nóżki ;)

Round 29-30 :

15ch, odwracamy, 14sc wzdłuż łańcuszka, 15sc wzdłuż tułowia

Round 31-50 :

1ch, 15sc (15) (20 rzędów)

Info :

Tutaj robimy zakręcone nóżki ;)

Round 51-52 :

15ch, odwracamy, 14sc wzdłuż łańcuszka, 15sc wzdłuż tułowia

Round 53-54 :

1ch, 15sc (15) (2 rzędy)

Round 55 :

1ch, dec, 11sc, dec (13)

Round 56 :

1ch, dec, 9sc, dec (11)

Round 57 :

1ch, dec, 7sc, dec (9)

Round 58 :

1ch, dec, 5sc, dec (7)

Round 59 :

1ch, dec, 3sc, dec (5)

Info :

Tułów razem z nogami obrabiamy półsłupkami brązową nitką.

— Uszy :

Info :

Uszy (x2) Kolor żółty

Round 1 :

4sc w MG (4)

Round 2 :

(inc) – powtórz 4 razy (8)

Round 3-6 :

8sc (8) (4 rzędy)

— Rogi :

Info :

Rogi (x2) Kolor brązowy

Round 1 :

6sc w MG (6)

Round 2 :

(inc) – powtórz 6 razy (12)

Round 3 :

(1sc, inc) - powtórz 6 razy (18)

Round 4-5 :

18sc

Round 6 :

(1sc, dec) - powtórz 6 razy (12)

Round 7 :

(2sc, dec) - powtórz 3 razy (9)

Info :

Krzyżykami wyszywamy oczy i nos - czarną nitką. Na tułowiu malujemy brązową kredką łatki.

Assembly Instructions

  • Składamy głowę na pół i łączymy oba brzegi według wzoru (zrób 1ch, 6sc) aby utworzyć szyję i stabilne zamknięcie, następnie mocno zaszyj krawędzie.
  • Przyszyj uszy po obu stronach głowy, dopasowując do poziomów podanych w wzorze i sprawdzając symetrię za pomocą szpilek przed ostatecznym szyciem.
  • Przymocuj rogi (x2) na czubku głowy, upewniając się, że są skierowane lekko do przodu i dobrze przyszyte dla trwałości.
  • Przyszyj głowę do tułowia na końcu szyi, dopasowując kształt i wypełnienie, tak aby bookmark leżał płasko i dobrze trzymał się w książce.
  • Obrębnij tułów i nogi brązową nitką półsłupkami według wzoru, aby uzyskać kontrastową krawędź i estetyczne wykończenie.
  • Wyhaftuj oczy i nos czarną nitką techniką krzyżyków, a następnie narysuj łatki na tułowiu brązową kredką według preferencji.

Important Notes

  • 💡Zmieniaj kolor tam, gdzie wskazano (np. na rządzie 6) aby zachować czyste przejścia między żółcią a brązem.
  • 💡Używaj szpilek i markerów przed szyciem elementów na stałe, aby sprawdzić symetrię i pozycjonowanie części.
  • 💡Wypełniaj stopniowo i umiarkowanie, aby zachować ładny kształt i uniknąć nadmiernego nabrzmienia.
  • 💡Utrzymuj równomierne napięcie oczek przez cały projekt, szczególnie przy małych częściach jak rogi i uszy.

This sweet giraffe bookmark was designed to bring a smile to every reading moment. It uses small amounts of yarn and simple shaping to create a lovable palm-sized friend. Perfect as a handmade gift or a special treat for your own books. 🧶📚😊

You ask,

we answer.

FAQs

What size will the finished piece be?

The finished bookmark measures approximately 20 cm in height when made with YarnArt Jeans and a 2.5 mm hook, as indicated in the pattern.

Can I use different yarn weights for this pattern?

Yes, you can substitute yarn, but the final size will change; adjust your hook size accordingly and expect differences in detail and firmness.

Do I need prior crochet experience for this pattern?

This pattern is rated intermediate, so some familiarity with amigurumi techniques, increases, decreases, and seams is recommended for best results.

How long does this project typically take to complete?

Most crocheters complete this project in 5-7 hours, though time may vary depending on experience, speed, and how much detailing you add.

Are safety eyes used or embroidered eyes recommended?

The pattern instructs to embroider the eyes and nose with black thread (Krzyżykami wyszywamy oczy i nos - czarną nitką), so no safety eyes are required.