Make a sweet, vintage-inspired baby beanie with clear step-by-step instructions and options for earflaps, motif spacing, and resizing. This pattern includes three motif spacing options and variants (Sweet & Simple, Twice as Nice, Matchy Mummy) so you can customise for every baby. Youll get stitch-by-stitch rounds, special stitch instructions, and resizing tips to make sizes from preemie to toddler.
Progress Tracker
0% Complete
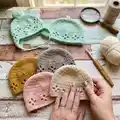
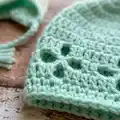
— Vintage Vibes Sweet & Simple Baby Beanie (Images 1 & 2) :
Info :
The Diamond Flower Motifs can be spaced either 3 DCs apart (refer to Image 1) or 2 DCs apart (refer to Image 2) in the middle round. Rounds 9-12 marked with an 'A' will result in the 3 DC spacing; whereas rounds 9-12 marked with a 'B' will result in 2 DC spacing. Please consistently follow either the A or B instructions. Note: the SlSt that finishes each round does not count as a stitch, for stitch count purposes, and as such, this stitch should not be worked into, in the subsequent round.
Round 1 :
Make a circle. Note: Beginning Ch 2 does not count as a stitch. 1. With first colour yarn make a closed circle using either: Magic circle; or 3-4 Ch and then SlSt into first Ch. 2. Ch 2, then DC 11 times into circle. (If using magic circle, now pull taut.) 3. SlSt into first DC (skip 2 Ch) to close circle. (Stitch Count: 11 DC (excluding beginning 2 Ch))
Round 2 :
Double the stitch count. 1. To commence the round, StndSt in first DC from previous round. 2. DC in the same stitch that the StndSt was made. 3. 2 DC in each of the remaining stitches around. 4. SlSt into the StndSt from Step 1. (Stitch Count: 22 DC (2 DCs made in each stitch from Round 1))
Round 3 :
Increase in every second stitch. 1. To commence the round, StndSt in StndSt from previous round. 2. 2 DC in the next stitch. 3. DC in the next stitch. 4. 2 DC in the next stitch. 5. Repeat Steps 3 and 4 nine times. 6. SlSt into the StndSt from Step 1. (Stitch Count: 33 DC)
Round 4 :
Increase in every third stitch. 1. To commence the round, StndSt in StndSt from previous round. 2. DC in the next stitch. 3. 2 DC in the next stitch. 4. DC in each of the next two stitches. 5. 2 DC in the next stitch. 6. Repeat Steps 4 and 5 nine times. 7. SlSt into the StndSt from Step 1. (Stitch Count: 44 DC)
Round 5 :
Increase in every fourth stitch and the second to last stitch. 1. To commence the round, StndSt in StndSt from previous round. 2. DC in each of the next two stitches. 3. 2 DC in the next stitch. 4. DC in each of the next three stitches. 5. 2 DC in the next stitch. 6. Repeat Steps 4 and 5 eight times. 7. DC in each of the next two stitches. 8. 2 DC in each of the next two stitches. 9. SlSt into the StndSt from Step 1. (Stitch Count: 56 DC)
Round 6 :
DC in all stitches around. 1. To commence the round, StndSt in StndSt from previous round. 2. DC in next and each of the remaining stitches around. 3. SlSt into the StndSt from Step 1. (Stitch Count: 56 DC)
Round 7 :
DC in all stitches around. Repeat Round 6. (Stitch Count: 56 DC)
Round 8 :
HDC in all stitches around. 1. To commence the round, HDCStndSt in StndSt from previous round. 2. HDC in next and each of the remaining stitches around. 3. SlSt into the HDCStndSt from Step 1. (Stitch Count: 56 HDC)
Round 9A :
First Round Diamond Flower – 3 DC spacing. 1. To commence the round, StndSt in HDCStndSt from previous round. 2. DC in each of the next three stitches. 3. Ch 3 and skip the next stitch. 4. DC in each of the next seven stitches. 5. Ch 3 and skip next stitch. 6. Repeat steps 4 and 5 five times. 7. DC in each of the next three stitches. 8. SlSt into the StndSt from Step 1. (Stitch Count: 49 DC and 7 Ch 3 Sp)
Round 9B :
First Round Diamond Flower – 2 DC spacing. 1. To commence the round, StndSt in HDCStndSt from previous round. 2. DC in each of the next three stitches. 3. Ch 3 and skip the next stitch. 4. DC in each of the next six stitches. 5. Ch 3 and skip next stitch. 6. Repeat steps 4 and 5 six times. 7. DC in each of the next two stitches. 8. SlSt into the StndSt from Step 1. (Stitch Count: 48 DC and 8 Ch 3 Sp)
Round 10A :
Second Round Diamond Flower – 3 DC spacing. 1. To commence the round, StndSt in StndSt from previous round. 2. DC in next stitch. 3. Ch 3 and skip the next 2 DC stitches and the first Ch (of the next previous round 3 Ch). 4. SlSt in the second (middle) Ch of the previous round 3 Ch. 5. Ch 3 and skip the third Ch of the previous round 3 Ch and the next 2 DC stitches. 6. DC in each of the next three stitches. 7. Ch 3 and skip the next 2 DC stitches and the first Ch (of the next previous round 3 Ch). 8. SlSt in the second (middle) Ch of the next previous round 3 Ch. 9. Ch 3 and skip the third Ch of the previous round 3 Ch and the next 2 DC stitches. 10. Repeat steps 6 to 9 five times. 11. DC in next (last) stitch. 12. SlSt into the StndSt from Step 1. (Stitch Count: 21 DC and 7 [Ch 3 Sp, SlSt, Ch 3 Sp])
Round 10B :
Second Round Diamond Flower – 2 DC spacing. 1. To commence the round, StndSt in StndSt from previous round. 2. DC in next stitch. 3. Ch 3 and skip the next 2 DC stitches and the first Ch (of the next previous round 3 Ch). 4. SlSt in the second (middle) Ch of the previous round 3 Ch. 5. Ch 3 and skip the third Ch of the previous round 3 Ch and the next 2 DC stitches. 6. DC in each of the next three stitches. 7. Ch 3 and skip the next 2 DC stitches and the first Ch (of the next previous round 3 Ch). 8. SlSt in the second (middle) Ch of the next previous round 3 Ch. 9. Ch 3 and skip the third Ch of the previous round 3 Ch and the next 2 DC stitches. 10. Repeat steps 6 to 9 five times. 11. DC in next (last) stitch. 12. SlSt into the StndSt from Step 1. (Stitch Count: 21 DC and 7 [Ch 3 Sp, SlSt, Ch 3 Sp])
Round 11A :
Third Round Diamond Flower – 3 DC spacing. 1. To commence the round, StndSt in StndSt from previous round. 2. DC in next DC. 3. DC in each of next two Ch stitches. 4. Ch 1 and skip all of: Ch, SlSt and Ch. 5. DC in each of next two Ch stitches. 6. DC in each of the next three DC stitches. 7. DC in each of next two Ch stitches. 8. Ch 1 and skip all of: Ch, SlSt and Ch. 9. DC in each of next two Ch stitches. 10. Repeat steps 6 to 9 five times. 11. DC in next (last) stitch. 12. SlSt into the StndSt from Step 1. (Stitch Count: 49 DC and 7 Ch 1 Sp)
Round 11B :
Third Round Diamond Flower – 2 DC spacing. 1. To commence the round, StndSt in StndSt from previous round. 2. DC in next DC. 3. DC in each of next two Ch stitches. 4. Ch 1 and skip all of: Ch, SlSt and Ch. 5. DC in each of next two Ch stitches. 6. DC in each of the next two DC stitches. 7. DC in each of next two Ch stitches. 8. Ch 1 and skip all of: Ch, SlSt and Ch. 9. DC in each of next two Ch stitches. 10. Repeat steps 6 to 9 six times. 11. SlSt into the StndSt from Step 1. (Stitch Count: 48 DC and 8 Ch 1 Sp)
Round 12A :
HDC in all stitches around – 3 DC spacing. 1. To commence the round, HDCStndSt in StndSt from previous round. 2. HDC in each of the next 3 DCs. 3. HDC over Ch Sp. 4. HDC in each of next 6 DCs. 5. HDC over Ch Sp. 6. Repeat Steps 4 and 5 five times. 7. HDC in each of the last 3 DCs. 8. SlSt into the HDCStndSt from Step 1. (Stitch Count: 56 HDC)
Round 12B :
HDC in all stitches around – 2 DC spacing. 1. To commence the round, HDCStndSt in StndSt from previous round. 2. HDC in each of the next 3 DCs. 3. HDC over Ch Sp. 4. HDC in each of next 6 DCs. 5. HDC over Ch Sp. 6. Repeat Steps 4 and 5 six times. 7. HDC in each of the last 2 DCs. 8. SlSt into the HDCStndSt from Step 1. (Stitch Count: 56 HDC)
SLSt Finishing Round (Optional) :
SlSt in every stitch around. (Careful to maintain same tension as previous HDC round.) Or, if you prefer, work a round of Crab Stitch or Spin Stitch.
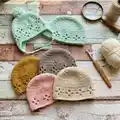
— Vintage Vibes Twice as Nice Baby Beanie (Image 3) :
Info :
Work the first four rounds as per Simple and Sweet pattern. Substitute the Simple and Sweet pattern rounds 5 onwards, with the rounds detailed below. Note: the SlSt that finishes each round does not count as a stitch, for stitch count purposes, and as such, this stitch should not be worked into, in the subsequent round.
Round 5 :
Increase in every fourth stitch and the second to last stitch. 1. To commence the round, HDCStndSt in StndSt from previous round. 2. HDC in each of the next two stitches. 3. 2 HDC in the next stitch. 4. HDC in each of the next three stitches. 5. 2 HDC in the next stitch. 6. Repeat Steps 4 and 5 eight times. 7. HDC in each of the next two stitches. 8. 2 HDC in each of the next two stitches. 9. SlSt into the HDCStndSt from Step 1. (Stitch Count: 56 HDC)
Round 6 :
First Round Diamond Flower. 1. To commence the round, StndSt in HDCStndSt from previous round. 2. DC in each of the next three stitches. 3. Ch 3 and skip the next stitch. 4. DC in each of the next seven stitches. 5. Ch 3 and skip next stitch. 6. Repeat steps 4 and 5 five times. 7. DC in each of the next three stitches. 8. SlSt into the StndSt from Step 1. (Stitch Count: 49 DC and 7 Ch 3 Sp)
Round 7 :
Second Round Diamond Flower. 1. To commence the round, StndSt in StndSt from previous round. 2. DC in next stitch. 3. Ch 3 and skip the next 2 DC stitches and the first Ch (of the next previous round 3 Ch). 4. SlSt in the second (middle) Ch of the previous round 3 Ch. 5. Ch 3 and skip the third Ch of the previous round 3 Ch and the next 2 DC stitches. 6. Repeat steps 4 and 5 five times. 7. DC in each of the next two stitches. 8. SlSt into the StndSt from Step 1. (Stitch Count: 21 DC and 7 [Ch 3 Sp, SlSt, Ch 3 Sp])
Round 8 :
Third Round Diamond Flower. 1. To commence the round, StndSt in StndSt from previous round. 2. DC in next DC. 3. DC in each of next two Ch stitches. 4. Ch 1 and skip all of: Ch, SlSt and Ch. 5. DC in each of next two Ch stitches. 6. DC in each of the next three DC stitches. 7. DC in each of next two Ch stitches. 8. Ch 1 and skip all of: Ch, SlSt and Ch. 9. DC in each of next two Ch stitches. 10. Repeat steps 6 to 9 five times. 11. DC in next (last) stitch. 12. SlSt into the StndSt from Step 1. (Stitch Count: 49 DC and 7 Ch 1 Sp)
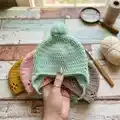
— Vintage Vibes Matchy Mummy Baby Beanie (Image 4) :
Info :
This beanie matches in design with the adult Vintage Vibes Beanie ('Basic Beanie Pattern' variant). The instructions below provide spacing for 3 DCs apart; if preferred, the motifs can be spaced 2 DCs apart (as per Sweet & Simple pattern). Note: the SlSt that finishes each round does not count as a stitch, for stitch count purposes, and as such, this stitch should not be worked into, in the subsequent round.
Round 1 :
Make a circle. Note: Beginning Ch 2 does not count as a stitch. 1. With first colour yarn make a closed circle using either: Magic circle; or 3-4 Ch and then SlSt into first Ch. 2. Ch 2, then DC 11 times into circle. (If using magic circle, now pull taut.) 3. SlSt into first DC (skip 2 Ch) to close circle. (Stitch Count: 11 DC (excluding beginning 2 Ch))
Round 2 :
Double the stitch count. 1. To commence the round, StndSt in first DC from previous round. 2. DC in the same stitch that the StndSt was made. 3. 2 DC in each of the remaining stitches around. 4. SlSt into the StndSt from Step 1. (Stitch Count: 22 DC (2 DCs made in each stitch from Round 1))
Round 3 :
Increase in every second stitch. 1. To commence the round, StndSt in StndSt from previous round. 2. 2 DC in the next stitch. 3. DC in the next stitch. 4. 2 DC in the next stitch. 5. Repeat Steps 3 and 4 nine times. 6. SlSt into the StndSt from Step 1. (Stitch Count: 33 DC)
Round 4 :
Increase in every third stitch. 1. To commence the round, StndSt in StndSt from previous round. 2. DC in the next stitch. 3. 2 DC in the next stitch. 4. DC in each of the next two stitches. 5. 2 DC in the next stitch. 6. Repeat Steps 4 and 5 nine times. 7. SlSt into the StndSt from Step 1. (Stitch Count: 44 DC)
Round 5 :
Increase in every fourth stitch and the second to last stitch. 1. To commence the round, StndSt in StndSt from previous round. 2. DC in each of the next two stitches. 3. 2 DC in the next stitch. 4. DC in each of the next three stitches. 5. 2 DC in the next stitch. 6. Repeat Steps 4 and 5 eight times. 7. DC in each of the next two stitches. 8. 2 DC in each of the next two stitches. 9. SlSt into the StndSt from Step 1. (Stitch Count: 56 DC)
Round 6 :
Ch 1 Sp for every other stitch. 1. To commence the round, StndSt in StndSt from previous round. 2. Ch 1 and skip the next stitch. 3. DC in the next stitch. 4. Ch 1 and skip the next stitch. 5. Repeat Steps 3 and 4, 26 times. 6. SlSt into the StndSt from Step 1. (Stitch Count: 28 DC and 28 Ch 1 Sp)
Round 7 :
HDC in all stitches around. 1. To commence the round, HDCStndSt in StndSt from previous round. 2. HDC over next Ch Sp. 3. HDC in next DC. 4. HDC over next Ch Sp. 5. Repeat Steps 3 and 4, 26 times. 6. SlSt into the HDCStndSt from Step 1. (Stitch Count: 56 HDC)
Round 8 :
First Round Diamond Flower. 1. To commence the round, StndSt in HDCStndSt from previous round. 2. DC in each of the next three stitches. 3. Ch 3 and skip the next stitch. 4. DC in each of the next seven stitches. 5. Ch 3 and skip next stitch. 6. Repeat steps 4 and 5 five times. 7. DC in each of the next three stitches. 8. SlSt into the StndSt from Step 1. (Stitch Count: 49 DC and 7 Ch 3 Sp)
Round 9 :
First Round Diamond Flower Offset. 1. To commence the round, SlSt in next stitch and then StndSt in the same stitch the SlSt was worked. 2. DC in each of the next six stitches. 3. Ch 3 and skip the next stitch. 4. DC in each of the next seven stitches. 5. Ch 3 and skip next stitch. 6. Repeat steps 4 and 5 five times. 7. SlSt into the StndSt from Step 1. (Stitch Count: 49 DC and 7 Ch 3 Sp)
Round 10 :
Second Round Diamond Flower Offset. 1. To commence the round, SlSt in the next two stitches and then StndSt in the same stitch the second SlSt was worked. 2. DC in the next two stitches. (Additional offset steps follow same principle as second round diamond flower instructions in main pattern.)
— Adding Earflaps - brief instructions (Images 5 & 6) :
Info :
Place stitch markers 11 stitches apart in a position as per earflaps shown in Image 6. Make two earflaps as follows. Earflap placement is approx 11 stitches apart; make two and mirror them on each side of the beanie.
Smaller solid earflap (Image 5A) :
Row 1: Commence earflap with an HDCStndSt in the first stitch, and then work a HDC in each of the following 10 stitches. (11 stitches) Row 2: Ch 1, turn work, 2HDCTog over the first two HDCs (reduction stitch), HDC in each subsequent stitch until reaching the last two stitches, and then 2HDCTog over the last two HDCs (reduction stitch). (9 stitches, excluding the Ch 1 and including the two reduction stitches at the beginning and end of row) Rows 3-5: Repeat Step 2, three times. A triangle should be forming, with each row reducing by two stitches. (3 stitches should remain at the end of Row 5, excluding 1 Ch) Row 6: Ch 1, turn work, and then 3HDCTog over the 3 DCs from the previous row. Row 7: Ch1, turn work, and then SC in 3HDCTog from the previous row. Earflap Chain: Turn work, and then work multiple HDCStndSts, to make a chunky chain that is the length of your preference. Chunky knot the chain, or if you prefer, first make a tassel before knotting the chain.
Larger motif earflap (Image 5B) :
Row 1: Commence earflap with a StndSt in the first stitch, work a DC in each of the following 4 stitches, Ch 3 and skip a stitch, and then work a DC in each of the following 5 stitches. (10 DC and a Ch 3 Sp) Row 2: Ch 2, turn work, 2DCTog over the first two DCs (reduction stitch), DC in next stitch, Ch 3 and SlSt into middle Ch stitch of the previous round Ch 3, Ch 3 and then DC into third to last stitch, 2DCTog over the last two stitches (reduction stitch). (4 DC and a Ch 3 Sp – SlSt – Ch 3 Sp sequence) Row 3: Ch 2, turn work, 2DCTog over the first two DCs (reduction stitch), DC in each of the first two Ch stitches, Ch 1 and (skipping Ch, SlSt, Ch) DC in the last two Ch stitches, and then 2DCTog over the last two DCs (reduction stitch). (6 DC and a Ch 1 Sp) Row 4: Ch 2, turn work, 2DCTog over the first two DCs (reduction stitch), DC in each subsequent stitch until reaching the two last stitches, and then 2DCTog over the last two stitches (reduction stitch). (5 DC) Row 5: Ch 1, turn work, 2HDCTog over the first two stitches (reduction stitch), HDC in next stitch, and then 2HDCTog over the last two stitches (reduction stitch). (3 HDC) Row 6: Ch 1, turn work, and then 3HDCTog over the 3 DCs from the previous row. Row 7: Ch1, turn work, and then SC in 3HDCTog from the previous row. Earflap Chain: as per Smaller Solid Earflap.
— Basic Resizing Tips :
Infos :
For an easy and minor resize, adjust one of yarn ply/hook size/tension, and then work a 3 round swatch. You can approximately estimate the finished circumference by using the formula: (Pattern Gauge Circumference/Pattern Gauge 3rd Round Diameter) * Your 3rd Round Diameter (n). Changing to 4-5ply will result in smaller beanie; changing to 10ply/Worsted weight will result in larger beanie. Substitute HDC for DC for additional length if needed.
Info :
Approximate required beanie circumference for resizing (baby): NB 33-35.5 cm (13-14 in), 3-6 months 40-43 cm (15.5-17 in), 6-9 months 43-44 cm (17.5-18 in). Follow chain and rounding guidance to adjust final stitch counts.
— BONUS: Vintage Vibes Itty Bitty Baby Beanie (Image 7) :
Info :
Applying a gauge with 8ply/DK weight yarn as per Pattern Details will result in a beanie that is ~28.5cm/~11.2' in circumference and ~9.5cm/~3.7' in height (mid-term preemie size). Use a thinner yarn or go down a hook size to make smaller preemie sizes. Note: the SlSt that finishes each round does not count as a stitch for stitch counts.
Round 1 :
Make a circle. Note: Beginning Ch 2 does not count as a stitch. 1. With first colour yarn make a closed circle using either: Magic circle; or 3-4 Ch and then SlSt into first Ch. 2. Ch 2, then DC 12 times into circle. (If using magic circle, now pull taut.) 3. SlSt into first DC (skip 2 Ch) to close circle. (Stitch Count: 12 DC (excluding beginning 2 Ch))
Round 2 :
Double the stitch count. 1. To commence the round, StndSt in first DC from previous round. 2. DC in the same stitch that the StndSt was made. 3. 2 DC in each of the remaining stitches around. 4. SlSt into the StndSt from Step 1. (Stitch Count: 24 DC (2 DCs made in each stitch from Round 1))
Round 3 :
Increase in every second stitch. 1. To commence the round, StndSt in previous round StndSt. 2. 2 DC in the next stitch. 3. DC in the next stitch. 4. 2 DC in the next stitch. 5. Repeat Steps 3 and 4 ten times. 6. SlSt into the StndSt from Step 1. (Stitch Count: 36 DC)
Round 4 :
Increase in every third stitch. 1. To commence the round, StndSt in previous round StndSt. 2. DC in the next stitch. 3. 2 DC in the next stitch. 4. DC in each of the next two stitches. 5. 2 DC in the next stitch. 6. Repeat Steps 4 and 5 ten times. 7. SlSt into the StndSt from Step 1. (Stitch Count: 48 DC)
Round 5 :
Ch 1 Sp for every other stitch. 1. To commence the round, StndSt in previous round StndSt. 2. Ch 1 and skip the next stitch. 3. DC in the next stitch. 4. Ch 1 and skip the next stitch. 5. Repeat Steps 3 and 4, 22 times. 6. SlSt into the StndSt from Step 1. (Stitch Count: 24 DC and 24 Ch 1 Sp)
Round 6 :
HDC in all stitches around. 1. To commence the round, HDCStndSt in previous round StndSt. 2. HDC over next Ch Sp. 3. HDC in next DC. 4. HDC over next Ch Sp. 5. Repeat Steps 3 and 4, 22 times. 6. SlSt into the HDCStndSt from Step 1. (Stitch Count: 48 HDC)
Round 7 :
First Round Diamond Flower. 1. To commence the round, StndSt in previous round HDCStndSt. 2. DC in each of the next two stitches. 3. Ch 3 and skip the next stitch. 4. DC in each of the next five stitches. 5. Ch 3 and skip next stitch. 6. Repeat steps 4 and 5 six times. 7. DC in each of the next two stitches. 8. SlSt into the StndSt from Step 1. (Stitch Count: 40 DC and 8 Ch 3 Sp)
Round 8 :
Second Round Diamond Flower. 1. To commence the round, HDCStndSt and DC in previous round StndSt (counts as first 2DCTogCl). 2. Ch 3 and skip the next 2 DC stitches and the first Ch (of the next previous round 3 Ch). 3. SlSt in the second (middle) Ch of the previous round 3 Ch. 4. 2DCTogCl in the next stitch. 5. Ch 3 and skip the next 2 DC stitches and the first Ch (of the next previous round 3 Ch). 6. SlSt in the second (middle) Ch of the next previous round 3 Ch. 7. Ch 3 and skip the third Ch of the previous round 3 Ch and the next 2 DC stitches. 8. Repeat steps 5 to 8 six times. 9. SlSt into the DC from Step 1 (i.e. skip HDCStndSt). (Stitch Count: 8 2DCTogCl and 8 [Ch 3 Sp, SlSt, Ch 3 Sp])
Round 9 :
Third Round Diamond Flower. 1. To commence the round, StndSt in first DC from previous round. 2. DC in each of next two Ch stitches. 3. Ch 1 and skip all of: Ch, SlSt and Ch. 4. DC in each of next two Ch stitches. 5. DC in the next 2DCTogCl stitch. 6. DC in each of next two Ch stitches. 7. Ch 1 and skip all of: Ch, SlSt and Ch. 8. DC in each of next two Ch stitches. 9. Repeat steps 5 to 8 six times. 10. SlSt into the StndSt from Step 1. (Stitch Count: 40 DC and 8 Ch 1 Sp)
Round 10 :
HDC in all stitches around. 1. To commence the round, HDCStndSt in previous round StndSt. 2. HDC in each of the next 2 DCs. 3. HDC over Ch Sp. 4. HDC in each of next 5 DCs. 5. HDC over Ch Sp. 6. Repeat Steps 4 and 5 six times. 7. HDC in each of the last 2 DCs. 8. SlSt into the HDCStndSt from Step 1. (Stitch Count: 48 HDC)
SLSt Finishing Round (Optional) :
SlSt in every stitch around. (Careful to maintain same tension as previous DC round.)
— BONUS: Vintage Vibes Titchy Baby Beanie :
Info :
Brief instructions for smaller preemie beanies in 8ply/DK weight yarn and soft 10 ply for mid to late term preemie beanies. Gauge as previous. Use rounds and reductions as described for smaller circumferences. Substitute Single Crochet (SC) stitches for HDC in rounds 5 and 9 if a shorter length is required.
Round 1 :
As per Itty Bitty pattern Round 1 instructions. (Stitch Count: 12 DC after Round 1 for Itty Bitty/Titchy variants)
Round 2 :
As per Itty Bitty pattern Round 2 instructions (Double the stitch count). (Stitch Count: 24 DC)
Round 3 :
As per Itty Bitty pattern Round 3 instructions (Increase in every second stitch). (Stitch Count: 36 DC)
Round 4 :
As per Itty Bitty pattern Round 4 instructions (Increase in every third stitch). (Stitch Count: 48 DC)
Round 5 :
Ch 1 Sp for every other stitch. (Stitch Count and spacing as per Itty Bitty instructions for smaller variants). (Stitch Count: 24 DC and 24 Ch 1 Sp)
This Vintage Vibes Baby Beanie pattern is perfect for gifting, matching family sets, and adding sweet vintage charm to newborn wardrobes. Whether you make the Sweet & Simple version, Twice as Nice, or Matchy Mummy, each beanie finishes with a crisp diamond flower motif and neat finishing options. Enjoy making every stitch count and sharing handmade warmth with little ones. 🧶✨