🧢 Beautiful ✨ Detailed πŸ’ Adorable

EZ Criss-Cross Baby Blanket Pattern

EZ Criss-Cross Baby Blanket Pattern
4.8β˜… Rating
5-7 Hours Time Needed
2.4K Made This
βœ‚οΈ

Beginner Friendly Level

Perfect for those just starting their crochet journey, with clear instructions and simple techniques

⏱️

Weekend Treat

Takes 5-7 hours, making it an enjoyable project to finish over a couple of days.

πŸ€—

Soft Hug

Gentle, plush, and full of warmth, creating a sense of comfort and coziness wherever they find a home.

About This EZ Criss-Cross Baby Blanket Pattern

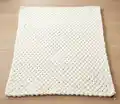
This pattern creates a plush 32" x 40" baby blanket using Bernat Alize Blanket-EZ loop yarn and a simple criss-cross loop technique. The design produces a woven, textured surface without traditional crochet hooks or complex stitches. It is perfect for quick handmade gifts and cozy nursery accessories.

EZ Criss-Cross Baby Blanket Pattern crochet pattern - detailed view of completed project

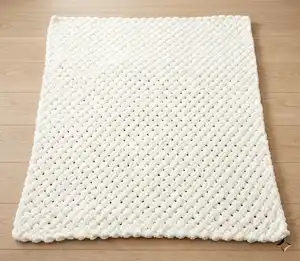
The instructions walk you through counting foundation loops and working three-row repeats to build the criss-cross texture. Finish by binding off and weaving in ends for a neat edge.

Why You'll Love This EZ Criss-Cross Baby Blanket Pattern

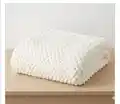
I absolutely love this pattern because it transforms simple loop yarn into a luxurious, textured blanket with very little effort. The criss-cross technique creates a beautiful woven surface that looks much more complex than it is, which always surprises my friends and family. I love that the blanket works up quickly and is a satisfying project to make over a weekend. The finished piece is incredibly soft and cuddly, perfect for babies or cozying on the couch.

EZ Criss-Cross Baby Blanket Pattern step 1 - construction progress EZ Criss-Cross Baby Blanket Pattern step 2 - assembly progress EZ Criss-Cross Baby Blanket Pattern step 3 - details and accessories EZ Criss-Cross Baby Blanket Pattern step 4 - final assembly and finishing

Switch Things Up

I love to customize this blanket by changing the yarn color to create stripes or blocks of color for a personalized look.

I often make a larger version by adding more foundation loops and repeating the same 2nd and 3rd rows until the desired width is reached.

If you want a smaller lovey or security blanket, use fewer foundation loops and stop when the blanket is a comfortable size for a baby to hold.

I sometimes add a simple crocheted border using a contrasting color to frame the criss-cross texture and give a polished finish.

For a gender-neutral gift, try soft pastels or muted earth tones instead of bright baby colors; it creates a timeless piece.

I also experiment with mixing one ball of a variegated loop yarn with a solid to add subtle color variation without changing the stitch pattern.

If you prefer a firmer texture, lightly block the blanket after weaving in ends to even out the stitches and flatten the crossings.

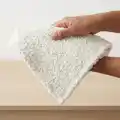
I recommend practicing the crossing motion on a small swatch first to get consistent tension before working the full blanket.

For extra durability, weave in ends using a yarn needle with multiple passes so the finished blanket stands up to frequent washing and use.

Finally, I enjoy gifting these blankets with a matching hand-tied yarn tag or small crocheted toy to make the present extra special.

Common Mistakes & How to Fix Them

βœ— Not counting exactly 50 loops for the foundation row will throw off the stitch pattern; recount and ensure 50 loops are placed before starting the first row. βœ— Turning the work when the pattern instructs 'Do not turn work' will reverse the crossing direction and ruin the criss-cross texture; keep the right side facing and do not turn between rows. βœ— Allowing the working yarn to move in front of the stitches instead of holding it behind will change loop direction and appearance; always keep the working yarn behind stitches as instructed. βœ— Leaving inconsistent tension will create uneven crossings and gaps; maintain steady tension and practice the crossing motion to achieve consistent loops throughout the blanket. βœ— Forgetting to leave last stitch unworked on the 2nd row will shift the repeat and edge look; follow the instruction to leave the last stitch unworked on each 2nd row.

EZ Criss-Cross Baby Blanket Pattern

Make a cozy, textured baby blanket using Bernat Alize Blanket-EZ yarn with an easy criss-cross loop technique. This pattern guides you step-by-step through creating a plush 32" x 40" blanket that is soft, quick to work up, and perfect for gifting. You will enjoy the simple repeating rows and the dramatic woven look without complicated stitches. Ideal for makers who love tactile, chunky blankets.

Beginner Friendly 5-7 Hours

Materials Needed for EZ Criss-Cross Baby Blanket Pattern

β€” Main Fabric

  • 01
    Bernat Alize Blanket-EZ (6.4 oz / 180 g; 18 yds / 16 m) Cream (37013) - 4 balls (as specified for approx. 32" x 40" blanket)

β€” Tools Required

  • 01
    Scissors
  • 02
    Yarn needle for tying and weaving in ends
  • 03
    Measuring tape to check blanket dimensions
  • 04
    Optional: stitch marker or safety pin to mark foundation loops

Progress Tracker

0% Complete

β€” Measurements :

Info :

Approximately 32" x 40" [81.5 x 101.5 cm]

β€” Materials :

Info :

Bernat Alize Blanket-EZ (6.4 oz/180 g; 18 yds/16 m) Cream (37013) 4 balls

β€” Instructions :

Infos :

Notes: Right side of work is facing at all times. 'Working yarn' is held behind stitches throughout. Loops from working yarn are always pulled through stitches from back to front of work.

Info :

Count 50 loops for foundation row, noting yarn end is at far left and all loops are facing upwards.

Round 1 :

1st row: Working from right to left, cross 50th loop in front of 49th loop. Pull next loop from working yarn up from behind through 49th loop. Pull next loop from working yarn up from behind 50th loop. *Cross next loop of foundation row in front of 2nd loop of foundation row. Holding crossed loops in position, pull next loop from working yarn up from behind through next loop. Pull next loop from working yarn up from behind through next loop. Repeat from * to end of row. Do not turn work. 50 stitches in row.

Round 2 :

2nd row: Working from left to right, skip first stitch of row just worked. Cross 2nd stitch in front of 3rd stitch. Holding crossed stitches in position, pull loop from working yarn up from behind through 3rd stitch. Pull next loop from working yarn up from behind 2nd stitch. *Cross next 2 stitches. Holding crossed stitches in position, pull next loop from working yarn up from behind through next stitch. Pull next loop from working yarn up from behind through next stitch. Repeat from * to end of row. Leave last stitch unworked. Do not turn work.

Round 3 :

3rd row: Working from right to left, cross unworked stitch in front of 2nd stitch. Holding crossed stitches in position, pull next loop from working yarn up from behind through 2nd stitch. Pull next loop from working yarn up from behind through first stitch. *Cross next 2 stitches. Holding crossed stitches in position, pull next loop from working yarn up from behind through next stitch. Pull next loop from working yarn up from behind through next stitch. Repeat from * to end of row. Do not turn work.

Info :

Repeat 2nd and 3rd rows until Blanket measures approximately 40" [101.5 cm], ending on a 2nd row.

Round 4 :

Bind off row: Working in same direction as last row, pull 2nd stitch through 1st stitch. Pull 3rd stitch through 2nd stitch. Pull 4th stitch through 3rd stitch. Continue in this manner to end of row. Cut thread at base of loop (thread used to create the loop) to create a yarn 'tail'. Tie to secure and weave in ends.

Assembly Instructions

  • Tie the yarn tail securely after cutting the thread at the base of the loop used to create the final loop, then weave in ends with a yarn needle.
  • When counting and placing your foundation loops, ensure all 50 loops face upward and the yarn end is at the far left to begin Row 1 correctly.
  • Keep the right side of work facing at all times and hold the working yarn behind the stitches throughout to maintain consistent loop direction.
  • After binding off, smooth and shape the blanket to the correct dimensions (approximately 32" x 40") and check that the last row matches the pattern edge before final weaving.

Important Notes

  • πŸ’‘Right side of work should always be facing you; do not turn work between rows as instructed.
  • πŸ’‘Hold the working yarn behind stitches throughout and pull loops from back to front to preserve the criss-cross texture.
  • πŸ’‘Count and place exactly 50 foundation loops; incorrect loop counts will affect the overall pattern repeat.
  • πŸ’‘Leave last stitch unworked on every 2nd row as instructed to maintain correct crossing and edge shape.
  • πŸ’‘Cut the thread at the base of the final loop to create a tail, tie to secure, and weave in ends neatly.

This EZ Criss-Cross Baby Blanket is an easy, cozy project that creates a beautiful woven texture with loop yarn. It works up quickly into a plush 32" x 40" throw that makes a perfect baby gift or lap blanket. Enjoy the soft feel and satisfying criss-cross pattern as you craft! 🧢✨

You ask,

we answer.

FAQs

What size will the finished piece be?

The finished blanket measures approximately 32" x 40" [81.5 x 101.5 cm] when made with the recommended yarn and following the pattern.

Can I change the size of the blanket?

Yes, you can adjust the size by increasing or decreasing the number of foundation loops; maintain the loop count multiple that works with the crossing repeats and make sure to keep an even edge.

Do I need a crochet hook to make this blanket?

This pattern uses loop-style yarn techniques where loops are pulled and crossed; no traditional crochet hook is requiredβ€”just use the loops and working yarn as instructed.

How long will the project take to complete?

Most crocheters finish this blanket in 5-7 hours, depending on experience and pace; it makes a great weekend project.