🧢 Beautiful ✨ Detailed πŸ’ Adorable

Christmas Pudding Amigurumi Pattern

Christmas Pudding Amigurumi Pattern
3.9β˜… Rating
2-3 Hours Time Needed
2.9K Made This
βœ‚οΈ

Intermediate Level

Ideal for those with basic crochet experience, featuring slightly more advanced stitches and techniques to expand your skills.

⏱️

Bite-Sized Project

Finishes in 2-4 hoursβ€”perfect for an afternoon of creative relaxation.

🧸

Cute Companion

An adorable friend to cherish, handcrafted with love to bring comfort and joy for years to come.

About This Christmas Pudding Amigurumi Pattern

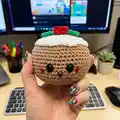
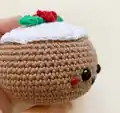
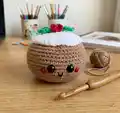
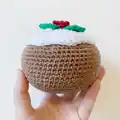
This pattern creates a small, charming Christmas Pudding amigurumi with icing, holly leaves and tiny red berries. It uses simple amigurumi shaping techniques and small embellishments for personality. The finished pudding measures about 12cm across and is perfect as a gift or holiday decoration.

Christmas Pudding Amigurumi Pattern crochet pattern - detailed view of completed project

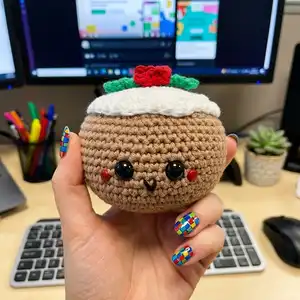
Clear round-by-round instructions and placement notes are included for easy assembly. Small materials and quick construction make this a delightful, fast holiday project.

Why You'll Love This Christmas Pudding Amigurumi Pattern

I absolutely love this pattern because it captures holiday cheer in a tiny, cuddly form that is quick to make. I enjoyed designing the little icing and holly details β€” they give the piece so much personality. The pattern is compact but full of character, perfect for gift-making or stocking stuffers. I find it relaxing to work through the rounds and finish with tiny facial details that really bring the pudding to life.

Christmas Pudding Amigurumi Pattern step 1 - construction progress Christmas Pudding Amigurumi Pattern step 2 - assembly progress Christmas Pudding Amigurumi Pattern step 3 - details and accessories Christmas Pudding Amigurumi Pattern step 4 - final assembly and finishing

Switch Things Up

I love swapping colors to create different holiday themes; try a gingerbread brown body with white icing or even pastel hues for a sweeter look.

You can make this pattern larger or smaller by changing yarn weight and hook size; bulky yarn with a larger hook creates a chunky pudding, while fine yarn makes a mini version.

I sometimes replace safety eyes with embroidered eyes for a fully handmade and child-safe toy β€” try simple French knots or tiny sewn circles instead.

For a festive touch, add metallic or sparkly yarn accents to the leaves or icing edges to make your pudding shimmer.

Consider adding a small hanging loop at the top of the icing to turn the pudding into a Christmas tree ornament or gift tag charm.

I like to create sets of puddings in different sizes and cluster them as festive table decorations or package toppers.

Try embroidering different expressions or blush placement to change the personality of each pudding β€” a winky eye or surprised 'o' mouth is delightful.

If you want posability, insert a short piece of wire in the body base or between layers for a subtle bendable effect, sealed inside with stuffing and stitches.

Swap the brad berries for tiny crocheted beads or French knot berries for a softer, safer finish suitable for small children.

I often make matching accessories like tiny crocheted spoons or mini plates to display the pudding as part of a holiday scene.

Common Mistakes & How to Fix Them

βœ— Skipping the placement note for the eyes can make the face look off-center; place safety eyes between rounds 14-15 and count stitches carefully before securing. βœ— Not stuffing as you go will make shaping difficult and cause gaps at decreases; stuff semi-firmly during the shaping rounds to maintain an even, rounded form. βœ— Forgetting to weave in ends before final assembly leaves messy tails; weave in or trim ends as you go to keep finishing neat and tidy. βœ— Using a much larger or smaller hook without adjusting yarn weight will change the final measurements significantly; match hook size and yarn or adjust for desired finished size.

Christmas Pudding Amigurumi Pattern

Short and sweet, this Christmas Pudding amigurumi is adorable and quick to make. You will love the playful details like the icing, holly leaves, and tiny berries that give it festive charm. The pattern is written with clear rounds and helpful placement notes so you can crochet a cute holiday gift in no time.

Intermediate 2-3 Hours

Materials Needed for Christmas Pudding Amigurumi Pattern

β€” Main Fabric

  • 01
    Paintbox Yarns One Ball Paper White (for icing) - 1 ball
  • 02
    Paintbox Yarns One Ball Grass Green (for leaves) - 1 ball
  • 03
    Paintbox Yarns One Ball Pillar Red (for berries) - 1 ball
  • 04
    Paintbox Yarns One Ball Soft Fudge (for body) - 1 ball
  • 05
    Small amounts of contrast yarn for facial details
  • 06
    Polyester stuffing - small amount for stuffing body

β€” Tools Required

  • 01
    Crochet hook size 3.25mm
  • 02
    Amigurumi eyes 9mm (2 pieces)
  • 03
    Red brads 5mm (2 pieces)
  • 04
    Tapestry needle
  • 05
    Glue
  • 06
    Stuffing

Progress Tracker

0% Complete

β€” Notes :

Info :

Christmas Pudding measures about 12cm across

β€” Body :

Round 1 :

MR 6 (6)

Round 2 :

inc around (12)

Round 3 :

(sc, inc) x 6 (18)

Round 4 :

(sc 2, inc) x 6 (24)

Round 5 :

(sc 3, inc) x 6 (30)

Round 6 :

(sc 4, inc) x 6 (36)

Round 7 :

(sc 5, inc) x 6 (42)

Round 8 :

(sc 6, inc) x 6 (48)

Round 9 :

(sc 7, inc) x 6 (52)

Round 10 :

(sc 8, inc) x 6 (60)

Round 11-20 :

sc around (10 rounds)

Info :

Embroider a smile on R13, add eyes between R14-15, 3-4 stitches above smile. Add red brads between R13-14 next to eyes. Secure with glue.

Round 21 :

(sc 8, dec) x 6 (54)

Round 22 :

(sc 7, dec) x 6 (52)

Round 23 :

(sc 6, dec) x 6 (48)

Round 24 :

(sc 5, dec) x 6 (42)

Round 25 :

(sc 4, dec) x 6 (36)

Info :

Stuff semi firmly as you go

Round 26 :

(sc 3, dec) x 6 (30)

Round 27 :

(sc 2, dec) x 6 (24)

Round 28 :

(sc, dec) x 6 (18)

Round 29 :

dec around (6)

Info :

FO. Weave in all ends.

Info :

Squish the body by pressing the top and bottom so it is more of a tall pancake shape.

β€” Leaves [Make three or more] :

Info :

Using Green Yarn: ch 7, sl st in 2nd ch from hook through bb, (sl st through bb, ch 2, sl st in same bb), sl st in next 2 back bumps, ch 3, sl st in same bb, sl st in next bb, 3 sl st in next bb.

Info :

working on other side of the ch: sl st in next 2 st, ch 3, sl st in current st, sl st in next, ch 2, sl st in same, sl st in last.

Info :

FO leaving long tail for sewing.

β€” Berries [Make three or more] :

Round 1 :

MR 4 (4)

Info :

Clean FO and leave a long tail for sewing.

β€” Icing [Make one] :

Round 1 :

MR 6 (6)

Round 2 :

inc around (12)

Round 3 :

(sc, inc) x 6 (18)

Round 4 :

(sc 2, inc) x 6 (24)

Round 5 :

(sc 3, inc) x 6 (30)

Round 6 :

(sc 4, inc) x 6 (36)

Round 7 :

(sc 5, inc) x 6 (42)

Round 8-9 :

sc, hdc in next 2 st, sc in next 3 st, hdc, sc, hdc, sc, hdc in next 2 st, sc in next 2 st, hdc in next 3 st, sc in next 4 st, hdc in next 5 st, sc in next 6 st, hdc in 8 st, sc in last 2 st (2 rounds)

Info :

FO leaving long tail for sewing.

β€” Assembly :

Info :

Sew Leaves onto the top of the icing, then the berries. Place Icing onto the top of the head (around R21-29). Weave in all ends. Please use picture for reference.

Assembly Instructions

  • Sew leaves onto the top of the icing, arranging three or more leaves evenly and securing with small stitches through the icing piece.
  • Sew the berries clustered in the center of the leaves, using long tails left when finishing each berry to stitch them securely in place and add glue if needed.
  • Place the completed icing piece onto the top of the body around rounds 21-29 and sew through the icing and the top rounds of the body to attach firmly.
  • Weave in all ends and secure any loose yarn with glue where necessary to keep small parts in place.
  • Adjust the stuffing and squish the body slightly by pressing top and bottom to create a tall pancake shape before final sewing.

Important Notes

  • πŸ’‘Place safety eyes between rounds 14-15, about 3-4 stitches above the embroidered smile for balanced facial placement.
  • πŸ’‘Stuff the body semi-firmly as you go to maintain shape and avoid gaps when closing with decreases.
  • πŸ’‘Weave in all ends neatly and secure brads or small parts with glue to prevent them from coming loose.
  • πŸ’‘Squish the body by pressing the top and bottom to achieve the intended tall pancake shape before finishing.

This adorable Christmas Pudding amigurumi is perfect for gifting or holiday decor, a tiny treat to brighten anyone's day. The pattern is quick, charming, and full of festive details like icing and holly leaves. Make several for a merry display and share the handmade joy this season! πŸŽ„πŸ§Ά

You ask,

we answer.

FAQs

What size will the finished piece be?

The finished amigurumi measures about 12 cm across when made with the recommended Paintbox Yarns and a 3.25mm hook.

Can I use different yarn weights for this pattern?

Yes, you can use different yarn weights, but this will affect the final size; choose an appropriate hook for the yarn and expect the pudding to be larger or smaller.

Do I need prior crochet experience for this pattern?

This pattern is rated intermediate, so basic knowledge of single crochet, increases, decreases, and working in the round is recommended.

How long does this project typically take to complete?

Most crocheters complete this project in 2-3 hours, depending on experience and how many embellishments you add.

How should I attach the small berries and leaves?

Sew leaves onto the icing first, then sew or glue the berries in the center; use the long tails left when finishing each piece and secure with glue if needed.