🧢 Beautiful ✨ Detailed πŸ’ Adorable

Bulbasaur Amigurumi Pattern

Bulbasaur Amigurumi Pattern
4.9β˜… Rating
2-3 Hours Time Needed
3.2K Made This
βœ‚οΈ

Beginner Friendly Level

Perfect for those just starting their crochet journey, with clear instructions and simple techniques

⏱️

Bite-Sized Project

Finishes in 2-4 hoursβ€”perfect for an afternoon of creative relaxation.

🧸

Cute Companion

An adorable friend to cherish, handcrafted with love to bring comfort and joy for years to come.

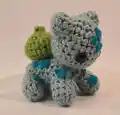
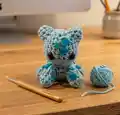
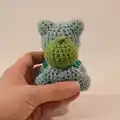
About This Bulbasaur Amigurumi Pattern

This pattern creates a small, cuddly Bulbasaur-inspired amigurumi using worsted weight yarn and basic single crochet techniques. You will make a head, body, ears, four legs/arms, and a small pod which are sewn together to form the finished toy. Felt markings and safety eyes add character, while simple shaping keeps the process accessible. The pattern is photo-supported and ideal for a relaxed weekend project.

Bulbasaur Amigurumi Pattern crochet pattern - detailed view of completed project

Worked mainly in single crochet with increases and decreases for shaping, this pattern is beginner-friendly and quick to stitch up. Perfect for gifting, decorating, or building your Pokemon amigurumi collection.

Why You'll Love This Bulbasaur Amigurumi Pattern

I absolutely love this pattern because it turns simple stitches into a personality-filled little Bulbasaur that brings a smile. I enjoy how fast it comes together β€” you can finish a full little toy in a few focused hours. The felt markings let me personalise each Bulbasaur and experiment with shapes and placement. Sewing the pod and ears on at the end is so satisfying because the toy instantly looks complete and characterful.

Bulbasaur Amigurumi Pattern step 1 - construction progress Bulbasaur Amigurumi Pattern step 2 - assembly progress Bulbasaur Amigurumi Pattern step 3 - details and accessories Bulbasaur Amigurumi Pattern step 4 - final assembly and finishing

Switch Things Up

I love how easy it is to customise this Bulbasaur pattern by changing colors; try pastel shades for a softer look or bright contrasting colors for a playful version.

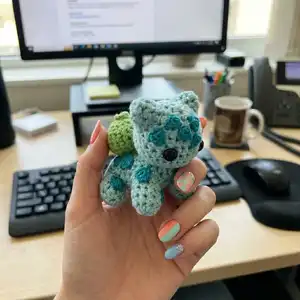
I sometimes make a mini keychain by using fingering weight yarn and a smaller hook to create tiny collectibles.

To make a chunkier, cuddlier Bulbasaur, use bulky yarn and a larger hook; remember to adjust stuffing amounts accordingly.

I add embroidered smiles or different felt shapes to change the character's expression and personality.

For more posability, I add a small length of wire inside the legs before stuffing so they can be posed slightly.

I recommend experimenting with eye sizes; try 6mm safety eyes for a cuter, smaller look or sew-on buttons for a vintage feel.

I also enjoy making matching sets β€” try creating Charmander and Squirtle variations using the same shaping but different colors and markings.

If making for a baby or small child, replace safety eyes with embroidered eyes for a fully washable and safe toy.

I sometimes add tiny crocheted accessories like a flower or scarf to personalise each Bulbasaur as a gift.

Don't be afraid to alter the pod size and shape; make it taller, flatter, or add leaf embellishments to create different looks and textures.

Common Mistakes & How to Fix Them

βœ— Placing safety eyes before checking placement can unbalance the face; mark eye placement with pins and check symmetry before securing the eyes. βœ— Overstuffing small pieces will cause seams to stretch and distort the shape; stuff gradually and add small amounts at a time to maintain even shaping. βœ— Skipping stitch counts during rounds results in uneven shaping and mismatched joins; count your stitches at the end of each round to ensure accuracy. βœ— Pulling your tension too tight on increases and decreases causes puckering; use a consistent, moderate tension and keep loops loose enough to work comfortably. βœ— Forgetting to fasten off and weave ends neatly before assembly makes finishing messy; tidy ends as you go and secure tails when joining parts together.

Bulbasaur Amigurumi Pattern

Make a tiny, adorable Bulbasaur amigurumi that is perfect for gifting or keeping on your shelf. This pattern uses simple single crochet techniques and small pieces to assemble into a charming Pokemon-inspired toy. You will enjoy quick shaping, easy assembly, and playful felt markings that bring this little creature to life. Follow the step-by-step instructions and photos to guide your build.

Beginner Friendly 2-3 Hours

Materials Needed for Bulbasaur Amigurumi Pattern

β€” Main Fabric

  • 01
    Worsted weight yarn (approx. medium/#4) - Light Teal / Aqua (main body and head)
  • 02
    Worsted weight yarn (approx. medium/#4) - Green (pod/back detail)
  • 03
    Dark teal felt for markings
  • 04
    Polyfil or another soft stuffing
  • 05
    Small amounts of contrast yarn or felt for additional details (optional)
  • 06
    1 pair 10mm safety eyes

β€” Tools Required

  • 01
    Crochet hook size 3.5mm
  • 02
    Scissors
  • 03
    Tapestry needle
  • 04
    Glue gun or fabric glue
  • 05
    1 pair 10mm safety eyes
  • 06
    Polyfil stuffing
  • 07
    Pins for placement (optional)

Progress Tracker

0% Complete

β€” Head :

Info :

Using the light teal yarn

Round 1 :

CH 2, SC 8 in first stitch. (8 stitches) Alternatively, SC 8 into a magic circle

Round 2 :

INC x 8 (16 stitches)

Round 3 :

*SC, INC* x 8 (24 stitches)

Round 4-6 :

SC x 24 (24 stitches)

Round 7 :

*SC x 9*, INC, *SC x 4*, INC, *SC x 9* (26 stitches)

Info :

Place eyes 5 stitches apart (in between each of the increases)

Round 8 :

SC x 26 (26 stitches)

Round 9 :

*SC x 2*, DEC x 11*, *SC x 2* (15 stitches)

Info :

Stuff as much of the head as you can

Round 10 :

*SC x 4*, *DEC x 3*, *SC x 5*

Info :

Finish stuffing head, FO with SlSt.

β€” Body :

Round 1 :

CH 2, SC 6 in first stitch. (6 stitches) Alternatively, SC 6 into a magic circle

Round 2 :

INC x 6 (12 stitches)

Round 3 :

*SC, INC* x 6 (18 stitches)

Round 4-6 :

SC x 18 (18 stitches)

Round 7 :

*SC x 5*, INC, *SC x 6*, INC, *SC x 5* (20 stitches)

Round 8-10 :

SC x 20 (20 stitches)

Round 11 :

DEC to close, stuffing the body as you go. FO with a SlSt.

Info :

Sew head onto body (row 1 is the front of the body, and the increases done face the upwards.)

Info :

Ignore the pod/ears (that's coming later), but this is the placement for the head to be sewn onto the body

β€” Ears :

Round 1 :

CH 2, SC 6 in first stitch. (6 stitches) Alternatively, SC 6 into a magic circle

Round 2 :

*SC, INC* x 3

Round 3 :

*SC 2, INC* x 3

Info :

FO with SlSt

Info :

Sew ears onto head (I've provided a picture to use as a placement guide.)

β€” Pod :

Round 1 :

CH 12, join the ends into a loop with a SlSt. (You're just making a crochet ring with 12 stitches around.) (12 stitches)

Round 2 :

INC x 12 (24 stitches)

Round 3-4 :

SC x 24 (24 stitches)

Round 5 :

*SC 4, DEC* x 4 (20 stitches)

Round 6 :

DEC x 10 (10 stitches)

Round 7 :

DEC x 5 (5 stitches)

Round 8 :

SC 4, SlSt, FO.

Info :

Stuff pod (from the bottom)

Info :

Sew pod to the back of your Bulbasaur

β€” Arms and Legs :

Round 1 :

CH 2, SC 10 in first stitch. (10 stitches) Alternatively, SC 10 into a magic circle

Round 2-5 :

SC x 10 (10 stitches)

Info :

FO with SlSt.

Info :

Stuff legs lightly, and sew them onto body. (see pictures to the right and below for placement.)

Info :

Next comes the markings! This part is super simple, just cut out a bunch of triangles /other angled shapes of varying sizes and using the fabric glue/your hot glue gun, fasten them to your Bulbasaur.

Info :

And you're done!

Assembly Instructions

  • Sew head to the top/front of the body aligning head row 1 with the front of the body and ensuring the increases face upwards; use whipstitch or mattress stitch to secure.
  • Sew ears onto the head using the provided photo as a placement guide, spacing them symmetrically on the top of the head.
  • Stuff legs lightly and sew them to the underside/sides of the body, referring to photos for correct placement and angle.
  • Stuff the pod from the bottom and sew the pod to the back/top of the body so it sits centered over the rear of the Bulbasaur.
  • Cut felt triangles or shapes and attach markings with fabric glue or a hot glue gun, arranging them around the head, back and legs as in the photos.

Important Notes

  • πŸ’‘Place safety eyes before final stuffing and check placement by counting stitches between eyes to keep symmetry.
  • πŸ’‘Stuff pieces gradually while shaping to avoid lumps and to achieve even, smooth curves for head and body.
  • πŸ’‘Use a stitch marker at the beginning of each round to maintain correct stitch counts and avoid accidental increases or decreases.
  • πŸ’‘Pin parts in place before sewing to ensure correct alignment and to make stitching easier and more precise.

This little Bulbasaur amigurumi is designed to be a quick, rewarding make that fits right in your palm. It combines easy single crochet shaping with cute felt details for personality. Make one as a gift, key decor, or to start your own amigurumi Pokemon collection. πŸ§ΆπŸ’š

You ask,

we answer.

FAQs

What size will the finished piece be?

The finished amigurumi measures approximately palm-sized (around 8-12 cm tall) when using worsted weight yarn and a 3.5mm hook; final size varies with yarn and tension.

Can I use different yarn weights for this pattern?

Yes, you can use different yarn weights, but this will affect the final size; choose an appropriate hook for your yarn and expect the toy to be larger with bulkier yarn or smaller with thinner yarn.

Do I need prior crochet experience for this pattern?

This pattern is beginner friendly and uses basic single crochet, increases and decreases; basic knowledge of these stitches and simple sewing skills is recommended for best results.

How long does this project typically take to complete?

Most crocheters finish this small amigurumi in 2-3 hours, though time will vary based on experience, assembly choices, and embellishing with felt markings.