🧢 Beautiful ✨ Detailed πŸ’ Adorable

Blue the Dumbo Octopus Amigurumi Pattern

Blue the Dumbo Octopus Amigurumi Pattern
4.3β˜… Rating
5-7 Hours Time Needed
2.6K Made This
βœ‚οΈ

Intermediate Level

Ideal for those with basic crochet experience, featuring slightly more advanced stitches and techniques to expand your skills.

⏱️

Weekend Treat

Takes 5-7 hours, making it an enjoyable project to finish over a couple of days.

🧸

Cute Companion

An adorable friend to cherish, handcrafted with love to bring comfort and joy for years to come.

About This Blue the Dumbo Octopus Amigurumi Pattern

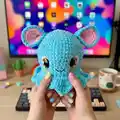
This pattern creates a charming dumbo-style octopus with floppy ears and a frilled skirt of tentacles. You will crochet the head and body in one piece and add eyes, ears, and a ruffled frill for personality. The instructions include detailed placement tips and photos to guide assembly and finishing.

Blue the Dumbo Octopus Amigurumi Pattern crochet pattern - detailed view of completed project

Perfect for intermediate crocheters who enjoy shaping and assembly work. Includes material list, abbreviations, and helpful tips for adjusting size and features.

Why You'll Love This Blue the Dumbo Octopus Amigurumi Pattern

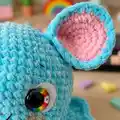
I absolutely love this pattern because it brings a playful personality to a classic amigurumi design. I enjoy how the dumbo-style ears give the octopus a sweet, expressive look that is both whimsical and unique. The ruffled frill/tentacles add movement and texture, making each finished piece feel special and handcrafted. I also appreciate that the pattern balances straightforward rounds with fun finishing techniques, so I can experiment while still finishing a complete toy.

Blue the Dumbo Octopus Amigurumi Pattern step 1 - construction progress Blue the Dumbo Octopus Amigurumi Pattern step 2 - assembly progress Blue the Dumbo Octopus Amigurumi Pattern step 3 - details and accessories Blue the Dumbo Octopus Amigurumi Pattern step 4 - final assembly and finishing

Switch Things Up

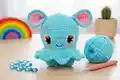
I love how easy it is to customize this octopus by changing yarn colors; try soft pastels for a nursery-friendly friend or bold brights for a playful toy.

You can make a mini version by using a thinner yarn and smaller hook for a keychain-sized octopus that is perfect as a gift tag or zipper charm.

For a chunkier, cuddlier octopus, use the same pattern with bulky yarn and a larger hook to create a plush, huggable version ideal for little ones.

I often add felt or embroidered freckles and cheeks to give the face more character; experiment with placement before committing to stitches or glue.

If you want a posable head or limbs, try threading thin wire into the tentacles and anchoring it securely inside for gentle shaping and posing.

I sometimes swap the ruffle pattern for longer curly tentacles by creating longer chains and working picots for a different silhouette and playful texture.

Try mixing yarn texturesβ€”velvet yarn for the body with a smooth cotton for the ear centersβ€”to create tactile contrast that kids will love to touch.

I recommend trying different eye styles: smaller safety eyes, embroidered eyes, or layered felt eyes for varied expressions and durability for gifts for young children.

To create a seasonal series, change accent colors and add small accessories like little hats, bows, or scarves crocheted separately and sewn on.

Don’t be afraid to combine techniques: add surface embroidery, applique hearts, or tiny buttons to make each octopus uniquely yours and full of personality.

Common Mistakes & How to Fix Them

βœ— Skipping the stitch marker during continuous rounds causes miscounts; always mark the beginning of each round and move the marker after each round. βœ— Placing safety eyes too early or too close together will distort facial features; follow the placement guidelines and adjust spacing according to your yarn and hook. βœ— Overstuffing the head and body can make assembly difficult and distort the shape; stuff gradually, shaping as you go and avoid packing too tightly. βœ— Failing to weave in ends and secure eyes before sewing results in loose details later; weave ends and secure eye backs while you have access and before final closing.

Blue the Dumbo Octopus Amigurumi Pattern

Make an adorable Blue Dumbo Octopus with this full step-by-step crochet pattern. You will create a cuddly octopus with floppy ears, a ruffled frill, and charming embroidered features. The pattern includes clear instructions for head, body, tentacles, ears, assembly, and helpful tips to get a professional finish. Perfect as a handmade gift or a new addition to your amigurumi collection.

Intermediate 5-7 Hours

Materials Needed for Blue the Dumbo Octopus Amigurumi Pattern

β€” Main Fabric

  • 01
    Bulky yarn Weight #6, approximately 100g of main color (Color A - Blue)
  • 02
    Accent yarn Weight #6, approximately 25g of Color B - Pink for ear centers and small details
  • 03
    Premier Parfait Chunky Turquoise (used as Color A in sample)
  • 04
    Premier Parfait Chunky Bubblegum (used as Color B in sample)
  • 05
    White felt circle (approx 4 cm diameter) for under-eye detail
  • 06
    30 mm safety eyes (pair)

β€” Tools Required

  • 01
    Crochet hook size J / 6.00 mm
  • 02
    30 mm safety eyes (2 pieces)
  • 03
    Scissors
  • 04
    Yarn needle / tapestry needle for sewing and embroidery
  • 05
    Stitch markers
  • 06
    Polyester stuffing (Polyfil)
  • 07
    White felt (approx 4 cm circle)
  • 08
    Black embroidery thread for facial details
  • 09
    Embroidery needle
  • 10
    Pins for assembly
  • 11
    Glue (optional, to glue felt to body)

Progress Tracker

0% Complete

β€” Head and Body :

Info :

Crocheted from top of head to bottom of body

Info :

Starting with Color A:

Round 1 :

Make 6 sc into a magic ring= 6

Round 2 :

Increase in each st around= 12

Round 3 :

(sc, inc) x 6= 18

Round 4 :

(2 sc, inc) x 6= 24

Round 5 :

(3 sc, inc) x 6= 30

Round 6 :

(4 sc, inc) x 6= 36

Round 7 :

(5 sc, inc) x 6= 42

Round 8 :

sc in each st around

Round 9 :

(6 sc, inc) x 6= 48

Round 10-14 :

sc in each st around

Round 15 :

(6 sc, dec) x 6= 42

Round 16 :

sc in each st around

Round 17 :

(5 sc, dec) x 6= 36

Info :

If you want, cut a circle larger than the eye in white felt, approximately 4 cm in diameter. Cut a hole on the outer edge of the circle to put the eye inside.

Info :

Place eyes between rounds 15 and 16, leaving 11 holes between them. If you want the sunken eye look, do not place the backs of the eyes on until round 20.

Info :

TIP! You may have to adjust the eye placement depending on yarn and hook size you use.

Round 18-20 :

sc in each st around

Info :

Start stuffing the head and body

Info :

Now for the eyes. Cut a long piece of yarn and remove the eyes. Place the needle in the hole where the first eye was and insert the needle into a hole next to the eye hole. Go back and forth between each eye hole repeating the process from the first eye. Pull slightly on the yarn after going through each hole. Do this about 3 times on each side until you reach the look you want. Follow the pictures for help. There is also a youtube video I have for extra help on this process. https://www.youtube.com/watch?v=9XoBnTY6k70&t=55s

Info :

To place the backs of the eyes you will need to remove most of the stuffing to place the washers on the eyes then re stuff it.

Round 21 :

BLO (4 sc, dec) x 6= 30

Round 22 :

(3 sc, dec) x 6= 24

Round 23 :

(2 sc, dec) x 6= 18

Round 24 :

(sc, dec) x 6= 12

Round 25 :

Dec x 6= 6

Info :

F/O and sew the hole closed

β€” Tentacles or Frill :

Info :

Turn the body upside down. Attach Color A yarn on round 21 with a sl st. Ch 2

Round 1 :

hdc-inc in each st around, join with a sl st to top of ch 2

Round 2 :

Ch 2, hdc in each st around, join with a sl st to top of ch 2

Round 3 :

Ch 2, (hdc, dc, tr, ch 1, tr, dc, hdc, 3 sl) x 8, sl st to top of ch 2 to fasten off

Info :

Weave in the tail ends.

β€” Ears(Make 2 Color A, 2 in Color B) :

Info :

Starting with Color B:

Round 1 :

Make 6 sc into a magic ring= 6

Round 2 :

Increase in each st around= 12

Round 3 :

(sc, inc) x 6= 18

Round 4 :

(2 sc, inc) x 6= 24

Info :

Do not F/O the Color A ears!

Info :

Place the back sides of Color A and Color B ears together. sc around the ears with the Color A yarn. F/O and leave a long tail for sewing.

β€” Assembly :

Head and Body :

1. Thread your needle with a strand of black embroidery thread. Insert the needle into a hole on the head. Bring the needle above the eye. Embroider an eyebrow. Repeat for the 2nd eye. Weave in the tail ends.

Head and Body :

2. Thread your needle with a long strand of black embroidery thread. Insert the needle into a hole in the head. Bring the needle up to a spot between the eyes. Embroider a smile. Weave in the tail ends.

Head and Body :

3. If you want, you can glue down your white felt circle to make it flat against the body.

Ears :

1. Pinch the ears at the bottom. Sew about 3 stitches together at the bottom to give the ear a pinched look.

Ears :

2. Pin the ears onto the top of the head.

Ears :

3. Sew the ears onto the head.

Face :

1. If you want you can add some blush to the cheeks with actual blush or pink crayon.

Assembly Instructions

  • Thread your needle with a strand of black embroidery thread and embroider an eyebrow above each eye, then weave in the tail ends.
  • Thread your needle with a long strand of black embroidery thread and embroider a smile between the eyes; weave in tail ends securely.
  • Glue down or position the white felt circle under each eye to create a flat white-eye surface if desired, trimming the felt to about 4 cm and cutting a small hole for the eye.
  • Pinch the ears at the bottom and sew about three stitches together to create a pinch, then pin and sew the ears onto the top of the head using the long tail left from the ears.
  • Attach the ruffled frill/tentacles to the bottom edge by working the frill rounds as written and weaving in tail ends for a neat finish.

Important Notes

  • πŸ’‘Do not join rounds unless stated; work in a continuous spiral for even shaping.
  • πŸ’‘Use a stitch marker to mark the beginning of each round and move it after each round to track progress accurately.
  • πŸ’‘All stitches are worked in both loops unless stated otherwise in the pattern.
  • πŸ’‘Start stuffing gradually and shape as you go; remove stuffing when placing eye backs and add stuffing again before closing the hole.

This adorable Blue Dumbo Octopus is a joyful little companion handcrafted with love and playful details. It features floppy dumbo ears, big dreamy eyes with felt backing, and a ruffled tentacle skirt that makes it extra huggable. Perfect as a gift or keepsake, each stitch brings out its sweet personality. 🧢✨

You ask,

we answer.

FAQs

What size will the finished piece be?

The finished amigurumi measures approximately 12 inches from bottom to top of head when using a weight 6 yarn and a 6.00 mm hook.

Can I use different yarn weights for this pattern?

Yes, you can use different yarn weights, but this will affect the final size and eye placement; adjust hook size and placements accordingly.

Do I need prior crochet experience for this pattern?

This pattern is rated intermediate, so basic crochet skills and experience with continuous spiral rounds, increases, decreases, and simple embroidery are recommended.

How long does this project typically take to complete?

Most crocheters finish this project in about 5-7 hours, though time can vary based on experience level and how much time you spend on detailing and assembly.