🧢 Beautiful ✨ Detailed πŸ’ Adorable

Vintage Style Drawstring Bag Pattern

Vintage Style Drawstring Bag Pattern
4.3β˜… Rating
5-7 Hours Time Needed
1.1K Made This
βœ‚οΈ

Intermediate Level

Ideal for those with basic crochet experience, featuring slightly more advanced stitches and techniques to expand your skills.

⏱️

Weekend Treat

Takes 5-7 hours, making it an enjoyable project to finish over a couple of days.

✨

Stylish Touch

An elegant detail to elevate any look, combining traditional techniques with contemporary design sensibilities.

About This Vintage Style Drawstring Bag Pattern

This pattern creates a vintage-style drawstring bag with a lacy shell motif and grouped treble texture. The bag measures approximately 14-16" in diameter when worked with size 10 cotton thread and a size 0 hook. The pattern is worked with two strands throughout to create a sturdy but delicate fabric.

Vintage Style Drawstring Bag Pattern crochet pattern - detailed view of completed project

Complete, round-by-round instructions are provided from the center base to the edging and finishing. Includes drawstring and fringe (tassel) instructions for a polished final accessory.

Why You'll Love This Vintage Style Drawstring Bag Pattern

I absolutely love this pattern because it blends vintage charm with practical construction. I enjoy how the shell and treble groups create a lovely openwork texture that still holds its shape when made with two strands. I designed the drawstrings and tassels to give a finished, elegant touch that makes the bag feel special. Working this bag is satisfying because each round builds noticeably on the last, and the final weaving of the drawstrings always feels like a rewarding finishing step.

Vintage Style Drawstring Bag Pattern step 1 - construction progress Vintage Style Drawstring Bag Pattern step 2 - assembly progress Vintage Style Drawstring Bag Pattern step 3 - details and accessories Vintage Style Drawstring Bag Pattern step 4 - final assembly and finishing

Switch Things Up

I love how easily you can customize this bag by changing yarn color or adding beads to the sc in center tr of the 7-tr group for sparkle.

I sometimes use a sport-weight yarn held double with a larger hook to create a softer, larger version of this bag.

I also enjoy making a mini version for gift bags by using finer thread and a smaller hookβ€”perfect for party favors.

I often line the bag with fabric for extra structure and to hide the inside yarn ends; this is a great way to add pattern or contrast.

I like to embroider initials or a small motif on the fabric lining and then attach it before weaving the drawstrings for a personalized touch.

I recommend experimenting with different tassel lengths and numbers of wraps on the cardboard to change the fringe fullness.

I sometimes replace the drawstring chain with a braided cord or leather strap for a modern twist on the vintage look.

I will occasionally add a small interior pocket to the lining so the bag can function as a small purse for keys or cards.

I suggest trying metallic thread or a metallic strand held with the working strands for a subtle shine without changing the stitch structure.

I also like to vary the placement of beadsβ€”either in each shell or only at cardinal pointsβ€”to change the visual rhythm of the design.

Common Mistakes & How to Fix Them

βœ— Working with a single strand instead of two can make the bag too flimsy; always join and work with two strands throughout the entire project as directed. βœ— Not counting increases in the early rounds leads to the wrong stitch total later; count stitches after rounds 2-4 to confirm 16, 32, and 64 dc counts. βœ— Twisting the drawstring before joining will make it difficult to weave evenly and will affect closure; lay the chain flat and check for twists before fastening off. βœ— Skipping picots or misplacing them changes the decorative edge appearance; place picots in the ch-1 spaces exactly as written and count repeats to maintain symmetry.

Vintage Style Drawstring Bag Pattern

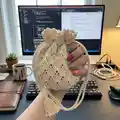
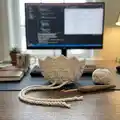
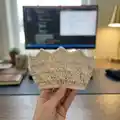
Make a charming vintage-style drawstring bag using size 10 cotton thread and a steel 0 hook. This intermediate pattern walks you through every round and finishing detail so you can create a 14-16" diameter decorative bag. Youll love the lacy shell and treble group texture and the elegant drawstring tassels that complete the look. Perfect for gifts, special occasions, or as a stylish accessory.

Intermediate 5-7 Hours

Materials Needed for Vintage Style Drawstring Bag Pattern

β€” Main Fabric

  • 01
    Size 10 cotton crochet thread, approximately 450 yards total
  • 02
    Pattern worked with two strands held together throughout for recommended gauge
  • 03
    Can be adapted to other yarn weights; adjust hook size and strand count accordingly

β€” Tools Required

  • 01
    Size 0 steel crochet hook (or size C/2/2.75mm Crochet Hook)
  • 02
    Or size C aluminum crochet hook as alternate
  • 03
    Scissors
  • 04
    Yarn/tapestry needle for sewing and weaving ends
  • 05
    Stitch markers
  • 06
    Measuring tape
  • 07
    4 inch cardboard square for making tassels/fringe
  • 08
    Pins for blocking or assembly (optional)
  • 09
    Beads for optional embellishment (optional)

Progress Tracker

0% Complete

β€” Bag :

Infos :

Skill Level: Intermediate. Supplies: Size 0 steel crochet hook (or size C/2/2.75mm Crochet Hook), 450 yds size 10 cotton crochet thread. (Note: Pattern may easily be adapted with most any size hook and any weight yarn and worked with single or double strand) Stitches Used: ch (chain), slst (slip stitch), sc (single crochet), scdec (decrease single crochet), dc (double crochet), tr (treble), picot (ch3, slst in 3rd ch from hook). Gauge: with 0 hook: 8 dc = 1 inch, 2 dc rows = 1 inch. Directions-Working with 2 strands throughout entire project.

Round 1 :

ch 4, join with sl st to form ring, ch 3 (counts as first dc of next rnd).

Round 2 :

work 15 dc in ring, join to top of beginning ch 3, ch 3, do not turn. 16 dc

Round 3 :

dc in same st, *2 dc in next dc*, repeat from asterisks 14 times, join with sl st to top of beginning ch 3, ch 3, do not turn. 32 dc

Round 4 :

dc in first st, *2 dc in next dc*, repeat from asterisks 30 times, join with sl st to top of beginning ch 3, ch 3, do not turn. 64 dc

Round 5 :

skip next dc, 3 dc, ch 1, 3 dc in next dc, skip next dc, *dc in next dc, skip next dc, 3 dc, ch 1, 3 dc in next dc, skip next dc*, repeat from asterisks 14 times, join with sl st to top of beginning ch 3, ch 1, do not turn. 16 shells

Round 6 :

sc in same st, 7 tr in next ch 1 sp, *sc in next dc, 7 tr in next ch 1 sp*, repeat from asterisks 14 times, join to beginning sc, ch 4 (counts as first tr of next rnd), turn. 16-7 tr groups

Round 7 :

6 tr in same sc, sc in center tr of next 7 tr group, *7 tr in next sc, sc in center tr of next 7 tr group*, repeat from asterisks 14 times, join with sl st to top of beginning ch 4, ch 1, turn. 16-7 tr groups

Round 8 :

7 tr in first sc, sc in center tr of next 7 tr group, *7 tr in next sc, sc in center tr of next 7 tr group*, repeat from asterisks 14 times, join to top of beginning tr, ch 1, turn.

Round 9-11 :

repeat rnd. 8.

Round 12 :

tr, ch 1 in first sc (7 times), sc, ch 1 in center tr of next 7 tr group, *tr, ch 1 (7 times) in next sc, sc, ch 1 in center tr of next 7 tr group*, repeat from asterisks 14 times, join with sl st to beginning tr, ch 1, turn.

Round 13 :

repeat rnd. 12, join with sl st to beginning tr, ch 1, do not turn.

Round 14 :

sc in each st and sc in each ch 1 sp around, join with sl st to beginning sc, ch 1, do not turn. 256 sc

Round 15 :

sc in first 4 sc, dec sc over next 2 sc, *sc in next 4 sc, dec sc over next 2 sc*, repeat around, join with sl st to beginning sc, ch 5, do not turn. 215 sc

Round 16 :

skip next sc, *tr, ch 1 in next sc, skip next 2 sc*, repeat from asterisks around, join to 4th ch of beginning ch 5, sl st to next ch 1 sp, ch 1, do not turn. 72-ch 1 spaces

Round 17 :

sc in same sp, skip next ch 1 sp, 7 tr in next ch 1 sp, skip next ch 1 sp, *sc in next ch 1 sp, skip next ch 1 sp, 7 tr in next ch 1 sp, skip next ch 1 sp*, repeat from asterisks around, join with sl st to beginning sc, ch 1, do not turn. 18-7 tr groups

Round 18 :

sc, ch 1 in first sc, tr, ch 1 in next tr (7 times), *sc, ch 1 in next sc, tr, ch 1 in next tr (7 times)*, repeat from asterisks around, join with sl st to beginning sc, ch 1, do not turn. 18-7 tr, ch 1 groups

Round 19 :

sc in first sc, sc, picot in next ch 1 sp, *sc in next tr, sc, picot in next ch 1 sp*, repeat from asterisks 6 times, [sc in next sc, sc, picot in next ch 1 sp, **sc in next tr, sc, picot in next ch 1 sp**], repeat from ** 6 times], repeat from [to] around, join with sl st to beginning sc, fasten off.

Drawstrings-Make 2 :

Rnd. 1: leaving 4 inch tail, ch 151, sl st in 2nd ch from hook and in each ch across, being careful not to twist, fasten off leaving 4 inch tail. Weave drawstring through ch 1 spaces at rnd. 16, pull 2 strands of tail through the end sl st of drawstring, tie to secure drawstring closed. Starting at opposite side of bag, weave 2nd drawstring through ch 1 spaces on rnd. 16, secure as done with first drawstring.

Fringe-Make 2 :

Wrap double strand of thread 12 times around 4" cardboard square, cut in half. Attach tassel on secured end of drawstring, trim if necessary.

Assembly Instructions

  • Weave the first drawstring through the ch-1 spaces created in Round 16, pulling the chain flat and avoiding twists; secure each end by pulling two strands of the 4" tails through the end sl st and tying tightly.
  • Starting at the opposite side of the bag, weave the second drawstring through the same ch-1 spaces on Round 16 and secure ends in the same manner as the first drawstring to allow even closure.
  • Make two tassels (fringe) by wrapping a double strand of thread 12 times around a 4" cardboard square, cut in half, and attach the tassel to the secured end of each drawstring; trim as needed for a neat finish.
  • Fasten off all round ends neatly and weave in tails with a yarn needle, trimming excess thread close to the work after securing to prevent unraveling.

Important Notes

  • πŸ’‘Work with two strands held together for the entire project to achieve the correct gauge and fabric stability.
  • πŸ’‘Place stitch markers if needed to help track round beginnings and pattern repeats, especially when working the shell and tr groups.
  • πŸ’‘Do not twist the drawstring chain before fastening off so it will feed smoothly through the ch-1 spaces at Round 16.

This vintage-style drawstring bag is a timeless accessory that adds handmade elegance to any outfit or gift. πŸŽ€ The lacy shell motifs and grouped treble texture create a delicate, eye-catching surface while remaining sturdy when worked with two strands. 🧢 Finish it with tassel-fringes and matching beads for an extra touch of vintage charm. ✨

You ask,

we answer.

FAQs

What size will the finished piece be?

The finished bag measures approximately 14-16 inches in diameter when using size 10 cotton thread and a size 0 hook, as specified in the pattern.

Can I use different yarn weights for this pattern?

Yes, you can adapt this pattern to other yarn weights, but the final size and drape will change; adjust hook size and strand count accordingly and check your gauge.

Do I need prior crochet experience for this pattern?

This pattern is rated intermediate and uses stitches such as treble groups, shells, picots, and decreases; basic familiarity with these stitches is recommended.

How do I secure the drawstrings so they do not pull out?

After weaving the drawstring through the ch-1 spaces at Round 16, pull two strands of the 4" tail through the end sl st and tie securely; you can also whipstitch the chain tail to the inside for extra security.