🧢 Beautiful ✨ Detailed πŸ’ Adorable

The Finley Blanket Pattern

The Finley Blanket Pattern
3.9β˜… Rating
12-15 Hours Time Needed
1.8K Made This
βœ‚οΈ

Intermediate Level

Ideal for those with basic crochet experience, featuring slightly more advanced stitches and techniques to expand your skills.

⏱️

Multi-Day Project

A rewarding 12+ hour journeyβ€”perfect for dedicated crafters who love detailed work.

🏑

Cozy Accent

A warm touch for your space that transforms ordinary corners into inviting nooks filled with handmade charm.

About This The Finley Blanket Pattern

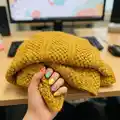
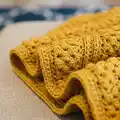
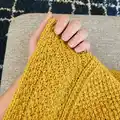
The Finley Blanket is a textured throw worked lengthwise to create vertical stripes and a cozy modern look. It combines the bean stitch and half double crochet for an engaging texture that works up quickly. The pattern is easily customizable for length and width so you can make it exactly the size you want.

The Finley Blanket Pattern crochet pattern - detailed view of completed project

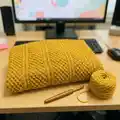
Made with worsted weight yarn and a 6.0 mm hook, this throw is warm without being too heavy. The pattern includes full step-by-step rows plus a simple border for a polished finish.

Why You'll Love This The Finley Blanket Pattern

I absolutely love this pattern because the bean stitch creates such a rich, tactile texture that feels luxurious and cozy at the same time. I enjoyed how it works lengthwise to create striking vertical panels that look like a boutique throw. The repeats are satisfying to crochet and keep you engaged without being tedious. I also love that it’s customizable β€” you can change the length by chaining any odd number and adjust the width by adding or subtracting row repeats.

The Finley Blanket Pattern step 1 - construction progress The Finley Blanket Pattern step 2 - assembly progress The Finley Blanket Pattern step 3 - details and accessories The Finley Blanket Pattern step 4 - final assembly and finishing

Switch Things Up

I love experimenting with color when I make this blanket; try alternating two colors every panel for a bold striped look.

I often switch yarn weight to get different sizes: use bulky yarn and a larger hook for a chunky, quick throw.

I sometimes make a baby version by using fingering or sport weight yarn with a smaller hook to create a delicate, baby-friendly blanket.

I like to add a contrasting border color for a framed effect β€” pick a darker shade to accent the texture.

I also enjoy adding fringe to the ends for a boho-inspired finish; add fringe after blocking for a tidy look.

I will occasionally swap the bean stitch for a puff stitch to see how the texture changes and to create a different stitch profile.

I recommend trying variegated yarn for the bean stitch panels to give a painterly, tonal effect without color changes.

I sometimes turn this pattern into a cushion cover by making two panels and seaming them together β€” it makes a beautiful pillow for the sofa.

I also like to embroider small motifs onto a finished panel for a personalized touch β€” use a tapestry needle and contrasting yarn.

I often change the border style: a simple single crochet border looks clean, while a scalloped edge adds a softer finish.

Common Mistakes & How to Fix Them

βœ— Chaining an even number for the foundation will misalign the pattern; always chain an odd number for the foundation to keep the stitch pattern correct. βœ— Skipping the 3rd back bump for the first hdc will change your stitch count; be sure to work the first round hdc into the 3rd back bump from the hook as instructed. βœ— Not securing the bean stitch chain correctly will distort the edge; remember you ch 1 to secure the bean stitch which technically chains 2 at the end of the row. βœ— Working inconsistent tension will produce uneven vertical stripes and size differences; maintain consistent tension and check your gauge occasionally to keep panels uniform. βœ— Not marking the beginning or end of rows may lead to misplaced repeats; use a stitch marker at the first stitch of the row during the first repeat to help track position.

The Finley Blanket Pattern

Make a cozy, textured throw designed to be worked lengthwise for vertical stripes and modern texture. This pattern uses simple repeats and the bean stitch to create beautiful vertical panels that are both warm and stylish. You can easily adjust the size by changing chain length or adding rows, making it a versatile project for home decor or gifting.

Intermediate 12-15 Hours

Materials Needed for The Finley Blanket Pattern

β€” Main Fabric

  • 01
    Worsted weight yarn (Weight 4) - Lion Brand Pound of Love, approximately 3,060 yards total (3 skeins)
  • 02
    Color: Maize
  • 03
    Pattern uses about 2 1/2 skeins of Lion Brand Pound of Love (this pattern only uses half of the third skein)

β€” Tools Required

  • 01
    Crochet hook J/6.0 mm (US J)
  • 02
    Scissors
  • 03
    Tapestry needle

Progress Tracker

0% Complete

β€” Notes :

Infos :

Finished size measures 45" wide x 53" long. This blanket is worked lengthwise. To change the length, chain any odd number. To change the width, simply add more rows. ch 2 does not count as stitch. 2hdc means 2 hdcs in same stitch. Video tutorial for the bean stitch HERE. This pattern uses 2 1/2 skeins of Lion Brand's Pound of Love yarn, so you will have some yarn leftover (save it for a scrapghan or granny squares!)

β€” Special Stitches :

Info :

hdc: Yarn over, insert hook into stitch, yarn over, pull up a loop, yarn over, pull through all three loops on hook

Info :

Bean Stitch: 1. Insert hook into stitch and pull up a loop (2 loops on hook). 2. Yarn over, insert hook into same stitch and pull up a loop (4 loops on hook). 3. Yarn over, insert hook into same stitch and pull up a loop (6 loops on hook). 4. Yarn over and pull through all 6 loops on hook. 5. Chain 1 to secure stitch. 6. Skip the next stitch and work steps 1 - 5 into the following stitch. Work bean stitch in every other stitch to end of row.

Info :

Video tutorial for the bean stitch HERE

β€” Finley Blanket :

Round Foundation row :

Ch 171, hdc in 3rd back bump from hook, hdc across to end, ch 2, turn (169 sts)

Round 1 :

work bean st into 1st hdc, *sk next hdc, bean st into next hdc*, rep from * to * across row to last st, ch 1, turn (remember you ch 1 to secure the bean st, so technically you are chaining 2 at the end of the row) (169 sts - bean and ch 1 spaces count as stitch)

Round 2 :

sk first bean st, work bean st into ch-1 sp *sk bean st, work bean st into ch-1 sp*, rep from * to * across row working last bean st in last ch-1 sp on the end, ch 1, turn (169 sts - bean and ch 1-space count as stitches)

Round 3 - 8 :

rep row 2

Round 9 :

hdc in 1st bean st, hdc in ch-1 sp *hdc in bean st, hdc in ch-1 sp*, rep from * to * across to last bean st, do not hdc in last bean st, hdc in last ch-1 sp, ch 2, turn (169 sts)

Round 10 :

hdc in each st across to end of row, ch 2, turn (169 sts)

Round 11 & 12 :

repeat row 10

Round 13 - 20 :

rep rows 1 - 8

Round 21 - 24 :

rep rows 9 - 12

Round 25 - 32 :

rep rows 1 - 8

Round 33 - 36 :

rep rows 9 - 12

Round 37 - 44 :

rep rows 1 - 8

Round 45 - 48 :

rep rows 9 - 12

Round 49 - 56 :

rep rows 1 - 8

Round 57 - 60 :

rep rows 9 - 12

Round 61 - 68 :

rep rows 1 - 8

Round 69 - 72 :

rep rows 9 - 12

Round 73 - 80 :

rep rows 1 - 8

Round 81 - 84 :

rep rows 9 - 12

Round 85 - 92 :

rep rows 1 - 8

Round 93 - 96 :

rep rows 9 - 12

Round 97 - 104 :

rep rows 1 - 8

Round 105 - 108 :

rep rows 9 - 12

Round 109 - 116 :

rep rows 1 - 8

Round 117 :

rep row 9; do not ch-2, only ch-1

Info :

Do not fasten off, continue with same yarn for border

β€” Border :

Item Name (Side 1) :

2hdc in first side st, working hdcs evenly along the side of the bean sts and hdc sts, ending with 2hdc in last st

Item Name (Side 2) :

2hdc in first st, working hdcs in each hdc st, ending with 2hdc in last st

Item Name (Side 3) :

rep side 1

Item Name (Side 4) :

rep side 2

Info :

sl st to first hdc from side 1

Info :

Fasten off; weave in all ends

Info :

Video tutorial for bean stitch HERE

Assembly Instructions

  • Do not fasten off after the last main row; continue with the same yarn to work the border around all four sides for a consistent edge.
  • Work the border along Side 1 by placing 2hdc in the first side stitch, then work hdc evenly along the side of the bean stitches and hdc stitches, ending with 2hdc in the last stitch.
  • Repeat the border method on Side 2 (2hdc in first st, hdc in each hdc st, ending with 2hdc), then repeat Side 1 and Side 2 for Sides 3 and 4 respectively.
  • After completing the border on all four sides, join with a slip stitch to the first hdc from Side 1, fasten off, and weave in all ends securely.

Important Notes

  • πŸ’‘Finished size measures 45" wide x 53" long as written; adjust chain length or number of rows to change dimensions.
  • πŸ’‘This blanket is worked lengthwise; chain any odd number to change the length and add more rows to increase the width.
  • πŸ’‘ch 2 does not count as a stitch in this pattern; follow the instructions for turning chains and stitch counts carefully.
  • πŸ’‘2hdc means work two half double crochets in the same stitch; use this for neat corners and the border.

This cozy Finley Blanket pattern gives you a modern textured throw that works up beautifully in worsted weight yarn. The lengthwise design and bean stitch create elegant vertical panels that add depth and warmth to any room. Perfect for gifting or keeping cozy at home β€” happy crocheting! 🧢✨

You ask,

we answer.

FAQs

What size will the finished piece be?

The finished blanket measures approximately 45" wide x 53" long when following the pattern with the recommended yarn and hook size.

Can I change the size of the blanket?

Yes β€” to change the length chain any odd number for the foundation row, and to change the width simply add or remove repeats (rows) as needed.

Do I need to fasten off before working the border?

No β€” do not fasten off after Row 117; continue with the same yarn to work the border so the edge looks continuous and neat.

What skill level is required and how long will it take?

This pattern is rated intermediate due to the bean stitch and multiple row repeats; it typically takes around 12-15 hours depending on your speed.