🧢 Beautiful ✨ Detailed πŸ’ Adorable

The Camera Crochet Bag & Purse Pattern

The Camera Crochet Bag & Purse Pattern
4.8β˜… Rating
5-7 Hours Time Needed
1.2K Made This
βœ‚οΈ

Intermediate Level

Ideal for those with basic crochet experience, featuring slightly more advanced stitches and techniques to expand your skills.

⏱️

Weekend Treat

Takes 5-7 hours, making it an enjoyable project to finish over a couple of days.

✨

Stylish Touch

An elegant detail to elevate any look, combining traditional techniques with contemporary design sensibilities.

About This The Camera Crochet Bag & Purse Pattern

This pattern creates a camera-shaped crochet bag with a detachable-looking lens and a long strap, perfect for everyday use or as a playful accessory. The design uses DK/light worsted yarn and simple single crochet construction worked in rows and rounds for a clean finish. Felt pieces and a wooden button add handcrafted detail while the zipper or magnetic snap keeps contents secure.

The Camera Crochet Bag & Purse Pattern crochet pattern - detailed view of completed project

Step-by-step instructions and photos guide you through the base body, two-part lens, strap, and cover assembly. Intermediate stitch techniques like increasing and black-loop single crochet are used for texture and shaping.

Why You'll Love This The Camera Crochet Bag & Purse Pattern

I absolutely love this pattern because it turns simple stitches into a fun, wearable accessory that feels like a small piece of art. I enjoy how the two-color lens detail adds personality without complicating the construction. The strap and cover options let me customize the fit and look for different outfits and occasions. Sewing on felt details and a wooden button is a satisfying finishing touch that elevates the whole piece.

The Camera Crochet Bag & Purse Pattern step 1 - construction progress The Camera Crochet Bag & Purse Pattern step 2 - assembly progress The Camera Crochet Bag & Purse Pattern step 3 - details and accessories The Camera Crochet Bag & Purse Pattern step 4 - final assembly and finishing

Switch Things Up

I love experimenting with color combinations on this camera bag β€” try a soft pastel body with a bright contrast trim for a modern look.

You can change the strap width by working sc 3 up to sc 5 in the strap chain rows, or use a larger hook for a chunkier strap.

To make a mini keychain version, use fingering weight yarn and a smaller hook, and shorten the strap to a small loop.

I sometimes replace the zipper with magnetic snaps for a cleaner top closure; choose whichever feels most comfortable for daily use.

Swap the wooden button for a decorative metal or resin button to give the bag a different character and finish.

I like to line the bag with fabric for extra structure and to protect the interior; cut the lining to the bag dimensions and whipstitch or ladder stitch it in place.

Try embroidering initials or a small logo on the back of the bag for a personalized gift option.

For a more whimsical lens, add tiny beads or embroidered highlights instead of felt, or use metallic yarn for a subtle shine.

If you want a crossbody rather than shoulder bag, lengthen the strap rows significantly and test the length before fastening off.

Consider adding inner pockets or a key loop when sewing the lining β€” I often add a small zip pocket for phone or cards.

Common Mistakes & How to Fix Them

βœ— Skipping stitch markers when joining rounds causes misaligned seams and uneven edges; place a marker at the beginning of each round to keep track of your starting stitch and ensure neat joins. βœ— Not counting stitches after rounds with increases leads to incorrect stitch counts and a misshapen piece; count stitches at the end of each increase round and correct any mistakes immediately. βœ— Pulling yarn too tight on the strap or body gives a stiff, distorted texture; maintain relaxed, consistent tension for a flat, even fabric. βœ— Forgetting to leave long yarn tails when fastening off prevents neat sewing and finishing; always leave the recommended yarn length (30-50 cm) for sewing parts securely. βœ— Sewing the lens or cover in the wrong position can unbalance the design and look off-center; pin pieces in place and check alignment before permanently stitching them down.

The Camera Crochet Bag & Purse Pattern

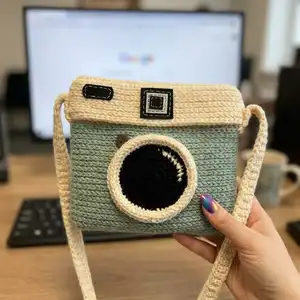
Create a charming camera-shaped crochet bag and matching lens detail with this clear, photo-led pattern. You will crochet a structured pouch, a decorative lens with two parts, and a long adjustable strap β€” all finished with felt details and a wooden button. The pattern is designed to guide you step-by-step so you can make a stylish, wearable accessory for yourself or as a thoughtful handmade gift.

Intermediate 5-7 Hours

Materials Needed for The Camera Crochet Bag & Purse Pattern

β€” Main Fabric

  • 01
    100% Acrylic DK / Light Worsted yarn - Color A (main body) approximately 80g
  • 02
    100% Acrylic DK / Light Worsted yarn - Color B (cover/trim) approximately 60g
  • 03
    100% Acrylic DK / Light Worsted yarn - Black accent approximately 20g
  • 04
    Felt: Black pieces for viewfinder details and small accents (various small pieces, see felt sizes)
  • 05
    Felt: White small piece for viewfinder highlight

β€” Tools Required

  • 01
    Crochet hook 3.75 - 4.5 mm (US F-5, G-6, 7)
  • 02
    Scissors
  • 03
    Yarn needle for sewing
  • 04
    Embroidery needle for felt and button
  • 05
    Embroidery thread (black and white)
  • 06
    Black plastic zipper ~9 inch (or magnetic snaps to sew on)
  • 07
    Wood button ~15 - 20 mm
  • 08
    Stitch markers

Progress Tracker

0% Complete

β€” Materials & Size :

Info :

100% Acrylic DK/Light Worsted. Crochet hook 3.75 - 4.5 mm (US F-5, G-6, 7). Felt (Black and White). Black plastic zipper ~9 inch or magnetic snaps (sew on). Wood button ~15 - 20 mm. Embroidery thread (black and white). Yarn needle and embroidery needle. Scissors. Size ~w 21 cm (8 inch) x h 21 cm (8 inch). Gauge/inch: 5-6. Skill Level: Intermediate.

β€” View fingers (felt) :

Info :

Felt pieces for viewfinder: 01: 3.7x3.7 cm (black square). 02: 2.4x2.4 cm (white square). 03: 1.5x1.5 cm (small black square). 04: 3.7x1.5 cm (long black rounded rectangle).

β€” Bag :

Info :

Color A, Start from base, Base chain – sl knot, chain 35.

Round 1 :

sc 2 into 2nd chain from hook, sc each ch on next 32 sts, sc 3 on next ch (the first ch of the base chain). Turn sideways and continue along another side of the base chain, sc each ch on next 33 sts, slst to the ch st at the beginning round. (70)

Round 2 :

ch 1, [*sc on next st, sc 2 on next st, sc each on next 32 sts, sc 2 on next st,]* 2 times, slst, then sl st(slip stitch) around, slst to the sc st at the beginning round. (74)

Round 3-21 :

ch1, sc around ,slst, then slst around, slst to the sc st at the beginning round. (74)

Round 22 :

Color B, blsc around , slst. (74)

Round 23-24 :

ch1, sc around , slst. (74)

Info :

Fasten off, weave the yarn end.

β€” Camera Lens #1 x 1 :

Round 1 :

Black, 9 sc in Magic Ring, slst. (9)

Round 2 :

ch 1, (inc) *9 times, slst. (18)

Round 3 :

ch 1, (sc 1, inc) *9 times, slst. (27)

Round 4 :

ch 1, (sc 2, inc) *9 times, slst. (36)

Round 5 :

ch 1, Black (sc 3, inc) *2 times, White (sc 3, inc) *2 times, Black (sc 3, inc) *5 times, slst. (45)

Round 6 :

ch 1, (sc 4, inc) *9 times, slst. (54)

Round 7 :

White, ch 1, sc around, slst. (54)

Info :

Fasten off, weave the yarn end. Leave the back yarn ~30cm.

β€” Camera Lens #2 x 1 :

Info :

White, Start from chains 54, slst to close circle. (54)

Round 1 :

ch 1, sc around, slst. (54)

Info :

Fasten off, leave the yarn ~30 cm. Sew to the lens #1.

β€” Strap x 1 :

Info :

Color B, sl knot, chain 4. (leave the yarn ~25-30 cm.)

Row 1 :

sc into 2nd chain from hook, sc each ch on next 2 sts, turn. (3)

Row 2-200 :

Ch1, sc across, turn. (3)

Info :

Fasten off, leave the yarn ~25-30 cm. You can adjust the wide strap from sc 3 - sc 5. The length also you can adjust the row form your body.

β€” Cover x 1 :

Info :

Color B, Start from base, Base chain – sl knot, chain 35. (35)

Round 1 :

sc 2 into 2nd chain from hook, sc each ch on next 32 sts, sc 3 on next ch (the first ch of the base chain). Turn sideways and continue along another side of the base chain, sc each ch on next 33 sts, slst to the ch st at the beginning round. (70)

Round 2 :

ch 1, [*sc on next st, sc 2 on next st, sc each on next 32 sts, sc 2 on next st,]* 2 times, slst, then sl st(slip stitch) around, slst to the sc st at the beginning round. (74)

Round 3-8 :

ch1, sc around ,slst, then slst around, slst to the sc st at the beginning round. (74)

Info :

Fasten off, leave the yarn ~50 cm. Sew to the bag.

β€” Assembly :

Info :

Follow photo steps for assembly: attach cover, sew on viewfinder felts, sew the zipper, mark and sew lens, attach strap, and sew button.

Step 1 :

Color A, start from the base, Rnd.2, then slst around as shown in photos.

Step 2 :

Crochet follow the pattern to complete the bag body through rnd.21.

Step 3 :

Finished rnd.21 - fold and check alignment before adding Color B trim.

Step 4 :

Color B, Crochet follow the pattern (rnd.22-24) to make the top trim and cover.

Step 5 :

Sew the viewfinder felts onto the cover (middle) using embroidery thread for decorative stitching.

Step 6 :

Attach and finish the cover piece; prepare strap and other trims.

Step 7 :

Sew the zipper securely along the bag opening; pin and hand-stitch for even placement.

Step 8 :

Mark the lens into the right position on the front of the bag using pins or washable marker.

Step 9 :

Sew the lens (lens #1 and lens #2 joined) onto the bag front, secure with tidy stitches around the edge.

Step 10 :

Sew the cover onto the top of the bag as shown in photos, aligning the viewfinder with the cover center.

Step 11 :

Sew the strap left and right sides into the bag seams, reinforcing with extra stitching for durability.

Step 12 :

Last, sew the wood button into the left lens position and secure all loose ends; weave tails inside.

Assembly Instructions

  • Color A: start from the base chain (chain 35), work the bag body through round 21, then join Color B for trim and cover.
  • Sew the viewfinder felt pieces onto the center of the cover using embroidery thread and visible running stitch for decorative effect.
  • Sew the black plastic zipper to the bag opening, pinning carefully and using a yarn needle for a neat hand-sewn finish; alternatively sew on magnetic snaps.
  • Mark the correct lens position on the front of the bag, then sew the assembled two-part lens (lens #1 + lens #2) securely in place with matching yarn.
  • Attach the strap to the left and right sides of the bag, making sure it is aligned and reinforced with several stitches for strength.
  • Sew the cover in place and then sew the wood button into the left lens position as the final decorative detail.

Important Notes

  • πŸ’‘Use stitch markers to keep track of the beginning of each round, especially when working continuous rounds to avoid misalignment.
  • πŸ’‘Leave the recommended yarn tails (about 25-50 cm) when fastening off so you have enough length to sew pieces neatly and securely.
  • πŸ’‘Pin pieces such as the cover, lens, and strap in place before sewing to ensure correct placement and symmetry.
  • πŸ’‘Keep tension consistent throughout the bag and strapβ€”too tight will make the fabric stiff and too loose will create gaps between stitches.

This Camera Crochet Bag & Purse is a delightful project that blends playful design with practical use. It makes a thoughtful handmade gift or a stylish everyday accessory you can proudly wear. Personalize the colors and trims to match your style and enjoy the satisfying finishing touches like the felt viewfinder and wood button. 🧢✨

You ask,

we answer.

FAQs

What size will the finished piece be?

The finished bag measures approximately 21 cm (8 inches) wide by 21 cm (8 inches) high using the recommended DK/light worsted yarn and hook size.

Can I use different yarn weights for this pattern?

Yes, you can use different yarn weights, but this will change the final size and drape; adjust your hook size accordingly and make a gauge swatch to estimate final dimensions.

Do I need prior crochet experience for this pattern?

This pattern is rated intermediate, so basic knowledge of single crochet, increases, and working in rounds is recommended for best results.

How long does this project typically take to complete?

Most crocheters finish the project in about 5-7 hours, though time will vary based on experience, finishing work, and assembly complexity.