๐Ÿงถ Beautiful โœจ Detailed ๐Ÿ’ Adorable

Plush snuggler BUNNY Amigurumi Pattern

Plush snuggler BUNNY Amigurumi Pattern
4.5โ˜… Rating
5-7 Hours Time Needed
3.6K Made This
โœ‚๏ธ

Intermediate Level

Ideal for those with basic crochet experience, featuring slightly more advanced stitches and techniques to expand your skills.

โฑ๏ธ

Weekend Treat

Takes 5-7 hours, making it an enjoyable project to finish over a couple of days.

๐Ÿงธ

Cute Companion

An adorable friend to cherish, handcrafted with love to bring comfort and joy for years to come.

About This Plush snuggler BUNNY Amigurumi Pattern

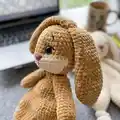
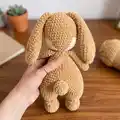
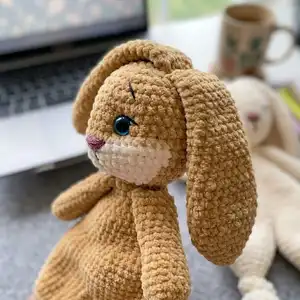
This pattern creates a plush snuggler bunny approximately 41 cm / 16" tall using plush chenille yarn. The design uses spiral crochet rounds and clear stitch counts so you can follow along precisely. The toy includes separate legs, body joining, arms, ears, tail and a detailed head section with options for safety eyes or embroidery.

Plush snuggler BUNNY Amigurumi Pattern crochet pattern - detailed view of completed project

Includes materials list, yarn analogues, and step-by-step finishing instructions for sewing and facial embroidery. Great for intermediate crocheters who want a tactile, squishy charm for gifting or nursery play.

Why You'll Love This Plush snuggler BUNNY Amigurumi Pattern

I absolutely love this pattern because the plush chenille yarn gives the bunny an irresistible, soft texture that kids and adults both adore. I enjoy the way the legs are crocheted and joined to create a natural snuggle shape, and the detailed head shaping makes adding expression fun. The embroidery options let me personalise every face, making each bunny unique. I also appreciate that the pattern lists yarn analogues and clear assembly steps, which makes the finishing work straightforward and satisfying.

Plush snuggler BUNNY Amigurumi Pattern step 1 - construction progress Plush snuggler BUNNY Amigurumi Pattern step 2 - assembly progress Plush snuggler BUNNY Amigurumi Pattern step 3 - details and accessories Plush snuggler BUNNY Amigurumi Pattern step 4 - final assembly and finishing

Switch Things Up

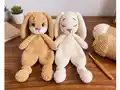
I love customizing this pattern to make different personalitiesโ€”try pastel shades for a sleepy nursery bunny or bright hues for a playful gift.

I often switch yarn weight and hook size to create minis or jumbo versions; a thicker yarn with a larger hook makes a chunky, cuddly friend.

I like to embroider different expressions by changing eyebrow angle or mouth shape to create happy, sleepy, or surprised faces.

I sometimes add tiny outfits or crochet a small blanket to make a complete set, which is great for gifting.

For safety-conscious projects, I embroider eyes and use yarn rather than safety eyes for baby-safe toys.

I add a small loop at the top of the head to turn the tiny version into a keychain or bag charm.

Try adding a ribbon collar, a tiny bell, or a crocheted bow for seasonal or themed variations.

I experiment with blended yarnsโ€”one plush and one cotton strandโ€”for an interesting texture contrast on the muzzle or belly.

To make the bunny poseable, I sometimes insert a small wire in the arms before stuffing to allow gentle repositioning.

I recommend testing stitch tension and making a small swatch so you can predict the finished size before committing to changes.

Common Mistakes & How to Fix Them

โœ— Skipping stitch markers during spiral rounds leads to losing the start of the round; place a marker at the first stitch and move it each round to keep track. โœ— Overstuffing the head or body makes shaping difficult and distorts the plush shape; stuff gradually and shape as you go, adding small amounts of filler. โœ— Not attaching safety eyes at the right round or spacing will make facial features look wrong; place safety eyes between rounds 10 and 11 and leave eight stitches between the eyes. โœ— Cutting yarn ends too early when making paired pieces can complicate joining; keep the tail of the first leg when instructed so you can join legs without extra sewing.

Plush snuggler BUNNY Amigurumi Pattern

Make a soft, cuddly plush snuggler bunny ready for hugs. This pattern guides you through every round and assembly step so you can crochet a charming toy with clear photos and stitch counts. Use plush chenille yarn for a cozy texture and add embroidered details or safety eyes for personality. Perfect as a handmade gift or nursery companion.

Intermediate 5-7 Hours

Materials Needed for Plush snuggler BUNNY Amigurumi Pattern

โ€” Main Fabric

  • 01
    Wolans Yarns BUNNY BABY plush yarn 100g / 120m (131yds) - main color (e.g. shade 100-18) - 2 skeins recommended
  • 02
    Wolans Yarns BUNNY BABY 100g / 120m (131yds) - secondary color for head (e.g. shade 100-02) - 1 skein if using two colors
  • 03
    If using one color only, total 2 skeins of Wolans BUNNY BABY (100g each)
  • 04
    Yarn Art DOLCE 100g / 120m (analogue)
  • 05
    Premier Yarns PARFAIT CHUNKY 100g / 120m (analogue)
  • 06
    Katia BAMBI 100g / 120m (analogue)
  • 07
    King Cole YUMMY 100g / 120m (analogue)
  • 08
    Universal Yarn BELLA CHENILLE 100g / 120m (analogue)
  • 09
    Cygnet JELLY CHUNKY CHENILLE 100g / 120m (analogue)

โ€” Tools Required

  • 01
    Crochet hook 4 mm (G6)
  • 02
    Toy filling or scraps of fabric or yarn for stuffing
  • 03
    Stitch markers
  • 04
    Tapestry needle
  • 05
    Scissors
  • 06
    Thread for sewing details
  • 07
    Rose/pink thread for embroidery nose
  • 08
    16 mm toy safety eyes OR dark thread for embroidery eyes

Progress Tracker

0% Complete

โ€” LEGS (make 2) :

Infos :

Use the main color yarn. Magic ring.

Round 1 :

6sc inside MR (6)

Round 2 :

6inc (12)

Round 3 :

(1sc, inc) x6 (18)

Rounds 4-6 :

18sc (18)

Round 7 :

(4sc, dec) x3 (15)

Round 8 :

(3sc, dec) x3 (12)

Info :

Add some filler.

Round 9 :

(2sc, dec) x3 (9)

Round 10 :

(1sc, dec) x3 (6)

Rounds 11-25 :

6sc (6)

Round 26 :

(1sc, inc) x3 (9)

Round 27 :

(2sc, inc) x3 (12)

Round 28 :

(3sc, inc) x3 (15)

Round 29 :

(4sc, inc) x3 (18)

Round 30 :

(5sc, inc) x3 (21)

Round 31 :

(6sc, inc) x3 (24)

Rounds 32-36 :

24sc (24)

Info :

Cut the yarn. Make the second leg in the same way, but donโ€™t cut the thread at the end.

โ€” BODY :

Assembling round 1 :

join the 2nd leg with 1st leg (insert hook and make sc in the point where stitch 24 of the last round ended), 23sc of 1st leg, join with the leg 2 (insert hook and make sc in the point where stitch 24 of last round ended), 23sc of 2nd leg (48)

Rounds 2-5 :

48sc (48)

Round 6 :

(6sc, dec) x6 (42)

Rounds 7-8 :

42sc (42)

Round 9 :

(5sc, dec) x6 (36)

Rounds 10-11 :

36sc (36)

Round 12 :

(4sc, dec) x6 (30)

Rounds 13-14 :

30sc (30)

Round 15 :

(3sc, dec) x6 (24)

Rounds 16-17 :

24sc (24)

Round 18 :

(2sc, dec) x6 (18)

Rounds 19-20 :

18sc (18)

Round 21 :

(1sc, dec) x6 (12), sl st.

Info :

Cut the yarn. Make knots on the legs.

โ€” ARMS (make 2) :

Infos :

Use the main color yarn. Magic ring.

Round 1 :

6sc inside MR (6)

Round 2 :

(1sc, inc) x3 (9)

Round 3 :

(2sc, inc) x3 (12)

Rounds 4-6 :

12sc (12)

Round 7 :

10sc, dec (11)

Round 8 :

9sc, dec (10)

Rounds 9-16 :

10sc (10)

Info :

Fold and crochet the edges together 5sc. Cut the yarn.

Info :

Make the second arm in the same way in rounds 1-6.

Round 7 :

dec, 10sc (11)

Round 8 :

dec, 9sc (10)

โ€” HEAD :

Infos :

Start with secondary color yarn. Magic ring.

Round 1 :

6sc inside MR (6)

Round 2 :

6inc (12)

Round 3 :

(1sc, inc) x6 (18)

Round 4 :

(2sc, inc) x6 (24)

Round 5 :

(3sc, inc) x6 (30)

Round 6 :

(4sc, inc) x6 (36)

Rounds 7-8 :

36sc (36)

Info :

Change yarn to the main color.

Rounds 9-15 :

36sc (36)

Info :

If you use the safety eyes, attach them between rounds 10 and 11 (leave 8 stitches between the eyes).

Round 16 :

(4sc, dec) x6 (30)

Round 17 :

(3sc, dec) x6 (24)

Info :

Fill the head with filler.

Round 18 :

(2sc, dec) x6 (18)

Round 19 :

(1sc, dec) x6 (12)

Info :

Add more filler to the head.

Round 20 :

6dec (6)

Info :

Cut the yarn, pull the hole. Hide the end of the thread inside the head.

โ€” EARS (make 2) :

Infos :

Use the main color yarn. Magic ring.

Round 1 :

6sc inside MR (6)

Round 2 :

(1sc, inc) x3 (9)

Round 3 :

(2sc, inc) x3 (12)

Round 4 :

(3sc, inc) x3 (15)

Round 5 :

(4sc, inc) x3 (18)

Round 6 :

(5sc, inc) x3 (21)

Round 7 :

(6sc, inc) x3 (24)

Rounds 8-14 :

24sc (24)

Round 15 :

(6sc, dec) x3 (21)

Rounds 16-17 :

21sc (21)

Round 18 :

(5sc, dec) x3 (18)

Rounds 19-20 :

18sc (18)

Round 21 :

(4sc, dec) x3 (15)

Rounds 22-23 :

15sc (15)

Round 24 :

(3sc, dec) x3 (12)

Rounds 25-26 :

12sc (12)

Info :

Fold and crochet the edges together 6sc. Cut the yarn.

โ€” TAIL :

Infos :

Use the main color yarn. Magic ring.

Round 1 :

6sc inside MR (6)

Round 2 :

6inc (12)

Round 3 :

12sc (12)

Round 4 :

(2sc, dec) x3 (9)

Info :

Cut the yarn.

โ€” FINISHING THE TOY :

Step 1 :

Sew the head to the body. Sew the arms to the body, leave 4 stitches between the arms. Sew the tail to the back.

Step 2 :

Sew the ears to the head between rounds 17 and 18.

Step 3 :

Embroider the nose with pink thread between rounds 8 and 9. I got a nose 5 stitches wide. You can use any yarn you have (plush or cotton or acrylic). Hide the end of the thread inside the head.

Step 4 :

Embroider the nose, the eyelashes and the brows with dark thread.

Step 5 :

Tighten the muzzle with the thread of the main color. 1 -> 2 -> 3 -> 4 -> 5 -> 6 -> 7 -> 8

Info :

If you donโ€™t use the safety eyes, embroidery the eyes, the nose and the brows with dark thread.

Assembly Instructions

  • Attach the head to the top of the body and sew securely through the head rounds into the body, matching the neck opening and hiding the seam inside the stitches.
  • Position the arms on either side of the body and sew them in place, leaving 4 stitches between the arms for a natural placement.
  • Sew the ears to the head between rounds 17 and 18 so they sit symmetrically on each side of the head.
  • Attach the tail to the center back of the body and secure firmly so it sits flush to the toy.
  • If using safety eyes, insert them between rounds 10 and 11 before stuffing fully, leaving 8 stitches between the eyes; if embroidering eyes, stitch them after the head is attached.

Important Notes

  • ๐Ÿ’กWork in spiral rounds without joining unless otherwise instructed and use a stitch marker to mark the first stitch of each round.
  • ๐Ÿ’กAttach safety eyes between rounds 10 and 11 and leave eight stitches between the eyes to achieve the intended expression.
  • ๐Ÿ’กStuff the head and body gradually, adding small amounts of filler to maintain even shape and avoid lumps.

This plush snuggler bunny is a cozy handmade companion perfect for gifting or nursery cuddles. The soft chenille yarn creates a plush, huggable texture you will love to touch. Finish the face with embroidered details or safety eyes to give your bunny a unique personality. ๐Ÿงถ๐Ÿฐ

You ask,

we answer.

FAQs

What size will the finished piece be?

The finished snuggler bunny measures approximately 41 cm / 16" tall when made with the recommended yarn and 4 mm hook.

Can I use different yarn weights for this pattern?

Yes, but changing yarn weight will change the final size and may require a different hook size; the pattern is written for plush chenille 100g/120m weight equivalents.

Do I need prior crochet experience for this pattern?

This pattern is rated intermediate; basic knowledge of single crochet, increases, decreases, and sewing amigurumi pieces together is recommended.

How long does this project typically take to complete?

Most crocheters complete this project in 5-7 hours, depending on experience level, finishing details, and embroidery time.