🧶 Beautiful ✨ Detailed 💝 Adorable

Plant Car Amigurumi Pattern

Plant Car Amigurumi Pattern
4.4★ Rating
2-4 Hours Time Needed
4.1K Made This
✂️

Intermediate Level

Ideal for those with basic crochet experience, featuring slightly more advanced stitches and techniques to expand your skills.

⏱️

Bite-Sized Project

Finishes in 2-4 hours—perfect for an afternoon of creative relaxation.

🏡

Cozy Accent

A warm touch for your space that transforms ordinary corners into inviting nooks filled with handmade charm.

About This Plant Car Amigurumi Pattern

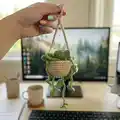
This pattern creates a small hanging potted plant with trailing vines, crocheted leaves, and tiny layered flowers. It uses superfine yarn and small hooks to achieve delicate detail and a realistic look. The project is modular: you make the pot, a circular soil/top insert, vines with leaves, and small flowers then sew them together. Great for gifting or decorating shelves and windows.

Plant Car Amigurumi Pattern crochet pattern - detailed view of completed project

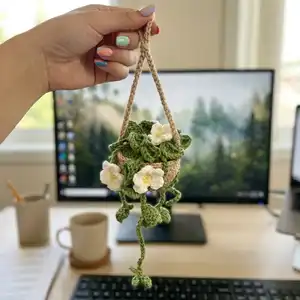
The pattern includes exact stitch counts and clear step instructions for each piece. Photos guide assembly so you can place vines and flowers naturally.

Why You'll Love This Plant Car Amigurumi Pattern

I absolutely love this pattern because it turns simple stitches into a charming hanging planter that looks delicate and full of life. I enjoy the way small components — leaves, vines and tiny flowers — come together to create a realistic miniature scene. It is satisfying to see the pot take shape quickly and then add personality with crocheted greenery. I also love that it makes a thoughtful handmade gift that lasts, and that you can easily customize colors and lengths to suit your style.

Plant Car Amigurumi Pattern step 1 - construction progress Plant Car Amigurumi Pattern step 2 - assembly progress Plant Car Amigurumi Pattern step 3 - details and accessories Plant Car Amigurumi Pattern step 4 - final assembly and finishing

Switch Things Up

I love playing with color combinations on this pattern — try soft pastels for a cottage look or deep greens and creams for a realistic style.

You can make the planter bigger by using a thicker yarn and a larger hook; conversely, use finer yarn and a smaller hook to create tiny keychain versions.

I often change vine lengths to create an asymmetrical trailing effect; experiment with 30ch, 25ch, and 20ch as suggested or add longer chains for dramatic drape.

Try embroidering small veins on leaves with a contrasting thread for delicate detail, or add tiny beads at the flower centers for sparkle.

Mix and match flower colors — use pinks or blues for seasonal themes, or make all-white blooms for a minimalist look.

You can attach a small keyring to the hanging chain to turn this into a decorative key fob or bag charm.

If you want a set, make several pots in different colors and hang them at varying heights to create a mini hanging garden display.

I sometimes add a thin wire inside longer vines for posability so they can be shaped to curl or hang precisely where I want them.

For a sturdier pot rim, use a slip stitch round with tighter tension or add a second round of single crochet in a contrasting color as an accent band.

Don’t be afraid to play with textures — mix a slightly fuzzy yarn for leaves with a smooth yarn for the pot to create visual contrast and interest.

Common Mistakes & How to Fix Them

✗ Skipping counting increases in the base can distort the pot shape; carefully count each increase and mark the start of the round to keep the stitch count accurate. ✗ Cutting the yarn after round 11 of the pot will prevent making the hanging chain; leave the yarn and chain 60 as instructed to create the hanger. ✗ Stuffing too aggressively inside the pot will make it bulge and lose shape; add small amounts of filling gradually and shape it as you stitch the circle inside. ✗ Not making enough vines or leaves will give a sparse appearance; follow the suggested counts (make 5-6 vines) and adjust lengths for fuller coverage as needed. ✗ Using inconsistent tension when crocheting leaves and vines causes uneven sizes; maintain even tension and practice one leaf to match the others before making multiples.

Plant Car Amigurumi Pattern

Make a charming hanging plant pot with vines, leaves and tiny flowers using this detailed crochet pattern. You will enjoy creating each small element — the pot, circle base, delicate leaves, and sweet flowers — then assembling them into a delightful hanging planter. Clear step-by-step instructions and handy photos guide you through every stage so you can craft a lovely gift or home accent.

Intermediate 2-4 Hours

Materials Needed for Plant Car Amigurumi Pattern

— Main Fabric

  • 01
    Super fine yarn, 1.8 oz (50 g) skeins - beige for pot (approx. one 50 g skein)
  • 02
    Super fine yarn, 1.8 oz (50 g) skeins - light green for leaves and vines (approx. one 50 g skein)
  • 03
    Super fine yarn, 1.8 oz (50 g) skeins - white for flower petals (small amount)
  • 04
    Super fine yarn, 1.8 oz (50 g) skeins - yellow for flower centers (small amount)

— Tools Required

  • 01
    Crochet hook size 2.5-3.0 mm
  • 02
    Stitch marker
  • 03
    Sewing needle
  • 04
    Scissors
  • 05
    Cotton filling (polyester stuffing)
  • 06
    Tapestry/yarn needle for sewing pieces together

Progress Tracker

0% Complete

— Pots :

Round 1 :

Magic ring, chain 1, 10 single crochet, slip stitch end row 1. (10 stitches)

Round 2 :

chain 1, (1 single crochet, 1 increase) 5 times, slip stitch end row 2. (15 stitches)

Round 3 :

chain 1, (2 single crochet, 1 increase) 5 times, slip stitch end row 3 (20 stitches)

Round 4 :

chain 1, (3 single crochet, 1 increase) 5 times (25 stitches)

Round 5 :

chain 1, (4 single crochet, 1 increase) 5 times (30 stitches)

Round 6 :

chain 1, (5 single crochet, 1 increase) 5 times (35 stitches)

Round 7 :

chain 1, (6 single crochet, 1 increase) 5 times (40 stitches)

Round 8-11 :

40 single crochet (40 stitches) *do not cut yarn*

Info :

sl st end row 11 and chain 60 make a hanging

— Circle Base :

Round 1 :

Magic ring, chain 1, 10 half double crochet. (10 stitches)

Round 2 :

10 half double crochet increase. (20 stitches)

Round 3 :

(1 half double crochet, 1 increase) 10 times. (30 stitches)

Round 4 :

(2 single crochet, 1 increase)*10 (40 stitches)

— Leaf (Part 1) :

Item Name (P1) :

Before make leaf, make the vines by 30ch, 25ch and 20ch. (make 5-6)

Item Name (P1) :

- start crochet the Leaf - *every vines crochet 1 - 5 leaf*

Item Name (P1) :

Slip knot and yarn over in chain stitch(vines), chain 7, 1 single crochet in 3rd stitches

Item Name (P1) :

2 half double crochet, 1 double crochet, chain 3 and slip stitch in next stitches

— Leaf (Part 2) :

Item Name (P2) :

1 slip stitch into the opposite row, chain 3 , 1 double crochet in next sts, 1 double crochet, 2 half double crochet, 1 single crochet

Item Name (P2) :

slip stitch in the first sts and cut yarn to finish the leaf.

— Flower :

Item Name (P1) :

FLOWER (MAKE 5-8)

Item Name (P1) :

(ylloew) hook in the vines a magic ring • 5 single crochet (5stitches) • Cut yarn.

Item Name (P1) :

(white) • chain 2, 2 double crochet in same sts, chain 2 and hook in same stitches (all in one stitches)

Item Name (P1) :

Slip titch in next stitch and do the same do

Item Name (P1) :

After 5 petals have been completed, slip stitch in first sts to end row and cut yarn.

— Assembly :

Info :

Use needle : sewing the circle inside the pot and stuffing inside the pot to finish

Info :

next step : sew every vines on the green circle

Assembly Instructions

  • Sew the green circle base inside the pot opening using a yarn needle, then stuff the pot lightly with cotton filling before final stitching to close.
  • Finish the pot body rounds and chain 60 to create the hanger; tie or secure the chain ends so the pot hangs evenly.
  • Arrange vines around the green circle and sew each vine in place using small secure stitches, spacing them for a natural drape.
  • Attach leaves to the vines and sew flowers onto desired vine positions, securing all loose ends and weaving them into the pot interior.
  • Position longer vines to hang down from the front and sides for a natural trailing look, trimming or tucking ends as needed.

Important Notes

  • 💡Use a stitch marker to mark the start of each round to ensure correct stitch counts and consistent shaping.
  • 💡Do not cut the yarn after round 11 of the pot so you can chain 60 to make the hanger as instructed.
  • 💡Stuff the pot gradually to keep the shape smooth and avoid overfilling which can distort the rim.
  • 💡Pin and arrange the vines and flowers before sewing so you can adjust placement for the most natural look.

This little hanging plant is a sweet handmade accent that brightens shelves, windows, or workspaces with tiny crocheted leaves and flowers. It makes a thoughtful gift and a satisfying quick project to personalize with color and length variations. Enjoy crafting each delicate piece and arranging the vines just the way you like. 🧶🌿

You ask,

we answer.

FAQs

What size will the finished piece be?

The finished hanging pot measures approximately 8-12 cm across depending on your tension and yarn; vine lengths vary based on the chain lengths you choose.

Can I use different yarn weights for this pattern?

Yes, you can use different yarn weights but this will change the final size; choose an appropriate hook for the yarn and expect larger or smaller proportions.

Do I need prior crochet experience for this pattern?

This pattern is rated intermediate and assumes familiarity with magic ring, single crochet, half double crochet, double crochet, increases, and basic assembly sewing.

How long does this project typically take to complete?

Most crocheters complete this project in 2-4 hours, though time may vary depending on experience and whether you make more vines, leaves, or flowers.