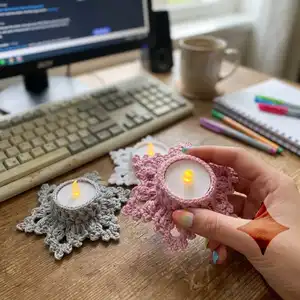
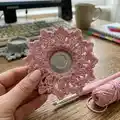
Make a delicate LED tealight holder with this charming 'Let it Snow' crochet pattern. You will create a lacy, decorative holder perfect for table displays and gifts. The pattern includes full round-by-round instructions, a crochet diagram, and step-by-step photos to guide you. Ideal for a relaxing afternoon of crochet and a lovely handmade accent for your home.
Progress Tracker
0% Complete
— Tealight Holder (base) :
Info :
Use crochet hook 3.0 mm, make a magic ring. (If you crochet rather loosely, take a 2.5 mm needle here)
Round 1 :
Ch 1, 6 sc in ring. Join with slst in first stitch (= 6 sc).
Round 2 :
Ch 1, 2 sc in each stitch around. Join with slst in first stitch (= 12 sc).
Round 3 :
Ch 1, (sc in next sc, 2 sc in next sc) around. Join with slst in first stitch (= 18 sc).
Round 4 :
Ch 1, (sc in next 2 sc, 2 sc in next sc) around. Join with slst in first stitch (= 24 sc).
Round 5 :
Ch 1, (sc in next 3 sc, 2 sc in next sc) around. Join with slst in first stitch (= 30 sc).
Round 6 :
Ch 1, (sc in next 4 sc, 2 sc in next sc) around. Join with slst-blo in first stitch (= 36 sc).
Round 7 :
Ch 2, 1 dc-blo (into the same puncture site as slst), 35 puff st-blo. Join with slst in first stitch (= 36 stitches).
Round 8 :
Ch 2, 1 FPpuff st around ch2 and dc of round 7 (see also basic instruction page 10): * for this, yarn over, insert the hook around the ch2 and dc of round 7 (from front to back to front - image 1) and grab the yarn (3 loops on hook), repeat from * 1 more time (5 loops on hook), get the yarn and pull it through the first 4 loops, get the yarn again and pull it through the last 2 loops. Insert hook between the 1st and 2nd stitch of last round and crochet 1 puff st, ch3, insert hook between the 2nd and 3rd stitch of last round and crochet 1 puff st, crochet in the 3rd stitch 1 FPpuff st, ch 2, skip 1 stitch, crochet 1 FPslst in next stitch, ch 2, skip 1 stitch,
Round 8 (continued) :
crochet in the next 3 stitches as follows: 1 FPpuff st into the 1st stitch, 1 puff st between the 1st and 2nd stitch, ch 3, 1 puff st between the 2nd and 3rd stitch, 1 FPpuff st into the 3rd stitch, ch 2, skip 1 stitch, 1 FPslst, ch 2, skip 1 stitch. Repeat from *** 4 more times, do not close the round here, this is done with the 1st slst of the 9th round.
Round 9 :
For better clarity, I have shown the stitches of this round in different colors in the crochet diagram - the text colors are matched accordingly to the crochet diagram. [slst, ch 3, slst] in 1st stitch (image 1), ch 1, skip 1 stitch, crochet in first ch3-space as follows: [slst, ch 3, slst in 2nd chain from hook, ch 1, slst in ch3-space, ch 4, slst in 2nd chain from hook, ch 2, slst in ch3-space, ch 3, slst in 2nd chain from hook, ch 1, slst in ch3-space] (image 2). Ch 1, skip 1 stitch, [slst, ch 3, slst] in next stitch (image 3).
Round 9 (special slst) :
Ch 1, 1 special slst as follows: insert between the two puff stitches of the 7th round (before the FPslst of the 8th round), get yarn and pull up a loop (2 loops on the hook) (image 4), insert between the next two puff stitches of the 7th round, get yarn and pull it through the stitch and both loops on the hook (image 5). Ch 1. * [slst, ch 3, slst] in next FPpuff st, ch 1, skip 1 stitch, Crochet in next ch3-space as follows: [slst, ch 3, slst in 2nd chain from hook, ch 1, slst in ch3-space, ch 4, slst in 2nd chain from hook, ch 2, slst in ch3-space, ch 3, slst in 2nd chain from hook, ch 1, slst in ch3-space]. Ch 1, skip 1 stitch, [slst, ch 3, slst] in next stitch, ch 1, 1 special slst as follows: insert between the two puff stitches of the 7th round (before the FPslst of the 8th round), yarn over and pull up a loop (2 loops on the hook), insert between the next two puff stitches of the 7th round, yarn over and pull through the stitch and both loops on the hook, ch 1. Repeat from * 4 more times. Fasten off. Close the round with sewing (image 7 and 8).
— Edge for the tea light :
Info :
Continue crocheting with crochet hook 2.5 mm. (I changed here to crochet hook 2.5 mm. I crochet rather tightly and with me it fits with this needle size then exactly for the tea light. If you crochet rather loosely, use a 2 mm needle here.) All stitches of this round are crocheted into the non-crocheted front loops of the 6th round. To do this, insert at one stitch of the 6th round, yarn over and pull up a loop, crochet ch 2. Crochet 1 dc into the same stitch.
Round 1 (edge) :
* Ch 1, skip 1 stitch, 1 puff st in next stitch (image 2), repeat from * 16 more times. Ch 1, join with slst in first stitch (image 3).
Round 2 (edge) :
[1 slst, ch 2, 1 dc] in first ch1-space, * ch 1, puff st in next ch1-space, repeat from * 16 more times. Ch 1, join with slst in first stitch.
Round 3 (edge) :
Ch 1, sc in first stitch, sc in next ch1-space, * sc in next stitch, sc in next ch1-space, repeat from * 16 more times. Fasten off. Close the round with sewing (image 1 bis 3).
— Basic Instructions :
Info :
magic ring: The magic ring is worked like the chain cast on, except the knot is not tightened. Then crochet chain 1, chain 2 or chain 3 and the corresponding number of stitches (see pattern) in the ring. When the round is complete, gently tug on the tail of the knot to tighten the center.
Info :
chain stitch = ch: Yarn over, pull yarn through stitch on hook.
Info :
slip stitch = slst: Insert hook into stitch or space indicated, yarn over, pull yarn through both loops on hook.
Info :
single crochet = sc: Insert hook into stitch or space indicated, yarn over, pull up a loop (2 loops on hook), yarn over, pull yarn through both loops on hook.
Info :
double crochet = dc: Yarn over, insert hook into stitch or space indicated, pull up a loop (3 loops on hook), yarn over, pull yarn through 2 loops on hook; repeat from * once more.
Info :
Front Post slip stitch (FPslst): Insert hook around the body of the stitch of the previous round (from front to back to front), grab the yarn and pull it through the stitch and the loop on hook at once.
Info :
puff stitch (puff st): Yarn over, insert hook into stitch or space indicated, pull the yarn through the stitch and pull it up a little (3 loops on hook), yarn over, get the yarn another time (you have 5 loops on your hook), get the yarn and pull it through the first 4 loops, get the yarn and pull it through the last two loops on hook.
Info :
Front Post puff stitch (FPpuff st): Yarn over, insert the hook around the body of the stitch of the previous round (from front to back to front), pull the yarn through the stitch and pull it up a little (you have 3 loops on your hook), yarn over, get the yarn another time as just described (you have 5 loops on your hook), get the yarn and pull it through the first 4 loops, get the yarn and pull it through the last two loops on hook.
This sweet 'Let it Snow' LED tealight holder adds handmade charm to any table or shelf. The lacy snowflake motif and textured puff stitches catch the light beautifully and make lovely gifts. Make a set in different colors for seasonal decor and cozy nights in. 🕯️❄️