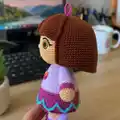
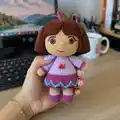
Make a charming Dora-inspired amigurumi doll with a classic bob haircut, big expressive eyes, and a layered purple skirt. This pattern recreates the soft tan skin, warm brown hair, and decorative scalloped trim in turquoise seen on the finished toy. Perfect as a handmade gift or a playful shelf companion, the doll stands as a compact, cuddly figure with sweet embroidered features.
Progress Tracker
0% Complete
— Head :
Round 1 :
6 sc in magic ring (6)
Round 3 :
(1 sc, inc) x 6 (18)
Round 4 :
(2 sc, inc) x 6 (24)
Round 5 :
(3 sc, inc) x 6 (30)
Round 6 :
(4 sc, inc) x 6 (36)
Round 7 :
(5 sc, inc) x 6 (42)
Round 8 :
(6 sc, inc) x 6 (48)
Round 9-12 :
1 sc in each st (48)
Info :
Place safety eyes between rounds 11-12 approximately 10-12 stitches apart depending on desired spacing; mark the round before placing eyes. If using embroiderd eyes, leave space for appliques placed later.
Round 13-16 :
1 sc in each st (48)
Info :
Begin light stuffing now. Use small amounts and push stuffing deep into the front of the head where the face will be, leaving slightly less at the crown to accommodate hair cap later.
Round 17-20 :
1 sc in each st (48)
Round 21 :
(6 sc, dec) x 6 (42)
Round 22 :
(5 sc, dec) x 6 (36)
Info :
Continue stuffing progressively as you decrease. Aim for a firm but slightly squeezable head—overstuffing can distort facial features.
Round 23 :
(4 sc, dec) x 6 (30)
Round 24 :
(3 sc, dec) x 6 (24)
Round 25 :
(2 sc, dec) x 6 (18)
Round 26 :
(1 sc, dec) x 6 (12)
Info :
Fasten off leaving a long tail for sewing the head to the body later. Finish closing the neck hole by sewing through remaining stitches and pulling tight. Weave tail securely inside the head.
— Eyes and Facial Details :
Info :
The eyes on this doll are layered appliques: white eye base, brown iris, darker brown ring, and tiny black pupil. Make two identical sets and sew onto head between rounds 11-12, spaced approximately 10-12 sts apart.
Eye White Round 1 :
6 sc in magic ring (6)
Eye White Round 2 :
6 inc (12)
Eye White Round 3 :
(1 sc, inc) x 6 (18)
Eye White Finish :
Fasten off leaving long tail for sewing. Make two.
Eye Iris Round 1 :
6 sc in magic ring (6)
Eye Iris Round 2 :
6 inc (12)
Eye Iris Finish :
Fasten off leaving tail. Center sew iris onto white base. Make two in medium brown.
Pupil :
Embroider small black French knot or sew a 3-4 mm black circle or use a 3-4 mm safety eye/puff. Secure in center of iris, then sew assembled appliques onto head making sure eyes are level and symmetrical.
Eyelashes and Eyelids :
Using black embroidery thread and a yarn needle, stitch an upper eyelid arc above each eye and add one or two short angled stitches for lashes on outer corners. For the subtle white inner highlight, leave a tiny stitch of white embroidery.
— Nose and Mouth :
Info :
Nose is a simple embroidered bump placed centered between the eyes around round 13-14. Mouth is a short embroidered curve in coral/red centered one round below nose.
Nose :
Stitch a small vertical satin stitch using tan yarn or embroidery thread to create a rounded nose bump. Anchor securely on the inside.
Mouth :
Using coral or red embroidery thread, stitch a slight smile with a curved satin stitch or split stitch. Begin each stitch inside the head so knots are hidden, and weave ends inside.
— Hair Cap (Brown Bob) :
Info :
The hair is worked as a cap to fit over the top of the head and additional small bangs are crocheted as individual strips to create the layered bob. Work the cap in rounds, then sew to head edge. Use brown worsted yarn and a slightly tighter tension to get a neat look.
Hair Cap Round 1 :
6 sc in magic ring (6)
Hair Cap Round 2 :
6 inc (12)
Hair Cap Round 3 :
(1 sc, inc) x 6 (18)
Hair Cap Round 4 :
(2 sc, inc) x 6 (24)
Hair Cap Round 5 :
(3 sc, inc) x 6 (30)
Hair Cap Round 6 :
(4 sc, inc) x 6 (36)
Hair Cap Round 7 :
(5 sc, inc) x 6 (42)
Hair Cap Round 8-10 :
1 sc in each st (42)
Info :
At this stage try the cap on the head (without sewing) to check fit. The cap should sit slightly back from the face to leave the forehead visible for bangs. Adjust rounds if necessary to fit your head circumference.
Hair Cap Round 11-14 :
1 sc in each st (42)
Info :
Fasten off leaving long tail to sew the cap to the head. Block slightly by pinning into shape if needed, then sew around the hairline with hidden whip stitch, aligning the front edge to sit just above the eyes and around the forehead.
Bangs Strip (Make 5 small strips) Round 1 :
ch 8, sc in 2nd ch from hook and across (7)
Bangs Round 2-4 :
Turn, sc across (7) (repeat to make thickness, adjust length for desired fringe)
Bangs Finish :
Fasten off leaving tails to sew each strip to front of hair cap centered over forehead. Sweep some outside pieces to frame face for the bob look and sew down so they slightly curl outward.
Top Loop / Hair Tie :
ch 12, sl st in 2nd ch from hook back to end to create a small loop. Fasten off and attach to crown center. Wrap a small embroidery chain or crocheted chain in accent color to hide attachments and create the small loop seen at the top.
— Body (Dress and Torso) :
Round 1 :
6 sc in magic ring (6)
Round 3 :
(1 sc, inc) x 6 (18)
Round 4 :
(2 sc, inc) x 6 (24)
Round 5 :
(3 sc, inc) x 6 (30)
Round 6-8 :
1 sc in each st (30)
Info :
Change to light purple/lilac yarn at the end of round 8 to start the dress body. Carry the tan yarn inside if you prefer not to fasten off; otherwise fasten off and weave in ends later.
Round 9-12 :
1 sc in each st (30) in light purple (lilac)
Info :
Work in rounds to build torso height. The doll pictured has a slightly flared skirt beginning around round 13; prepare to increase for skirt shaping.
Round 13 :
(4 sc, inc) x 6 (36) - begin gentle flare for skirt
Round 14-16 :
1 sc in each st (36) in lilac
Info :
At the front chest center, add the little bow appliqued motif later. Leave space free of embellishment while stitching; attach motif after finishing body but before final assembly for accurate placement.
Round 17 :
Change to deep pink/magenta for the skirt band: 1 sc in each st (36)
Round 18-20 :
1 sc in each st (36) in magenta
Round 21 :
Change to turquoise accent for scallop start: 1 sc in each st BLO (36) - this creates a ridge for scallops
Round 22 :
Change to magenta, 1 sc in each st (36)
Scallop Trim Instructions :
Switch to turquoise and work scallops spaced evenly: *skip 2 sts, 5 dc in next st, skip 2 sts, sl st in next st* around. You will have approximately 12 scallops spaced around a 36-st round. Adjust by using smaller or larger scallops if your stitch count differs.
Info :
Fasten off scallops and weave ends neatly. The scallop row may be worked into the magenta round below for a cleaner join; use a contrasting edging if desired.
Round 23-26 :
Return to lilac for the upper torso and sleeves shaping: 1 sc in each st (36)
Round 27 :
Begin shaping the neck opening: (8 sc, dec) x 4 (32)
Round 28 :
(7 sc, dec) x 4 (28)
Round 29 :
(6 sc, dec) x 4 (24)
Info :
Stop and leave a wide opening at the top for head insertion if you plan to sew the head on after stuffing the body. Fasten off leaving long tail for sewing head to body.
— Arms (Make 2) :
Round 1 :
6 sc in magic ring (6) - start with tan (hand)
Round 3 :
(1 sc, inc) x 6 (18)
Round 4-5 :
1 sc in each st (18) - shape the palm
Info :
Stuff hand portion firmly with fiberfill; use small amounts pushed into fingertips to give a rounded hand shape. Stuff well before changing to sleeve color.
Round 6 :
Change to lilac for sleeve: 1 sc in each st (18)
Round 7-9 :
1 sc in each st (18)
Round 10 :
Change to magenta for cuff stripe: 1 sc in each st (18)
Round 11-14 :
1 sc in each st (18)
Round 15 :
(2 sc, dec) x 4 + 2 sc (14) - begin taper to shoulder
Round 16 :
(1 sc, dec) x 4 + 2 sc (10)
Round 17 :
1 sc in each st (10)
Round 18 :
Fasten off leaving long tail for sewing. Lightly stuff arm along length; hands should remain firmer than upper arm for shape consistency.
Info :
If you want poseable arms, insert a thin wire or pipe cleaner before final stuffing. Ensure wire tips are folded and wrapped to avoid poking through yarn.
— Legs (Make 2) :
Round 1 :
6 sc in magic ring (6) - start with magenta for shoes
Round 3 :
(1 sc, inc) x 6 (18)
Round 4-6 :
1 sc in each st (18) - build shoe height
Round 7 :
Change to tan for leg skin: 1 sc in each st (18)
Round 8-11 :
1 sc in each st (18) - calf section
Round 12 :
Change to lilac stripe: 1 sc in each st (18)
Round 13-16 :
1 sc in each st (18)
Round 17 :
(2 sc, dec) x 4 + 2 sc (14) - begin shaping to thigh
Round 18 :
(1 sc, dec) x 4 + 2 sc (10)
Round 19-22 :
1 sc in each st (10). Fasten off leaving long tail for sewing hips to body.
Info :
Stuff the feet firmly, the legs moderately. Ensure the bottom of each shoe is well filled to allow the doll to stand with support. If you need more stability, insert a small felt circle inside the sole before sewing closed.
— Bow Motif and Chest Decoration :
Bow Round 1 :
ch 6, sc in 2nd ch from hook and across (5)
Bow Round 2 :
Turn, sc across (5)
Bow Finish :
Fasten off, pinch center and wrap with a small strip of contrasting yarn to form a small bow. Sew to chest center on lilac area around round 12-13 of body.
Small Square Motif :
ch 5, sc in 2nd ch from hook and across (4), turn and sc back across (4) to make a tiny square; sew behind bow for layered look.
— Hair Detail and Edge Finishing :
Info :
Sew bangs strips onto the front hairline, sweeping edges slightly outward and anchoring securely. For the bob edge, add a short row of reverse single crochet (crab stitch) along the rim to give a smooth finished hem if desired.
Crab Stitch Edge :
With brown yarn held and working from left to right, sl st in next st then sc in previous st repeating around to create firm, decorative edge. Fasten off and weave in ends.
— Assembly Preparation :
Info :
Block pieces slightly if needed. Pin parts in place before sewing: place head into body opening to judge how much neck shows; position arms between rounds 18-22 of torso; line up legs under skirt so doll stands upright.
— Sew and Finish :
Info :
Sew head to body using the long tail left earlier. Use a mattress or whip stitch and gather the neck opening until snug and symmetrical. Reinforce with several passes for stability.
Attach Arms :
Position arms on sides of body approximately between body rounds 18-22. Pin each position front-to-back so the palm faces slightly forward then sew through both arm and body fabric using ladder stitch to hide seams.
Attach Legs :
Space legs evenly under skirt, aligning centers roughly 10-12 sts apart depending on your circumference. Sew through upper leg rounds 19-22 into body opening with tight, secure stitches to ensure weight is supported when standing.
Finishing Touches :
Sew bow motif to chest after assembly. Embroider any final facial details and secure all loose ends by weaving at least 3 inches into internal stuffing before trimming. Use small dots of fabric glue if you used felt eye pieces to secure them.
Info :
Check symmetry and proportions from multiple angles. Add a few invisible stitches around the base of the hair cap to anchor it to the head so it won't shift in play.
This adorable Dora-inspired amigurumi brings together playful proportions, a sweet bob haircut, and a colorful scalloped skirt for maximum charm. Working through each section is satisfying and the details—like the bow and embroidered eyes—really make the character shine. Enjoy the process of assembling all the little parts into a lovable finished doll. 🧶💕 Share your creation and celebrate the handmade result! 🎨