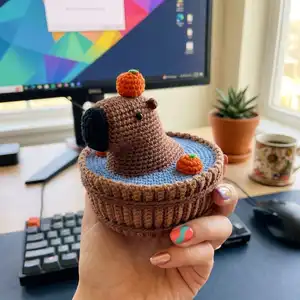
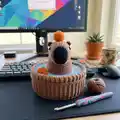
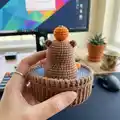
Create an adorable little capybara relaxing in a tub with this friendly crochet pattern. Youll make a small, stuffed capybara, water detail, tub with hoops, and tiny oranges — perfect as a gift or pocket-sized decor. The pattern includes step-by-step rounds, clear abbreviations, and helpful assembly photos to guide you.
Progress Tracker
0% Complete
— Materials :
Infos :
Brown, orange, beige, blue and black yarn. This toy was crocheted with YarnArt Begonia yarn (169 m/50 gr). Some green yarn for orange leaf. Hook 1,5 mm. Stuffing material. Needle. Piece of cardboard. The size of the toy is about 9 cm (~3 1/2 inches), if the specified materials are used. The thinner yarn you use, the smaller toy you will have as a result.
— Abbreviations :
Infos :
MR - magic ring. ch st - chain stitch. sc - single crochet. inc - increase. inc3 - double increase (make 3 sc in one stitch). invdec - invisible decrease. sc3tog - single crochet 3 together. hdc - half double crochet. sl st - slip stitch. ex st - extra stitch (extra sc for shifting the beginning of the row).
— Some tips for happy crocheting :
Infos :
Need to crochet with tight stitches to be sure that there won't be any holes. If there are some tiny holes, use a smaller size hook. Most of all details are crocheted in a spiral without slip stitch and lifting loops to avoid seams. Use a marker to avoid losing the begin of the row. It can be a colored pin or thread of contrasting color. All details must be finished with slip stitch to avoid uneven edges.
— Head :
Info :
Brown color, hook 1,5 mm.
Round 1 :
1row: 8 ch st, inc in the second stitch from the hook in the back loop (photo 1, 2), in the back loops of the chain: 5sc, 4sc in the last loop of the chain, keep crocheting on the other side of the chain (photo 3): 5sc, inc (photo 4) (18)
Round 2 :
2row: (incx2, 5sc, incx2)x2 (26)
Round 3 :
3row: (1sc, incx2, 7sc, incx2, 1sc)x2 (34)
Round 5 :
5row: 2sc, inc, 28sc, inc, 2sc (36)
Round 6-8 :
6-8rows: 36sc (36)
Round 9 :
9row: 2sc, incx2, 28sc, incx2, 2sc (40)
Round 10 :
10row: 40sc (40)
Round 11 :
11row: 16sc, invdecx4, 16sc (36)
Round 12 :
12row: 1sc, inc, 14sc, invdecx2, 14sc, inc, 1sc (36)
Round 13 :
13row: 3sc, inc, 12sc, invdecx2, 12sc, inc, 3sc (36)
Round 14 :
14row: 4ch st, inc in the second stitch from the hook in the back loop, in the back loops of the chain: 2sc, keep crocheting on the body: 2sc, inc, 30sc, inc, 2sc, on the other side of the chain: 2sc, inc (46)
Round 15 :
15row: inc, 3sc, invdec, 34sc, invdec, 3sc, inc (46)
Round 16 :
16row: incx2, 2sc, invdecx2, 30sc, invdecx2, 2sc, incx2 (46)
Round 17 :
17row: (1sc, inc)x2, 2sc, invdec, 30sc, invdec, 2sc, (inc, 1sc)x2 (48)
Round 18 :
18row: 2sc, inc, 42sc, inc, 2sc
Info :
Fasten off and cut the yarn, leave a long end for sewing.
Info :
Move the marker thread in the next stitch from the hook.
— Muzzle :
Info :
Black color, hook 1,5 mm.
Round 1 :
1row: 6ch st, inc in the second stitch from the hook in the back loop, in the back loops of the chain: 3sc, in the last loop of the chain: incx2, on the other side of the chain: (3sc, inc) (14)
Round 2 :
2row: (1sc, inc, 3sc, inc, 1sc)x2 (18)
Round 3 :
3row: 1sl st, inc, 5hdc, inc, 2sc, inc, 5hdc, inc, 1sl st (22)
Info :
Fasten off and cut the yarn, leave a long end for sewing.
— Ears :
Info :
Attach the thread between 4th and 5th rows as shown in the photo.
Info :
Then in one stitch make: 1ch st, 1hdc, 1ch st, 1sl st
Info :
Fasten off and cut the yarn, hide the end of the yarn. The second ear make in the same way.
— Water :
Info :
Blue yarn, hook 1,5 mm.
Round 1 :
1row: 6sc in MR (6)
Round 2 :
2row: incx6 (12)
Round 3 :
3row: (1sc, inc)x6 (18)
Round 4 :
4row: (1sc, inc, 1sc)x6 (24)
Round 5 :
5row: (3sc, inc)x6 (30)
Round 6 :
6row: (2sc, inc, 2sc)x6 (36)
Round 7 :
7row: (5sc, inc)x6 (42)
Round 8 :
8row: (3sc, inc, 3sc)x6 (48)
Round 9 :
9row: (7sc, inc)x6 (54)
Round 10 :
10row: (4sc, inc, 4sc)x6 (60)
Round 11 :
11row: (9sc, inc)x6 (66)
Round 12 :
12row: (5sc, inc, 5sc)x6 (72)
Round 13 :
13row: (11sc, inc)x6 (78)
Round 14 :
14row: (6sc, inc, 6sc)x6 (84)
Round 15 :
15row: (13sc, inc)x6 (90)
Round 16 :
16row: (7sc, inc, 7sc)x6 (96)
Info :
Fasten off and cut the yarn, leave a long end for sewing.
— Wooden tub :
Info :
Beige yarn, hook 1,5 mm.
Round 1 :
1row: 15ch st, 1sc in the second stitch from the hook, 13sc (4)
Round 2-90 :
2-90rows: (in back loops only) 1ch st, turn, 14sc (14)
Round 91 :
91row: (work on the long side of the detail) 1ch st, (4sc, invdec, 4sc)x9, 1sl st in the beginning of the row
Info :
Keep crocheting in round to create the bottom part of the tub
Round 92 :
92row: (in back loops only) (7sc, invdec)x9 (72)
Round 93 :
93row: (3sc, invdec, 3sc)x9 (63)
Round 94 :
94row: (5sc, invdec)x9 (54)
Round 95 :
95row: (7sc, invdec)x6 (48)
Round 96 :
96row: (3sc, invdec, 3sc)x6 (42)
Round 97 :
97row: (5sc, invdec)x6 (36)
Round 98 :
98row: (2sc, invdec, 2sc)x6 (30)
Round 99 :
99row: (4sc, invdec, 4sc)x3 (27)
Round 100 :
100row: (7sc, invdec)x3 (24)
Round 101 :
101row: (1sc, invdec, 1sc)x6 (18)
Round 102 :
102row: invdecx9 (9)
Info :
Pull the hole closed. Fasten off and cut the yarn, hide end of the yarn. Sew the open sides of the tub.
Info :
Cut a circle out of the cardboard. Diameter of the circle should be a bit smaller than bottom part. Glue it to the wrong side of the detail.
— Tub hoops :
Info :
Brown yarn, hook 1,5 mm.
— Upper hoop :
Round 1 :
1row: 2ch st, 1sc in the second stitch from the hook
Round 2-103 :
2-103rows: 1sc in the bottom part of the sc of the previous row: insert hook into the bottom part of the previous sc (photo 1), yarn over and pull up a loop (two loops on the hook) (photo 2). Yarn over and pull through two loops to finish off the single crochet (photo 3). Fasten off and cut the yarn, leave a long end for sewing.
— Bottom hoop :
Round 1 :
1row: 2ch st, 1sc in the second stitch from the hook.
Round 2-92 :
2-92rows: 1sc in the bottom part of the sc of the previous row. Fasten off and cut the yarn, leave a long end for sewing.
— Orange :
Info :
Orange color, hook 1,5 mm.
Round 1 :
1row: 6sc in MR (6)
Round 2 :
2row: incx6 (12)
Round 3-6 :
3-6rows: 12sc (12)
Info :
Stuff the orange with stuffing material.
Round 7 :
7row: invdecx6 (6)
Info :
Fasten off and cut the yarn, leave a long end for sewing. Embroider leaf on the orange with green yarn.
— Orange halves :
Info :
Orange yarn, hook 1,5 mm.
Item Name (Bigger half P1) :
Bigger half (2 pcs). 1row: 6sc in MR (6). 2row: incx6 (12). 3row: 12sc (12). Fasten off and cut the yarn, leave a long end for sewing. Embroider leaf on one of the orange halves with green yarn.
Item Name (Smaller half P1) :
Smaller half (1 pc). 1row: 6sc in MR (6). 2row: (1sc, inc)x3 (9). 3row: 9sc (9). Fasten off and cut the yarn, leave a long end for sewing.
— Assembly :
Info :
With black yarn make eyes a French knot stitch between 5th and 6th rows. The distance from the ear is 3 sc. With brown yarn make eyelids above eyes. Stuff the capybara with stuffing material. Sew the muzzle to the head.
Info :
Cut a circle out of the cardboard. Diameter of the circle should be a bit smaller than detail. Glue it to the wrong side of the detail.
Info :
Sew the capybara to the water detail as shown in the photo. Add stuffing material if needed.
Info :
Sew the orange to the head. Stuff orange halves with stuffing material and sew them near the capybara as shown in the photo.
Info :
Stuff the tub with stuffing material and sew the water detail to the tub. Edge of the water is below the edge of the tub.
Info :
Sew hoops to the tub.
Info :
Congratulations! Your capybara is ready!
This adorable Capybara in a tub is a tiny, handmade treasure thats full of charm and tiny details. Perfect for gifting or collecting, the little tub and oranges make it an irresistible miniature scene. Enjoy every stitch as you create your own relaxing capybara friend. 🧶🧸✨