🧢 Beautiful ✨ Detailed πŸ’ Adorable

Cactus Frog with Removeable Pot Amigurumi Pattern

Cactus Frog with Removeable Pot Amigurumi Pattern
4.8β˜… Rating
5-7 Hours Time Needed
1.8K Made This
βœ‚οΈ

Intermediate Level

Ideal for those with basic crochet experience, featuring slightly more advanced stitches and techniques to expand your skills.

⏱️

Weekend Treat

Takes 5-7 hours, making it an enjoyable project to finish over a couple of days.

🧸

Cute Companion

An adorable friend to cherish, handcrafted with love to bring comfort and joy for years to come.

About This Cactus Frog with Removeable Pot Amigurumi Pattern

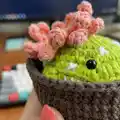
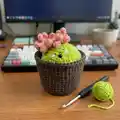
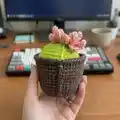
This pattern makes a delightful small cactus frog amigurumi with a removable pot and a flower to sew on. It uses basic amigurumi techniques plus a few shaping stitches to create the cactus texture and adorable limbs. The removable pot gives the frog a playful display option and makes it perfect for gifting or shelf decor.

Cactus Frog with Removeable Pot Amigurumi Pattern crochet pattern - detailed view of completed project

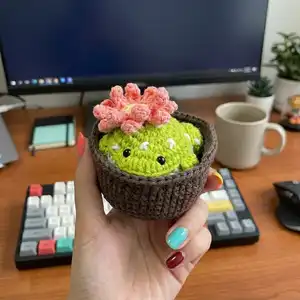
Clear rounds and photo guidance are included to help you assemble each piece accurately. Customize the colors to create many unique cactus-frog friends for yourself and loved ones.

Why You'll Love This Cactus Frog with Removeable Pot Amigurumi Pattern

I absolutely love this pattern because it combines a playful character with small, satisfying crochet pieces that work up quickly. The removable pot adds a delightful interactive element that makes the frog more than just a toy. I enjoy the simple flower petal technique β€” it creates a lovely textured bloom with minimal effort. This pattern is a great way for me to use up small yarn scraps while making something charming and displayable.

Cactus Frog with Removeable Pot Amigurumi Pattern step 1 - construction progress Cactus Frog with Removeable Pot Amigurumi Pattern step 2 - assembly progress Cactus Frog with Removeable Pot Amigurumi Pattern step 3 - details and accessories Cactus Frog with Removeable Pot Amigurumi Pattern step 4 - final assembly and finishing

Switch Things Up

I love customizing this pattern by changing the flower color and size; try bright pinks or purples for a fun contrast.

I often make a mini version by using fingering weight yarn and a smaller hook to create keychain-sized frogs.

For a chunkier look, I use bulky cotton and a larger hook to create a soft, squishy frog that is great as a stress toy.

I sometimes replace the safety eyes with embroidered eyes for a fully child-safe version that’s machine washable.

Try adding a tiny felt leaf under the flower for more botanical detail and secure it with a few stitches.

I also experiment with patterned or variegated yarn for the frog body to give each frog a unique texture and visual interest.

To make the pot heavier and more stable, I put a small flat pebble or sewing weights in the bottom before finishing and then crochet over it carefully.

Embroider different cactus marks: small crosses, dots, or tiny lines to vary the look of the cactus skin.

You can make a whole family by varying sizes and colors β€” a mother frog, baby frogs, or a trio in one pot make a charming set.

I recommend testing eye placement and flower position with pins before sewing to achieve the perfect expression and balance.

Common Mistakes & How to Fix Them

βœ— Skipping the stitch marker will make counting rounds difficult and can cause shaping errors; use a marker or a piece of scrap yarn to mark the start of each round. βœ— Forgetting to insert safety eyes before stuffing can make placement awkward; add eyes between rounds 5 and 6 as instructed to get the correct spacing. βœ— Overstuffing the body will distort the shape and make sewing parts together tricky; stuff gradually and check the silhouette before finishing rounds. βœ— Pulling yarn too tightly when sewing limbs will pucker the body fabric and change the frog's shape; use even tension and pin pieces in place before stitching. βœ— Not leaving long yarn tails when fastening off makes assembly harder later; leave long ends on parts that need to be sewn into the body for easier attachment. βœ— Closing the pot or body too early without checking orientation can result in mismatched seams; assemble and check right-side placement before final sewing.

Cactus Frog with Removeable Pot Amigurumi Pattern

Create a charming cactus frog complete with a removable flower pot and a pretty bloom. This intermediate amigurumi pattern guides you step-by-step to crochet the frog, legs, toes, flower and pot. The finished toy is small and gift-ready, making a delightful handmade present. Enjoy the tactile process and customize colors to make it uniquely yours.

Intermediate 5-7 Hours

Materials Needed for Cactus Frog with Removeable Pot Amigurumi Pattern

β€” Main Fabric

  • 01
    Any type of yarn (author used Sugar and Cream cotton yarn)
  • 02
    Green - hot green (main frog color)
  • 03
    White - small amount for belly and details
  • 04
    Yellow - small amount for flower center
  • 05
    Light red - tea rose (for flower petals)
  • 06
    Red - accent (listed as available color)
  • 07
    Brown - warm brown (for flower pot)

β€” Tools Required

  • 01
    Crochet hook size 3.5mm
  • 02
    Poly-fill fiber for stuffing
  • 03
    Yarn needle
  • 04
    Safety eyes 6mm (Not for children under 3)
  • 05
    Scissors
  • 06
    Stitch markers or a piece of scrap yarn
  • 07
    Pins for assembly (optional)

Progress Tracker

0% Complete

β€” Head and body :

Round 1 :

8sc in a MR (8)

Round 2 :

8inc (16)

Round 3 :

(sc, inc) x8 (24)

Round 4 :

(2sc, inc) x8 (32)

Round 5 :

(3sc, inc) x8 (40)

Round 6 :

16sc, inc, 5hdc-inc, inc, 17x (47)

Info :

Change to white yarn.

Round 7 :

BLO: 21sc, 3dec, 20sc (44)

Round 8 :

(3sc, inc) x2, 12sc, 2dec, 12sc, (3sc, inc) x2 (46)

Round 9-10 :

46sc (46)

Round 11 :

(3sc, dec) x2, 10sc, dec, 2sc, dec, 10sc, (3sc, dec) x2 (40)

Round 12 :

(2sc, dec) x10 (30)

Round 13 :

30sc (30)

Info :

Now it’s time to insert the safety eyes between round 5 and 6, 4 stitches apart. Make sure the nose is in the middle of the eyes.

Info :

Stuff the piece.

Round 14 :

(sc, dec) x10 (20)

Round 15 :

10dec (10)

Round 16 :

3 dec. F.O You don’t have to finish this round.

Info :

Close the body by using needle and cut the yarn. Hide the end inside the body.

β€” Back legs x2 :

Round 1 :

6sc in a MR (6)

Round 2 :

6inc (12)

Round 3 :

(sc, inc) x6 (18)

Round 4 :

18sc (18) F.O

Info :

Leave long end to connect with the body.

β€” Toes x2 :

Round 1 :

8sc in a MR (8)

Round 2 :

Do not break the working yarn, continue to work the toes with it: chain 3, turn work, start from the second chain from the hook, hdc, 1 slst in the chain, 1 slst on the MR)x3, 4sc, slst on the last stitch. (8) F.O

Info :

Leave long end to connect with the back legs.

β€” Front legs x2 :

Round 1 :

5sc in a MR (5)

Round 2 :

inc, 2sc, inc, sc (7)

Round 3-10 :

7sc (7) F.O

Info :

Do not close the piece. Do not stuff the piece. Leave long end to connect with the body.

β€” Flower :

Round 1 :

BLO: 6sc in a MR (6)

Round 2 :

BLO: 6inc (12)

Round 3 :

BLO: (sc, inc) x6 (18)

Info :

Change to light red yarn.

Round 4 :

BLO: slst, (chain 5, start from the 2nd chain from the hook, 4hdc along the chain, skip 1 stitch, slst on the next stitch of the base) x8.

Info :

After you finished all the petals in the back loop (8 petals), change to the front loop and do the same step (8 petals). F.O the last stitch. At the end you should have 16 petals.

Info :

Leave long end to sew into the frog's body.

β€” Flower Pot :

Round 1 :

8sc in a MR (8)

Round 2 :

8inc (16)

Round 3 :

(sc, inc) x8 (24)

Round 4 :

(2sc, inc) x8 (32)

Round 5 :

(3sc, inc) x8 (40)

Round 6 :

(4sc, inc) x8 (48)

Round 7 :

(5sc, inc) x8 (56)

Round 8 :

BLO: 56sc (56)

Round 9-14 :

56sc (56)

Round 15 :

FLO: 56hdc (56), slst to the first stitch.

Info :

F.O Leave long end and sew around the pot to secure and hide the end. Cut off the yarn.

β€” Assembly :

Info :

Back legs and toes: Start sewing the back legs on two side of the thighs and make sure to stuff it before closing it all the way. Sew the toes to the bottom of the legs. Make sure 3 toes pointed out.

Info :

Front legs: Sew the front leg two stitches away from the back leg, 3 stitches long. Then sew the tip of the leg into the belly. Repeat the same steps on the other side.

Info :

Using white yarn, embroider "X" around the frog body.

Info :

Sew the flower to one side of the frog. You can also sew it on the top of the frog. It’s completely up to you.

Info :

Now you have a cactus frog. Please take care of it by handwashing when dirty. Hope you enjoy making this pattern.

Assembly Instructions

  • Start sewing the back legs on each side of the thighs; stuff the legs before closing them completely and sew the toes to the bottom so three toes point outward.
  • Sew the front legs two stitches away from each back leg, making them three stitches long, then sew the tip of each front leg into the belly for a natural pose.
  • Embroider small "X" marks around the frog body with white yarn to mimic cactus spines, spacing the stitches evenly for a balanced look.
  • Sew the flower onto one side of the frog (or on top if you prefer), using the long tail left on the flower to stitch it securely into the frog’s body.

Important Notes

  • πŸ’‘Insert safety eyes between rounds 5 and 6, spaced 4 stitches apart, before stuffing to ensure even placement.
  • πŸ’‘Work in continuous spiral rounds and use a stitch marker or scrap yarn to mark the beginning of each round for accurate counts.
  • πŸ’‘Leave long yarn tails on parts that will be sewn to the body to make assembly easier and neater.

You now have a tiny cactus frog with a removable pot and a happy flower to display! 🌸🧢 This little amigurumi is perfect for gifting, desk decor, or a cheerful handmade companion. 😊 Keep it clean with gentle handwashing and enjoy crafting more colorful variations! 🌿

You ask,

we answer.

FAQs

What size will the finished piece be?

The finished amigurumi is approximately 2 1/2 inches in height and 2 1/2 inches wide when made with the recommended cotton yarn and 3.5mm hook.

Can I use different yarn weights for this pattern?

Yes, you can substitute yarn weight, but the final size will change; use an appropriate hook for your selected yarn and adjust stuffing accordingly.

Do I need prior crochet experience for this pattern?

This pattern is rated intermediate; basic knowledge of amigurumi techniques like magic ring, increases, decreases and working in continuous rounds is recommended.

How long does this project typically take to complete?

Most crocheters complete this project in 5-7 hours, though total time may vary based on experience and customization choices.