🧢 Beautiful ✨ Detailed πŸ’ Adorable

Butterfly Pattern

Butterfly Pattern
4.0β˜… Rating
1-2 Hours Time Needed
2.6K Made This
βœ‚οΈ

Intermediate Level

Ideal for those with basic crochet experience, featuring slightly more advanced stitches and techniques to expand your skills.

⏱️

Quick Make

Complete in under 2 hoursβ€”lightning fast fun for instant gratification and quick gifts.

🏑

Cozy Accent

A warm touch for your space that transforms ordinary corners into inviting nooks filled with handmade charm.

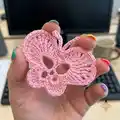
About This Butterfly Pattern

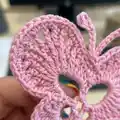
This pattern creates a small, decorative crochet butterfly perfect as an applique or embellishment. It uses a round-and-shell construction to form layered wings with elegant openwork details. The instructions include every round and a diagram to help you follow along step by step.

Butterfly Pattern crochet pattern - detailed view of completed project

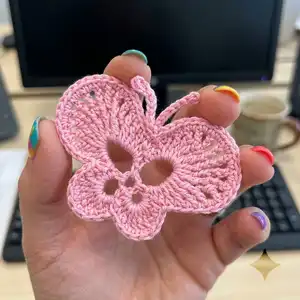
Worked in a lightweight yarn with a 2.0mm hook, the butterfly is delicate and quick to make. Use it to decorate clothing, accessories, or gift tags.

Why You'll Love This Butterfly Pattern

I absolutely love this pattern because it transforms a few simple stitches into a beautifully shaped butterfly that looks much more complex than it is. I enjoy how quickly one can finish a butterfly and immediately use it on a project or give it as a small handmade gift. The layered wing construction creates lovely texture and shadowing that always draws compliments. I find the diagram very helpful and satisfying to follow, and I hope you enjoy making many variations.

Butterfly Pattern step 1 - construction progress Butterfly Pattern step 2 - assembly progress Butterfly Pattern step 3 - details and accessories Butterfly Pattern step 4 - final assembly and finishing

Switch Things Up

I love how easily this butterfly adapts to different yarns and hooks, allowing me to make larger or tinier versions with simple swaps.

I sometimes use a fine cotton thread and a 1.5mm hook for a lacey, delicate look that is perfect for bridal accents.

For a chunkier, more playful butterfly, I pick a sport or DK weight yarn and a 3.5mm hook for a bold applique that stands out.

I also change color sequences between rounds to add stripes or ombre effects to the wings for visual interest.

I often embroider a small bead or French knot in the center to add a focal point and sparkle.

To make a garland, I create several butterflies and join them with chains or ribbon, spacing them evenly for a festive look.

I sometimes stiffen the wings with diluted fabric stiffener to create ornaments that hold their shape beautifully.

I enjoy combining different textures by adding a metallic thread for one round to create a subtle shimmer on the wing edges.

If I want poseable antennae, I thread a thin floral wire into the chain before sewing it into the center for gentle shaping.

I encourage you to experiment with color, size, and finishing touches β€” each small variation makes the butterfly uniquely yours.

Common Mistakes & How to Fix Them

βœ— Skipping the initial chain-and-slip loop can make the center uneven; always start with the specified 5 chain and join with a slip stitch to form a neat center ring. βœ— Working inconsistent tension across the long treble and multiple-treble stitches will distort the wing shape; maintain steady tension and practice the taller stitches first on a scrap. βœ— Not counting stitches between shells can cause the wings to be lopsided; count the single crochet and chain spaces after each round to ensure symmetry. βœ— Forgetting to fasten off and weave in ends securely will make the applique unravel during handling; finish each section by fastening off and weaving tails neatly to the back.

Butterfly Pattern

Make a delicate crochet butterfly applique to brighten up garments, bags, or home decor. This pattern gives you a pretty layered wing design with clear round-by-round instructions and a diagram. Youll enjoy a quick and satisfying project that shows impressive results with minimal yarn. Perfect for scrap yarn and small gifts.

Intermediate 1-2 Hours

Materials Needed for Butterfly Pattern

β€” Main Fabric

  • 01
    Cotton or blended yarn, 169 m / 50 g (fingering/light) - main color (pink) approximately 50 g
  • 02
    Optional accent colors (green, cream, purple shown) - small quantities (10-20 g each) as desired

β€” Tools Required

  • 01
    Crochet hook size 2.0 mm (No.2)
  • 02
    Scissors
  • 03
    Yarn/tapestry needle for weaving ends
  • 04
    Stitch markers (optional)
  • 05
    Blocking surface and pins (optional for shaping)

Progress Tracker

0% Complete

β€” Butterfly :

Infos :

DIAGRAM KEY: o -chain. -slip stitch. + -single crochet. | -half double crochet. T -double crochet. t -treble crochet. tt -double treble crochet. ttt -triple treble crochet. tttt -quadruple treble crochet. -single crochet between crochet.

Info :

Start 5 chain, 1slip stitch-round.

Round 1 :

1r-1 chain, 1 single crochet, 5 chain, 1 single crochet, 10 chain, 1 single crochet, 10 chain, 1 single crochet, 5 chain, 1slip stitch.

Round 2 :

2r-1 chain, 1 single crochet,1 half double crochet,1double crochet,5 treble crochet,1double crochet,1 half double crochet, 1 single crochet, *1 single crochet,1 half double crochet,1 double crochet,1 treble crochet, 1 double treble crochet,1 triple treble crochet,7 quadruple treble crochet,1 triple treble crochet,1 double treble crochet,1 treble crochet,1 double crochet,1 half double crochet,1 single crochet* repeat ** 2 1 single crochet,1 half double crochet,1double crochet,5 treble crochet,1double crochet,1 half double crochet, 1 single crochet,1slip stitch.

Round 3 :

3r-1 chain,10 single crochet(between crochet),skip miss 2 single crochet,16 single crochet(between crochet),skip miss 2 single crochet,16 single crochet(between crochet),skip miss 2 single crochet,10 single crochet(between crochet),1slip stitch.

Info :

11 chain,skip miss 3 chain, 7 slip stitch,10 chain,skip miss 3 chain, 7 slip stitch.

Info :

VIDEO http://youtu.be/7FXw9Kke3P4

Assembly Instructions

  • Block the finished butterfly flat to shape by pinning it to a blocking surface and spritzing lightly; allow to dry for clean wing curves.
  • Weave in all yarn tails on the reverse side using a yarn needle, hiding ends within the stitches for a neat finish.
  • If attaching as an applique, position the butterfly on your chosen fabric and sew through the back loops with matching thread to secure it.
  • Create the antennae by forming a short chain (11 chains as shown), slip stitching back along the chain, and sew them into the center top of the wings.
  • For a raised effect, add a few small stitches of stuffing under the center circle before closing and sewing to your project.

Important Notes

  • πŸ’‘Use the diagram and written rounds together to confirm stitch counts and placement for best accuracy.
  • πŸ’‘Work the taller multi-treble stitches with even tension to prevent the wings from curling or sagging.
  • πŸ’‘Pin and block the butterfly after finishing to open up the lace and shape the wings evenly.

This pretty butterfly pattern is perfect for adding handmade charm to clothing, accessories, and home projects. Its delicate layered wings create a lovely silhouette thats both quick and satisfying to crochet. Make a flock of butterflies in different colors to decorate gifts or room decor. πŸ¦‹βœ¨

You ask,

we answer.

FAQs

What size will the finished piece be?

The finished butterfly size will vary by yarn and hook, but using the recommended 169m/50g yarn and a 2.0 mm hook yields a small applique approximately 6-8 cm across.

Can I use different yarn weights for this pattern?

Yes, you can use different yarn weights, but the final size and stitch definition will change; adjust the hook size accordingly and consider practicing a sample first.

Do I need prior crochet experience for this pattern?

This pattern is rated intermediate because it uses taller stitches like double treble and triple treble; familiarity with basic stitches and reading diagrams is helpful.

How long does this project typically take to complete?

Most crocheters can complete one butterfly in about 1-2 hours, depending on experience and yarn choice.