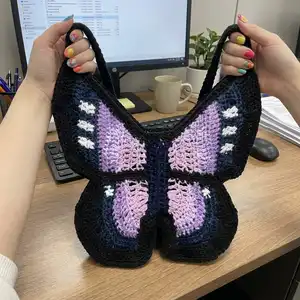
Make a whimsical Butterfly Bag that doubles as a statement accessory and a fun crochet project. This pattern guides you through making two butterfly motifs, assembling them into a bag, crocheting the strap and adding a decorative border. With clear row-by-row instructions and color-change tips, you will create a unique wearable piece to gift or keep. Perfect for crafters who enjoy colorwork and shaping.
Progress Tracker
0% Complete
— Abdomen :
Row 1 :
sc in the 2nd ch from your hook, sc 14, sc 3 into the next stitch, sc 14, sc inc, sl st and ch 1. (34)
Row 2 :
sc 16, sc inc, sc 16, sc inc, sl st and fasten off. (36)
Info :
Size: 3.5 cm x 12.5 cm
— Forewings (Left) :
Info :
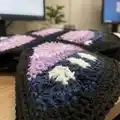
Graph of the butterfly shown in the pattern. Colors: Light purple-1, medium purple-2, dark purple-3, blue-4 and white-5.
Info :
Attach your yarn-2 to the 3rd stitch of the abdomen with the right side facing up.
Row 1 :
Insert your hook and make a chain, sc in the same stitch (change to yarn-1), then dc 3, sc 1, ch 3 and TO. (5)
Row 2 :
2 dc inc (change to yarn-2), dc 1, dc inc, ch 3 and TO. (8)
Row 3 :
Dc in the same stitch, dc inc (change to yarn-1), tr 2, dc 4 (change to yarn-2), ch 1 and TO. (10)
Row 4 :
Sc 1 (change to yarn-1), sc 5 (change to yarn-2), sc 1, dc 2, dc inc (change to yarn-3), ch 3 and TO. (11)
Row 5 :
Dc in the same stitch, dc 2 (change to yarn-2), dc inc, dc 2, 2 tr inc, dc 1 (change to yarn-3), dc 2, ch 1 and TO. (15)
Row 6 :
Sc 3 (change to yarn-2), sc 7 (change to yarn-3), sc 4, sc inc, ch 3 and TO. (16)
Row 7 :
Dc in the same stitch, dc 2, tr 4, dc 4, sc 5 (change to yarn-4), ch 1 and TO. (17)
Row 8 :
Sc across the row, ch 3 and TO. (17)
Row 9 :
Dc in the same stitch, dc 2 (change to yarn-5), dc 2 (change to yarn-4), dc 2 (change to yarn-5), dc 2 (change to yarn-4), dc 2 (change to yarn-5), dc 2 (change to yarn-4), dc 4, ch 1 and TO. (18)
Row 10 :
Sc 4 (change to yarn-5), dc 2 (change to yarn-4), dc 2 (change to yarn-5), dc 2 (change to yarn-4), dc 2 (change to yarn-5), dc 2 (change to yarn-4), dc 3, sc inc, ch 3 and TO. (19)
Row 11 :
Dc in the same stitch, dc 4, tr 2, ch 4, sl st to the 2nd tr, tr 2, dc 4, hdc 2, sc 3, sl st and fasten off. (20)
Info :
You have finished the left forewing. Let's work on the right forewing.
— Forewings (Right) :
Info :
Attach yarn-1 to the 28th stitch of the abdomen with the right side facing up.
Row 1 :
Insert your hook and ch 1, sc in the same stitch, dc 3 (change to yarn-2), sc 1, ch 3 and TO. (5)
Row 2 :
Dc in the same stitch, dc 1 (change to yarn-1), 2 dc inc, dc 1, ch 3 and TO. (8)
Row 3 :
Dc 3, tr 2 (change to yarn-2), 2 dc inc, ch 3 and TO. (10)
Row 4 :
Dc in the same stitch, dc 2, sc 1 (change to yarn-1), sc 5 (change to yarn-2), sc 1 (change to yarn-3), ch 3 and TO. (11)
Row 5 :
Dc 1 (change to yarn-2), dc 1, 2 tr inc, dc 2, dc inc (change to yarn-3), dc 2, dc inc, ch 1 and TO. (15)
Row 6 :
Sc inc, sc 4 (change to yarn-2), sc 7 (change to yarn-3), sc 3, ch 1 and TO. (16)
Row 7 :
Sc 5, dc 4, tr 4, dc 2, dc inc (change to yarn-4), ch 1 and TO. (17)
Row 8 :
Sc across the row, ch 3 and TO. (17)
Row 9 :
Dc 3 (change to yarn-5), dc 2 (change to yarn-4), dc 2 (change to yarn-5), dc 2 (change to yarn-4), dc 2 (change to yarn-5), dc 2 (change to yarn-4), dc 2, dc inc, ch 1 and TO. (18)
Row 10 :
Sc inc, dc 3 (change to yarn-5), dc 2 (change to yarn-4), dc 2 (change to yarn-5), dc 2 (change to yarn-4), dc 2 (change to yarn-5), dc 2 (change to yarn-4), sc 4, ch 1 and TO. (19)
Row 11 :
Sl st, sc 3, hdc 2, dc 4, tr 2, ch 4, sl st to the 2nd tr, tr 2, dc 4, dc inc and fasten off. (20)
Info :
You have finished the right forewing.
— Hindwings (Left) :
Info :
Attach your yarn-1 to the 10th stitch of the abdomen with the right side facing up.
Row 1 :
Insert your hook and ch 3, dc in the next stitch, tr 3 in one stitch, dc inc, sc inc, ch 1 and TO. (9)
Row 2 :
Sc inc, hdc 3, dc 1, dc inc, dc 1, tr 2 (change to yarn-2), ch 1 and TO. (11)
Row 3 :
Sc 1, hdc 2, dc inc, tr 2, dc 2, hdc 2, sc 1 (change to yarn-3), ch 1 and TO. (12)
Row 4 :
Sc 5, hdc inc, dc 2, tr inc, dc 1, hdc 1, sc 1 (change to yarn-4), ch 1 and TO. (14)
Row 5 :
Sc 3, sc inc, sc 5, sc inc, sc 4, ch 1 and TO. (16)
Row 6 :
Sc 9, hdc inc, dc inc, dc 2 (change to yarn-5), dc 2 (change to yarn-4), sc 1, ch 3 and TO. (18)
Row 7 :
Dc 5, 3 dc inc, dc 3, ch 4, sl st to the last dc, sc 4, sl st 2 and fasten off. (21)
— Hindwings (Right) :
Info :
Attach your yarn-1 to the 21st stitch of the abdomen with the right side facing up.
Row 1 :
Insert your hook and ch 1, sc inc in the same stitch, dc inc, tr 3 in the same stitch, dc 2, ch 4 and TO. (9)
Row 2 :
Tr 1, dc 1, dc inc, dc 1, hdc 3, sc inc (change to yarn-2), ch 1 and TO. (11)
Row 3 :
Sc 1, hdc 2, dc 2, tr 2, dc inc, hdc 2, sc 1 (change to yarn-3), ch 1 and TO. (12)
Row 4 :
Sc 1, hdc 1, dc 1, tr inc, dc 2, hdc inc, sc 5 (change to yarn-4), ch 1 and TO. (14)
Row 5 :
Sc 4, sc inc, sc 5, sc inc, sc 3, ch 1 and TO. (16)
Row 6 :
Sc 1 (change to yarn-5), dc 2 (change to yarn-4), dc 2, dc inc, hdc inc, sc 9, ch 1 and TO. (18)
Row 7 :
Sl st 2, sc 4, ch 4, sl st to the 4th sc, dc 3, 3 dc inc, dc 6 and fasten off. (21)
— Border :
Info :
Here is the graph of the border. Row 1 is graphed in black. Row 2 is in purple and yellow. Attach your yarn to the last stitch of the abdomen with the right side facing up.
Row 1 (left forewing to the abdomen) :
Ch 1, sc 17, hdc 2, dc 2, ch 3, sl st to the 2nd dc, dc in the same stitch, dc 1, tr 2, dc 4, sc 16, ch 3, sl st to last sc, sc in the same stitch, sc 16
Row 1 (left hindwing to the bottom of the abdomen) :
sc 10, ch 2, sl st to the last sc, sc in the same stitch, sc 3, hdc 2, dc 4, hdc 2, sc 13, ch 3, sl st to the last sc, sc in the same stitch, sc 3, hdc 2, dc 2, sc 4, dc 1
Row 1 (right hindwing to the abdomen) :
dc 1, hdc 2, sc 4, ch 3, sl st to the last sc, sc in the same stitch, sc 12, hdc 2, dc 4, hdc 2, sc 4, ch 2, sl st to the last sc, sc in the same stitch, sc 11
Row 1 (right forewing) :
sc 15, ch 3, sl st to the last sc, sc in the same stitch, sc 15, dc 4, tr 2, dc 2, ch 3, sl st to the last dc, dc in the same stitch, dc 1, hdc 2, sc 17, sl st and ch 1. (214)
Info :
Then fold the butterflies into half, right sides in, and connect the lower part of the forewing and the top of the hindwing together by sc 11 and fasten it off. (Yellow part of the graph)
Info :
Attach the yarn to the 2nd ch of the top left corner of the left hindwing and work across the top edge using the graph instructions: ch 1, sc in the same stitch, sc 4, hdc 2, 2 dc inc, dc 9, hdc 9, hdc inc, hdc 7, hdc3tog, sl st 2, hdc3tog, hdc 7, hdc inc, hdc 9, dc 9, 2 dc inc, hdc 2, sc 5. Again, connect 2 wings together by sc 11 and fasten off.
Info :
Attach the yarn to the 4th stitch counting from the right, after the ch 3 from the bottom of the right forewing and continue the border sequence: ch 1, sc in the same stitch, sc 13, hdc 5, dc 4, tr 5, dc 3, tr 3, dc 4, hdc 5, sc 8, sc3tog, sc 1, sl st and fasten off. (208)
Info :
You have now finished 1 butterfly. Make 2 in total. Iron the butterflies if necessary.
— Strap :
Info :
After finishing 2 butterflies, ch 8 (or till the desired width of the strap), sc in the 2nd ch from your hook, *sc across, ch 1 and TO*, repeat till you reach the desired length, including the border of the butterfly.
Info :
Then you may sc/ sl st/ sew the ends of the strap together, with wrong sides facing up.
Info :
Length of the strap should include part of the butterfly bag and the strap itself; crochet a long rectangle and connect the ends of the strap together.
— Assembly :
Info :
Start connecting from the bottom of abdomen. Connect the strap and the butterflies by sc from the bottom centre of the abdomen, with right sides facing up.
Info :
After sc across the left side of the butterfly, continue to sc along the edge of the strap, then connect back to the top of the right wing, sc across till you reach the bottom of the abdomen again, sl st and fasten off.
Info :
Repeat to connect both butterflies to the strap so the strap runs along both wing edges and the bag is secured.
This Butterfly Bag pattern transforms crochet stitches into a wearable statement piece that is equal parts playful and practical. Whether you make it in pastels, brights, or a bold monochrome, each bag becomes a small work of art you can wear every day. Make two butterflies, join them carefully, add a sturdy strap, and you have a unique bag ready to go out into the world. 🧶✨