🧢 Beautiful ✨ Detailed πŸ’ Adorable

Bunny Hand Puppet Amigurumi Pattern

Bunny Hand Puppet Amigurumi Pattern
4.0β˜… Rating
2-4 Hours Time Needed
1.9K Made This
βœ‚οΈ

Intermediate Level

Ideal for those with basic crochet experience, featuring slightly more advanced stitches and techniques to expand your skills.

⏱️

Bite-Sized Project

Finishes in 2-4 hoursβ€”perfect for an afternoon of creative relaxation.

🧸

Cute Companion

An adorable friend to cherish, handcrafted with love to bring comfort and joy for years to come.

About This Bunny Hand Puppet Amigurumi Pattern

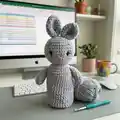
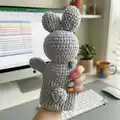
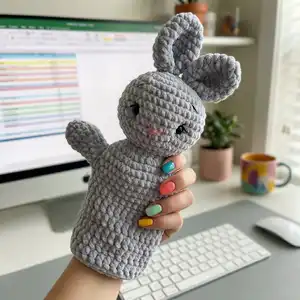
This pattern creates a plush Bunny Hand Puppet using super bulky plush yarn and basic amigurumi techniques. You will crochet a shaped head with inset eyes, folded ears, small arms, and a tubular body that becomes the puppet sleeve. The instructions include assembly, eye indenting and embroidery guidance so your bunny has a sweet expressive face.

Bunny Hand Puppet Amigurumi Pattern crochet pattern - detailed view of completed project

Includes materials list, abbreviations, step-by-step rounds, and photo-supported finishing tips. Designed to be made with a 4.5 mm hook and plush yarn for a cuddly, soft texture.

Why You'll Love This Bunny Hand Puppet Amigurumi Pattern

I absolutely love this pattern because it brings a simple toy to life using plush yarn for an irresistibly soft finish. I enjoy how quickly the hand puppet takes shape β€” the head and body come together in a few satisfying rounds. The small details like indented eyes and embroidered nose give each bunny personality and charm. I also love that the pattern is adaptable: you can change yarn colors and add tiny accessories to customize your puppet.

Bunny Hand Puppet Amigurumi Pattern step 1 - construction progress Bunny Hand Puppet Amigurumi Pattern step 2 - assembly progress Bunny Hand Puppet Amigurumi Pattern step 3 - details and accessories Bunny Hand Puppet Amigurumi Pattern step 4 - final assembly and finishing

Switch Things Up

I love to change the color scheme to make different characters; try pastel pinks or mint greens for a softer look.

I sometimes swap the super bulky plush for a bulky yarn and a slightly smaller hook to create a firmer puppet with more stitch definition.

I add removable accessories like tiny crocheted scarves or bows to personalize each bunny and create a little wardrobe of outfits.

I experiment with eye styles: use safety eyes, embroidered eyes, or felt cut-outs to alter the character's expression.

I sometimes enlarge the puppet by using a larger hook and more rounds, giving a chunky, oversized friend perfect for cuddles.

I embroider different mouth and nose shapes to change the personality β€” a small smile or a surprised O makes a big difference.

I add a bit of wire in the arms if I want posable limbs; I wrap the wire in yarn to keep it safe inside the stuffing.

I alter ear shapesβ€”longer, shorter, or roundedβ€”to create different rabbit breeds or totally new creatures.

I stitch tiny pockets inside the body sleeve if I want a secret stash for small treasures or a finger puppet insert.

I recommend testing color and hook changes on a small swatch first so you can predict final size and texture before starting the whole puppet.

Common Mistakes & How to Fix Them

βœ— Not using the recommended 4.5 mm hook with super bulky plush yarn can change the finished size and texture; use the suggested hook size to achieve the intended 28 cm (11") puppet. βœ— Forgetting to place eyes between rounds 10 and 11 will shift facial placement; fix safety eyes between rounds 10 and 11 and keep them 9 sc apart for accurate spacing. βœ— Overstuffing the head causes distortion and lumps; stuff gradually, adding small amounts of fiber filler and shaping as you go to maintain smooth contours. βœ— Skipping stitch counts during increases or decreases leads to uneven shaping; count your stitches at the end of each round and use a marker to track the round start. βœ— Attaching ears without folding correctly will give asymmetrical ears; fold each ear in half, then quadruple and sew them 1-2 cm apart on top of the head for consistent placement.

Bunny Hand Puppet Amigurumi Pattern

Make a sweet bunny hand puppet with this friendly amigurumi crochet pattern. You will follow clear, photo-supported steps to crochet the head, ears, arms and body and assemble them into a cuddly puppet. The pattern uses super bulky plush yarn for a soft, tactile finish and includes embroidery details for a charming face. Perfect for gifting or playtime, this pattern helps you create a 28 cm (11") puppet you'll be proud of.

Intermediate 2-4 Hours

Materials Needed for Bunny Hand Puppet Amigurumi Pattern

β€” Main Fabric

  • 01
    Super bulky plush yarn - Himalaya Dolphin Baby (120m - 100g) or (131 yd - 3.52 oz) - gray color (1 skein, No 80351)
  • 02
    Sport cotton yarn - Yarn Art Jeans (160m - 50g) or (175 yd - 1.76 oz) - black yarn for embroidered eyebrows and eyelashes (small amount)
  • 03
    Sport cotton yarn - Yarn Art Jeans - pink yarn for embroidered nose (small amount)
  • 04
    Sport cotton yarn - Yarn Art Jeans - gray color yarn for sewing pieces (small amount)
  • 05
    Fiber filler - small bag for stuffing the head
  • 06
    Plastic safety eyes 8 mm (1 pair)

β€” Tools Required

  • 01
    Crochet hook size 4.5 mm
  • 02
    Large needle (for sewing and embroidery)
  • 03
    Knitting markers (stitch markers)

Progress Tracker

0% Complete

β€” Head :

Round 1 :

7 sc in MR (7)

Round 2 :

inc * 7 (14)

Round 3 :

inc * 14 (28)

Round 4 :

(3 sc, inc) * 7 (35)

Round 5 :

(4 sc, inc) * 7 (42)

Round 6 :

(13 sc, inc) * 3 (45)

Round 7-11 :

45 sc (5 rounds)

Round 12 :

(13 sc, dec) * 3 (42)

Round 13 :

(4 sc, dec) * 7 (35)

Round 14 :

(3 sc, dec) * 7 (28)

Info :

Insert safe plastic eyes. Fix eyes between 10 and 11 rounds from the head's top. The distance between the eyes is 9 sc.

Info :

Stuff the head with fiber filler.

Round 15 :

(2 sc, dec) * 7 (21)

Round 16 :

(1 sc, dec) * 7 (14)

Round 17 :

dec * 7 (7)

Info :

Draw the yarn through 7 loops and tighten. Cut and secure the yarn.

Info :

HOW TO CLOSE A HOLE IN AMIGURUMI https://youtu.be/DdqCjjfLtXA

β€” Ears :

Round 1 :

7 sc in MR (7)

Round 2 :

inc * 7 (14)

Round 3 :

sc (14)

Round 4 :

(1 sc, inc) * 7 (21)

Round 5-8 :

21 sc (4 rounds)

Round 9 :

(1 sc, dec) * 7 (14)

Round 10 :

14 sc, sl st

Info :

Leave the tail for sewing. Cut the yarn. Don't stuff the piece. Make 2 details.

Info :

Fold in half and then quadruple and sew on top of the head at a distance of 1-2 cm from each other.

Info :

HOW TO INDENT AMIGURUMI EYES https://youtu.be/ta3Hl1hU8SY

Info :

Use the gray cotton yarn. Take the thread. Pull it through the back of the head and pull it out above the left eye. Leave the tail on back head's part.

Info :

Pass the needle from below under the left eye and pull out under the right eye. Make sure that the yarn falls from the inside of the left eye.

Info :

Next, pass the needle from above the right eye, making sure that the thread lies on the inside of the eye. And pull out the needle in the same place behind the head.

Info :

Tighten both threads so that the eyes are sunken. Tie a knot, hide the tail inside the head.

Info :

EMBROIDERY Use the pink yarn and a large needle. Embroider nose as shown on photos.

Info :

Use the thin black yarn and a large needle. Embroider eyelashes as shown on photos. Embroider eyebrows as shown on photos.

β€” Arms :

Round 1 :

6 sc in MR (6)

Round 2 :

inc * 6 (12)

Round 3 :

(2 sc, inc) * 4 (16)

Round 4-5 :

16 sc (2 rounds)

Round 6 :

(2 sc, dec) * 4 (12)

Round 7-9 :

12 sc (3 rounds)

Info :

Make sl st, cut the yarn. Don't stuff. Make 2 pieces.

β€” Body :

Info :

Use the gray plush yarn. Crochet hook 4.5 mm. Leave the tail for sewing, begin crochet without sl st. Make 24 ch, sl st in the first loop. Make a circle.

Round 1 :

24 sc

Round 2 :

(3 sc, inc) * 6 (30)

Round 3 :

(4 sc, inc) * 6 (36)

Round 4 :

(5 sc, ins) * 6 (42)

Info :

HOW TO ATTACH ARM TO BODY https://youtu.be/Bq3PAUiOh2M

Round 5 :

crochet together with arm - 7 sc, 13 sc only on the body, 7 sc together with another arm, 15 sc only on the body (42)

Info :

Crochet sc2tog on both sleeves sides to avoid holes.

Info :

HOW TO CROCHET SC2TOG https://youtu.be/tZqOHv2NJhM

Round 6 :

sc2tog, crochet only on the arm - 4 sc, sc2tog, 12 sc only on the body, sc2tog, 4 sc only on the another arm, sc2tog, 14 sc only on the body (38)

Round 7 :

dec, 2 sc, dec, 12 sc, dec, 2 sc, dec, 14 sc (34)

Round 8 :

34 sc, ch

Round 9-14 :

34 dc (6 rounds)

Info :

Sew the body to the head as shown in the photos

Info :

CONGRATULATIONS! Your hand puppet is ready

Assembly Instructions

  • Attach ears by folding each ear in half, quadrupling them, and sewing them to the top of the head about 1-2 cm apart for symmetry.
  • Insert and secure 8 mm safety eyes between rounds 10 and 11 of the head, spacing them 9 single crochet stitches apart before indenting or sewing.
  • Position arms on each side and crochet them together into the body at Round 5 as instructed (7 sc together with arm, body-only stitches, then with the second arm), then continue body rounds.
  • Sew the finished body sleeve to the underside of the head so the neck opening fits snugly, using the long sewing tails and a whipstitch for a neat join.
  • Use gray cotton thread to indent eyes by pulling the thread through the head as instructed, tighten to sink eyes, knot and hide tails inside the head.
  • Embroider the nose with pink yarn and add eyelashes and eyebrows using thin black yarn before weaving in ends and trimming excess threads.

Important Notes

  • πŸ’‘Use stitch markers to mark the beginning of each round to keep track of rounds and increases or decreases.
  • πŸ’‘Stuff the head gradually and shape as you go; do not overstuff to avoid distorting the stitch definition.
  • πŸ’‘Leave long tails for sewing ears and body-to-head assembly and pin pieces in place before final sewing for correct alignment.
  • πŸ’‘Work consistently with the recommended hook and yarn to achieve the intended size and texture of the puppet.

This Bunny Hand Puppet pattern makes a soft, huggable puppet perfect for play and gifting. It uses plush yarn for a cozy feel and includes detailed steps for eyes, embroidery, and assembly. Make one for storytime, gifts, or a delightful handmade collection! 🐰🧢

You ask,

we answer.

FAQs

What size will the finished piece be?

The finished hand puppet measures approximately 28 cm (11") tall when using the recommended super bulky plush yarn and 4.5 mm hook.

Can I use different yarn weights for this pattern?

Yes, you can substitute yarn weights, but the finished size and texture will change; adjust your hook size accordingly and note that thinner yarn will make a smaller puppet.

Do I need prior crochet experience for this pattern?

This pattern is rated intermediate and assumes familiarity with amigurumi basics like magic ring, single crochet, increases and decreases, and sewing pieces together.

How long does this project typically take to complete?

Most crocheters finish this puppet in 2-4 hours, though time may vary based on experience and how much time you spend on embroidery and finishing details.