🧢 Beautiful ✨ Detailed πŸ’ Adorable

Bunny Crochet Pattern #105 Amigurumi Pattern

Bunny Crochet Pattern #105 Amigurumi Pattern
4.7β˜… Rating
5-7 Hours Time Needed
4.1K Made This
βœ‚οΈ

Intermediate Level

Ideal for those with basic crochet experience, featuring slightly more advanced stitches and techniques to expand your skills.

⏱️

Weekend Treat

Takes 5-7 hours, making it an enjoyable project to finish over a couple of days.

🧸

Cute Companion

An adorable friend to cherish, handcrafted with love to bring comfort and joy for years to come.

About This Bunny Crochet Pattern #105 Amigurumi Pattern

This pattern creates a soft, seated crochet bunny approximately 20cm tall (with ears) using sport weight yarn. It features long ears, rounded limbs, a small tail, and embroidered facial details. You will work in continuous rounds and the pattern includes step-by-step stitch counts and photo references.

Bunny Crochet Pattern #105 Amigurumi Pattern crochet pattern - detailed view of completed project

Clear rounds and helpful photos make assembly straightforward and beginner-friendly within the intermediate skill level. Complete materials list, abbreviations and finishing steps are included for a polished result.

Why You'll Love This Bunny Crochet Pattern #105 Amigurumi Pattern

I absolutely love this pattern because it combines simple shaping with charming proportions to create a bunny full of personality. I enjoy how the long ears and rounded body give it a handcrafted, cozy look that is instantly lovable. Sewing the parts together and adding embroidered facial features always makes the project feel rewarding to finish. I also appreciate that the pattern includes photos at key stages to guide placement and stuffing, which helps me get neat, consistent results every time.

Bunny Crochet Pattern #105 Amigurumi Pattern step 1 - construction progress Bunny Crochet Pattern #105 Amigurumi Pattern step 2 - assembly progress Bunny Crochet Pattern #105 Amigurumi Pattern step 3 - details and accessories Bunny Crochet Pattern #105 Amigurumi Pattern step 4 - final assembly and finishing

Switch Things Up

I love changing colors to make different personalities β€” try pastel shades for a nursery bunny or bold brights for playful toys.

I often switch yarn weight and hook size to create a mini keychain version or a larger cuddle buddy; adjust stuffing to suit.

I sometimes embroider eyelashes or freckles for extra character β€” small facial changes alter expression dramatically.

Try adding tiny crocheted accessories like a scarf, bow or little hat to create seasonal versions for holidays.

I like to make a set of bunnies in gradient colors for a coordinated nursery display.

You can use safety eyes for an older-child toy or embroider eyes for a baby-safe option.

I recommend trying different ear shapes β€” shorter rounded ears or longer floppy ears change the whole silhouette.

For a posable version, I have added thin wire inside the limbs before stuffing to allow gentle posing.

I sometimes stuff with lavender sachet inside the body to make a scented sleep buddy, but secure the sachet well for safety.

Don't be afraid to experiment with facial placement and size β€” repositioning the nose or eyes a stitch or two changes the bunny’s personality.

Common Mistakes & How to Fix Them

βœ— Skipping a stitch marker at the beginning of rounds causes lost counts and mis-shaped parts; always use a stitch marker to mark the first stitch of each round and move it up as you go. βœ— Not stuffing gradually results in uneven or lumpy limbs and body; stuff lightly as you work, adding small amounts after several rounds to keep shape smooth. βœ— Forgetting to count stitches after increases or decreases leads to incorrect shaping; count your stitches at the end of each round and compare to the pattern stitch counts. βœ— Sewing parts without pinning can make placement uneven and crooked; pin or use sewing pins to position parts first, then tack and sew securely for symmetry.

Bunny Crochet Pattern #105 Amigurumi Pattern

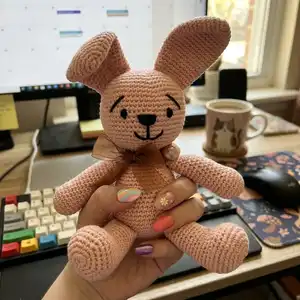
Make a lovable hand-crocheted bunny with this clear, photo-illustrated pattern. You will work in continuous rounds to create a soft, 20cm sitting amigurumi bunny with long ears and simple facial embroidery. The pattern includes complete stitch-by-stitch rounds for head, body, arms, legs, ears and tail, plus finishing instructions for assembly and embroidery. Perfect for gifting or decorating your home with a handmade companion.

Intermediate 5-7 Hours

Materials Needed for Bunny Crochet Pattern #105 Amigurumi Pattern

β€” Main Fabric

  • 01
    Sport weight yarn (approx. 260-330m / 100g) Cream color: approx. 240m (263 yds) for body and limbs
  • 02
    Black color yarn: approx. 1m (1.1 yds) for facial embroidery
  • 03
    Optional: Additional 50-75g accent colors for ribbons or accessories

β€” Tools Required

  • 01
    Crochet hook size 2.5 - 2.75mm (US size C)
  • 02
    Sewing needle
  • 03
    Scissors
  • 04
    Stitch markers
  • 05
    Polyester stuffing/fiberfill
  • 06
    Yarn needle for sewing and embroidery
  • 07
    Pins for assembly

Progress Tracker

0% Complete

β€” Notes :

Infos :

I worked in continuous rounds. You may use a stitch marker to mark beginning of rounds. The number (red color) at the end of each round is the number of stitches you should now have. Do not join first and last stitches in round with slip stitch if not stated otherwise. When a number is followed by st, that stitch needs to be worked over that number of stitches. Examples: 5sc means 1sc in each of next 5 stitches; Sc2tog 2 times means to decrease 2 times over the next 4sc; Inc 5 times means increase in each of next 5 stitches.

β€” Head :

Info :

Cream color yarn: ch2

Round 1 :

6sc in 2nd ch from hook; 6sts

Round 2 :

inc 6 times; 12sts

Round 3 :

(1sc, inc) 6 times; 18sts

Round 4 :

(2sc, inc) 6 times; 24sts

Round 5 :

(3sc, inc) 6 times; 30sts

Round 6 :

(4sc, inc) 6 times; 36sts

Round 7 :

(5sc, inc) 6 times; 42sts

Round 8 :

(6sc, inc) 6 times; 48sts

Round 9 :

(7sc, inc) 6 times; 54sts

Round 10 :

(8sc, inc) 6 times; 60sts

Round 11 :

(9sc, inc) 6 times; 66sts

Round 12-20 :

sc around; 66sts

Round 21 :

(sc2tog, 9sc) 6 times; 60sts

Round 22 :

(sc2tog, 8sc) 6 times; 54sts

Round 23 :

(sc2tog, 7sc) 6 times; 48sts

Round 24 :

(sc2tog, 6sc) 6 times; 42sts

Round 25 :

(sc2tog, 5sc) 6 times; 36sts

Round 26 :

(sc2tog, 4sc) 6 times; 30sts

Round 27 :

(sc2tog, 3sc) 6 times; 24sts

Round 28 :

(sc2tog, 2sc) 6 times; 18sts

Info :

Finish. Stuff the head (Pic.1).

β€” Body :

Info :

Cream color yarn: ch2

Round 1 :

6sc in 2nd ch from hook; 6sts

Round 2 :

inc 6 times; 12sts

Round 3 :

(1sc, inc) 6 times; 18sts

Round 4 :

(2sc, inc) 6 times; 24sts

Round 5 :

(3sc, inc) 6 times; 30sts

Round 6 :

(4sc, inc) 6 times; 36sts

Round 7 :

(5sc, inc) 6 times; 42sts

Round 8 :

(6sc, inc) 6 times; 48sts

Round 9 :

(7sc, inc) 6 times; 54sts

Round 10-17 :

sc around; 54sts

Round 18 :

(sc2tog, 7sc) 6 times; 48sts

Round 19 :

sc around; 48sts

Round 20 :

(sc2tog, 6sc) 6 times; 42sts

Round 21 :

sc around; 42sts

Round 22 :

(sc2tog, 5sc) 6 times; 36sts

Round 23 :

sc around; 36sts

Round 24 :

(sc2tog, 4sc) 6 times; 30sts

Round 25-27 :

sc around; 30sts

Round 28 :

(sc2tog, 3sc) 6 times; 24sts

Round 29 :

(sc2tog, 2sc) 6 times; 18sts

Info :

Finish and leave long end to sew head to the body. Stuff the body. (Pic.2).

β€” Arms :

Info :

Arms (make 2). Cream color yarn: ch2

Round 1 :

6sc in 2nd ch from hook; 6sts

Round 2 :

inc 6 times; 12sts

Round 3 :

(1sc, inc) 6 times; 18sts

Round 4 :

(2sc, inc) 6 times; 24sts

Round 5-9 :

sc around; 24sts

Round 10 :

(sc2tog, 4sc) 4 times; 20sts

Round 11-20 :

sc around; 20sts

Round 21 :

(sc2tog, 3sc) 4 times; 16sts

Info :

Start to stuff the arm lightly and keep adding stuffing after every few rounds.

Round 22 :

sc around; 16sts (Pic.3)

Round 23 :

(sc2tog, 6sc) 2 times; 14sts

Round 24 :

(sc2tog, 5sc) 2 times; 12sts

Round 25 :

(sc2tog, 2sc) 3 times; 9sts

Info :

Finish, leave long end to sew arms to the body.

β€” Legs :

Info :

Legs (make 2). Cream color yarn: ch2

Round 1 :

6sc in 2nd ch from hook; 6sts

Round 2 :

inc 6 times; 12sts

Round 3 :

(1sc, inc) 6 times; 18sts

Round 4 :

(2sc, inc) 6 times; 24sts

Round 5 :

(3sc, inc) 6 times; 30sts

Round 6 :

(4sc, inc) 6 times; 36sts

Round 7-10 :

sc around; 36sts

Round 11 :

sc2tog 10 times; 26sts

Round 12-13 :

sc around; 26sts

Round 14 :

2sc, sc2tog 3 times, 18sc; 23sts

Round 15 :

sc around; 23sts

Round 16 :

1sc, sc2tog 3 times, 16sc; 20sts (Pic.4)

Info :

Start to stuff the leg lightly and keep adding stuffing after every few rounds.

Round 17-20 :

sc around; 20sts

Round 21 :

(sc2tog, 8sc) 2 times; 18sts

Round 22-23 :

sc around; 18sts

Round 24 :

(sc2tog, 4sc) 3 times; 15sts

Round 25 :

sc around; 15sts

Info :

Finish and leave long end to sew legs to the body. (Pic.5).

β€” Ears :

Info :

Ears (make 2). Cream color yarn: ch2

Round 1 :

6sc in 2nd ch from hook; 6sts

Round 2 :

inc 6 times; 12sts

Round 3 :

(1sc, inc) 6 times; 18sts

Round 4 :

(2sc, inc) 6 times; 24sts

Round 5 :

(3sc, inc) 6 times; 30sts

Round 6 :

(4sc, inc) 6 times; 36sts

Round 7-11 :

sc around; 36sts

Round 12 :

(sc2tog, 4sc) 6 times; 30sts

Round 13-15 :

sc around; 30sts

Round 16 :

(sc2tog, 3sc) 6 times; 24sts

Round 17-22 :

sc around; 24sts

Round 23 :

(sc2tog, 4sc) 4 times; 20sts

Round 24-27 :

sc around; 20sts

Info :

Finish and leave long end to sew ear onto the head. Do not stuff (Pic.6).

β€” Tail :

Info :

Tail (make 1). Cream color yarn: ch2

Round 1 :

6sc in 2nd ch from hook; 6sts

Round 2 :

inc 6 times; 12sts

Round 3 :

(1sc, inc) 6 times; 18sts

Round 4-6 :

sc around; 18sts

Round 7 :

(sc2tog, 1sc) 6 times; 12sts

Info :

Finish and leave long end to sew tail to the body. Stuff the tail (Pic.7).

β€” Finishing :

Item Name (P1) :

1. Sew legs, arms and tail to the body.

Item Name (P2) :

2. Sew head to the body.

Item Name (P3) :

3. Sew ears onto the head.

Item Name (P4) :

4. Embroider eye, nose and mouth areas with black yarn (if you prefer, mark those areas with a textile marker before embroidering).

Assembly Instructions

  • Sew legs, arms and tail to the body first, positioning the legs at the bottom, arms at the sides and tail at the rear center.
  • Sew head to the body using the long tail left at the end of the body, centering the neck opening over the top of the body and secure with tight mattress stitches.
  • Position ears on top of the head and tack them with pins to check symmetry before sewing; do not stuff the ears.
  • Embroider eyes, nose and mouth with black yarn; mark positions with a textile marker first if desired for accurate placement.
  • Weave in all ends and secure seams; add a ribbon or accessory as desired for finishing touch.

Important Notes

  • πŸ’‘Work in continuous rounds and use a stitch marker to mark the beginning of each round.
  • πŸ’‘Place safety eyes or mark eye positions before closing head if using safety eyes; embroidery can be added afterward for baby-safe toy.
  • πŸ’‘Stuff gradually while crocheting to maintain smooth shaping and avoid lumps; overstuffing can distort shaping.
  • πŸ’‘Pin all pieces in place before sewing to ensure correct positioning and symmetry.

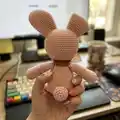
This sweet Bunny pattern makes a charming handmade gift or nursery friend you can finish in a weekend. It features simple rounds, clear stitch counts and helpful photos to guide assembly. Happy crocheting and enjoy creating a cuddly companion! 🧢✨

You ask,

we answer.

FAQs

What size will the finished piece be?

The finished amigurumi measures approximately 20 cm tall when sitting, using the recommended sport weight yarn and 2.5-2.75mm hook.

Can I use different yarn weights for this pattern?

Yes, you can use different yarn weights, but this will affect the final size. Use an appropriate hook for your chosen yarn and adjust stuffing accordingly.

Do I need prior crochet experience for this pattern?

This pattern is rated intermediate, so basic knowledge of crochet in the round, increases and decreases is recommended for best results.

How long does this project typically take to complete?

Most crocheters complete this project in 5-7 hours, though time may vary based on experience level and working pace.