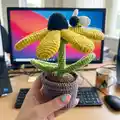
Brighten your windowsill with this cheerful Bumble Blossom Black Eyed Susan amigurumi. You'll crochet a smiling flower, leaves, a sturdy stem and a tiny bumblebee friend — perfect for gifting or keeping. The pattern uses sport weight yarn and clear step-by-step rounds so you can follow along easily. Finished size fits beautifully on a shelf or desk and adds handmade charm to any space.
Progress Tracker
0% Complete
— Stem :
rnd 2-30 :
8 Sc (8) (29 rounds)
Info :
Add stuffing to the stem for added support starting after round 10. Continue to add stuffing as you go.
rnd 31 :
BLO (1 Sc, 1 INC) x 4 (12)
rnd 33 :
(3 Sc, 1 INC) x 6 (30)
Info :
Cut yarn and fasten off invisibly.
Info :
Add the sepal to the stem. Holding the stem with the bottom facing up, insert the hook into last stitch of the remaining loops of round 31 and attach the yarn.
Info :
Ch 9, starting in the 2nd chain from the hook Sc 8. Slst into the next loop in the row.
Info :
Repeat in the remaining 11 loops of round 31. Cut yarn and fasten off invisibly.
— Flower Center :
rnd 4 :
(1 Sc, 1 INC) x 6 (18)
rnd 6 :
(1 Sc, 1 INC, 1 Sc) x 6 (24)
rnd 8 :
(3 Sc, 1 INC) x 6 (30)
Info :
Cut yarn and fasten off invisibly.
— Petal :
Make :
Make 7 petals using yellow yarn
rnd 3 :
(1 Sc, 1 INC) x 6 (18)
rnd 4-7 :
18 Sc (18) (4 rounds)
rnd 8 :
(2 Sc, 1 DEC, 2 Sc) x 3 (15)
rnd 9-12 :
15 Sc (15) (4 rounds)
rnd 13 :
(3 Sc, 1 DEC) x 3 (12)
rnd 14-17 :
12 Sc (12) (4 rounds)
rnd 18 :
(1 Sc, 1 DEC, 1 Sc) x 3 (9)
Info :
Cut yarn and fasten off. Leave a long tail for sewing.
— Leaf :
Make :
Make 2 leaves using green yarn
rnd 3 :
(1 Sc, 1 INC, 1 Sc) x 2, 1 Sc (9)
rnd 4 :
(1 Sc, 1 INC, 1 Sc) x 3 (12)
rnd 5 :
(3 Sc, 1 INC) x 3 (15)
rnd 6 :
(2 Sc, 1 INC, 2 Sc) x 3 (18)
rnd 7-16 :
18 Sc (18) (10 rounds)
rnd 17 :
(1 Sc, 1 DEC) x 6 (12)
Info :
Cut yarn and fasten off. Leave a long tail for sewing.
— Pot :
Make :
Make 1 pot using light brown yarn
rnd 3 :
(1 Sc, 1 INC) x 6 (18)
rnd 4 :
(1 Sc, 1 INC, 1 Sc) x 6 (24)
rnd 5 :
(3 Sc, 1 INC) x 6 (30)
rnd 6 :
(2 Sc, 1 INC, 2 Sc) x 6 (36)
rnd 7 :
(5 Sc, 1 INC) x 6 (42)
rnd 9-11 :
42 Sc (42) (3 rounds)
rnd 12 :
(13 Sc, 1 INC) x 3 (45)
rnd 13-15 :
45 Sc (45) (3 rounds)
rnd 16 :
(7 Sc, 1 INC, 7 Sc) x 3 (48)
rnd 17-19 :
48 Sc (48) (3 rounds)
rnd 20 :
FLO (7 Dc, 1 DcINC) x 6 (54)
Info :
Cut yarn and fasten off invisibly.
— Dirt :
Make :
Make 1 dirt using brown yarn. The dirt for the pot is created in two parts: the hole in which the flower will be inserted and the top of the dirt. Begin with the dirt hole.
rnd 3-14 :
12 Sc (12) (12 rounds)
Info :
Cut yarn and fasten off invisibly.
Info :
Begin to crochet the dirt top by holding the hole with the opening facing up. Reattach the yarn and continue crocheting the dirt top.
rnd 15 :
(1 Sc, 1 INC) x 6 (18)
rnd 16 :
(1 Sc, 1 INC, 1 Sc) x 6 (24)
rnd 17 :
(3 Sc, 1 INC) x 6 (30)
rnd 18 :
(2 Sc, 1 INC, 2 Sc) x 6 (36)
rnd 19 :
(5 Sc, 1 INC) x 6 (42)
rnd 20 :
(3 Sc, 1 INC, 3 Sc) x 6 (48)
Info :
Cut yarn and fasten off. Leave a long tail for sewing.
— Bumblebee Body :
Make :
Make 1 bumblebee starting with black yarn.
Info :
Switch to yellow yarn.
rnd 4-5 :
12 Sc (12) (2 rounds)
Info :
Switch to black yarn.
rnd 6-7 :
12 Sc (12) (2 rounds)
Info :
Switch to yellow yarn.
Info :
Cut yarn and use the yarn end to close the remaining stiches.
— Bumblebee Wing :
Make :
Make 2 wings using white yarn.
Instruction :
Ch 4, starting in the 2nd chain from the hook.
rnd 1 :
1 Sc, 1 HDc, 5 Dc in the same stitch, 1 HDc, 1 Sc (9)
Info :
Cut yarn and fasten off. Leave a long tail for sewing.
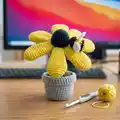
— Flower Assembly :
Info :
Begin to assemble the flower by attaching the stem to the center piece. Place the center piece on the stem and sew the pieces together using the yarn tail of the center piece.
Info :
Add stuffing before sewing the last remaining stitches closed.
Info :
Attach the petals by sewing along the rounds where the stem and center piece were connected. The petals will fit closely next to one another when attached, with very little space between one another.
Info :
Attach the leaves to the stem by sewing into place near the 11th round of the stem.
— Pot Assembly :
Info :
Add a piece of cardboard to the bottom of the pot for extra stability before sewing.
Info :
Attach the dirt to the pot by sewing into the remaining loops of round 20 of the pot. Add stuffing before sewing the last remaining loops closed.
Info :
Tip #1 - The "wrong side" of the stitches should be on the bottom of the dirt when finished, make sure to insert your hook correctly when reattaching the yarn!
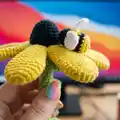
— Bumblebee Assembly :
Info :
Sew the wings to the body of the bumblebee between rounds 4 and 5.
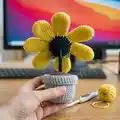
This Bumble Blossom pattern makes a cheerful, everlasting Black Eyed Susan and tiny bumblebee to brighten desks and windowsills. Whether you gift it or keep it, it brings a handmade smile that never wilts. Perfect for quick seasonal decor or a thoughtful handmade present — enjoy creating and sharing a little bit of sunshine! 🧶🌼🧵