About This Bucket Hat Crochet Pattern
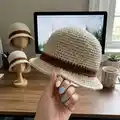
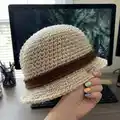
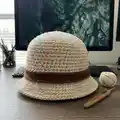
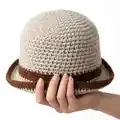
This pattern creates a classic bucket hat worked in the round with both strands of worsted weight yarn held together for structure and texture. It features a single round of front-post single crochet to create a defined, flared brim that stands out. The pattern includes sizes for small, medium, and large, plus instructions for a removable decorative band. Clear round-by-round instructions make shaping easy to follow.
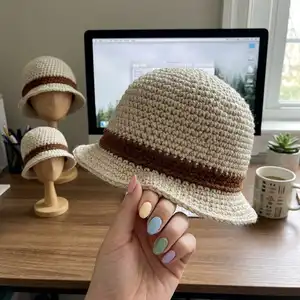
Perfect for gifting or everyday wear, this hat is quick to crochet and easy to customize with color choices. The band can be made separately and swapped to match your outfits.
Why You'll Love This Bucket Hat Crochet Pattern
I absolutely love this pattern because it turns simple stitches into a stylish and wearable accessory you can finish in an afternoon. I enjoy how the front-post round instantly defines the brim and gives the hat a professional edge without complicated shaping. Working with two strands held together makes the fabric durable and gives a lovely dense texture that blocks nicely. I also love that the separate band lets me change the look of the hat in seconds, making the pattern endlessly versatile.
Switch Things Up
I love customizing the band color to completely change the look; try bright contrasting yarns or subtle tone-on-tone combinations to match your wardrobe.
You can make a softer, slouchier hat by using a single strand of bulky yarn and a larger hook for a trendier oversized silhouette.
If you want a more structured brim, try adding a lightweight hat interfacing or fabric stiffener to the underside after finishing and blocking the brim into shape.
I often experiment with ombre or variegated yarn for the body while keeping a solid band for contrast; it creates a great visual interest with minimal effort.
To size the hat differently, add or remove increase rounds; each increase round adds approximately 2 inches, so adjust one round at a time and re-measure as you go.
I sometimes embroider small motifs onto the band or attach crochet flowers for a feminine touch — these little decorations make excellent personalization options.
Try changing the brim depth by adding extra rounds of single crochet before the fpsc round; this will make the hat sit lower and give more sun coverage.
For a nautical look, use striped bands in two colors and consider adding a small crochet anchor or button detail to the side.
I like to block the hat lightly after finishing to even out stitches and set the brim; dampen the hat and shape it on a suitable form, then let it dry completely.
If you want a reversible band, work the band slightly wider and finish both edges neatly so you can flip it for a different color on each side.
Consider using cotton blends for a summer-friendly hat or wool blends for a cozy, cooler-weather version; each fiber changes the drape and feel, so choose based on season.
Adding a row of slipstitch or decorative edging along the brim can provide a subtle finished look; I often use a metallic or contrasting strand for a chic edge detail.
Common Mistakes & How to Fix Them
✗ Not holding both yarn strands together consistently; ensure you always carry and work both strands together to keep the tension and fabric density even.
✗ Failing to move the stitch marker each round can cause miscounts and missed increases; place a marker after the first sc and move it up each round to track the start accurately.
✗ Skipping the front post single crochet round will result in a floppy brim that doesn't stand out; follow the fpsc round exactly to give the brim its defined shape.
✗ Joining the hat band before checking fit can make it too tight or loose; wrap the chain around your hat first, adjust the chain count, then join with a slip stitch.
✗ Forgetting to end increases at the correct round for your size leads to wrong circumference; follow the size-specific notes (stop increases at Round 8 for small, Round 9 for medium) and count stitches carefully.