🧢 Beautiful ✨ Detailed πŸ’ Adorable

Bonnie Amigurumi Pattern

Bonnie Amigurumi Pattern
4.0β˜… Rating
5-7 Hours Time Needed
1.8K Made This
βœ‚οΈ

Intermediate Level

Ideal for those with basic crochet experience, featuring slightly more advanced stitches and techniques to expand your skills.

⏱️

Weekend Treat

Takes 5-7 hours, making it an enjoyable project to finish over a couple of days.

🧸

Cute Companion

An adorable friend to cherish, handcrafted with love to bring comfort and joy for years to come.

About This Bonnie Amigurumi Pattern

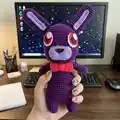
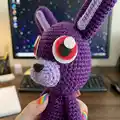
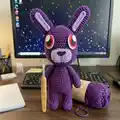
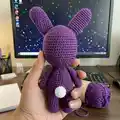
This pattern creates a charming purple bunny amigurumi inspired by Bonnie from FNAF, complete with anime-style felt eyes and a removable bow tie. Youll crochet the head, join the legs to form the body, and add inner and outer ear pieces for a 3D effect. The instructions include round-by-round details and helpful tips on stuffing and joining for a neat finish.

Bonnie Amigurumi Pattern crochet pattern - detailed view of completed project

Designed for intermediate crocheters, the pattern uses single crochet shaping and simple increases/decreases. Felt eye templates and a bow tie tutorial are included to personalize your bunny.

Why You'll Love This Bonnie Amigurumi Pattern

I absolutely love this pattern because it brings a playful character to life with simple shaping and charming details like the felt anime eyes and bow tie. I enjoyed designing the leg-join technique so the body is seamless and stable. The pattern lets me experiment with color and small accents, making each bunny unique. Sharing an approachable way to make a recognizable character feels rewarding and fun for makers and gifters alike.

Bonnie Amigurumi Pattern step 1 - construction progress Bonnie Amigurumi Pattern step 2 - assembly progress Bonnie Amigurumi Pattern step 3 - details and accessories Bonnie Amigurumi Pattern step 4 - final assembly and finishing

Switch Things Up

I love how easy it is to personalize this pattern by changing the yarn color to create new characters and looks.

You can make a mini version by choosing a lighter weight yarn and a smaller hook for keychains or tiny collectibles.

I often swap the felt eyes for safety eyes or embroidered eyes for different expressions and safer toys for kids.

Try different bow tie colors and textures to match seasons or holidays β€” a plaid or striped yarn can be very cute.

If you want a posable version, I add thin wire inside the arms for gentle poseability and secured ends for safety.

I sometimes embroider little details like freckles or brow lines to give each bunny more personality.

Make a family set by adjusting hook and yarn size: bulky yarn makes a cuddly large bunny and sport weight makes a tiny charm.

Experiment with faux fur or textured yarn for a fuzzy, whimsical finish β€” just be patient when sewing and stuffing.

Switch the muzzle contrast color to change facial expression and make the character more cartoon-like or realistic.

If you want softer edges, use a slightly larger hook and looser tension for a plush, squishy result that still keeps shape.

I like adding small clothes like a scarf or tiny crochet jacket to create seasonal characters or gifts for special occasions.

Finally, try making matching accessories such as a small crochet guitar or sign to create themed decor or play pieces for your Bonnie.

Common Mistakes & How to Fix Them

βœ— Skipping stitch markers when joining the legs can make the join messy and uneven; place a stitch marker in the last stitch of the left leg before joining to keep your start point accurate. βœ— Overstuffing the head or body will distort shaping and make joining difficult; stuff gradually and evenly, adding small amounts until you reach the desired firmness. βœ— Pulling your yarn tension too tight will make the amigurumi stiff and hard to shape; maintain relaxed, consistent tension to get smooth rounds and easy sewing. βœ— Forgetting to leave a long tail when finishing the head can make sewing into the final stitches impossible; always leave enough yarn to sew into the last six stitches and weave in tails. βœ— Changing yarn weight without adjusting hook and eye sizes will change final size and appearance; if you switch yarn, test gauge and adjust eye templates or embroidery accordingly.

Bonnie Amigurumi Pattern

Make your own purple Bonnie amigurumi with this detailed, photo-assisted crochet pattern. Youll work from the head down, join the legs to form the body, and add signature details like anime-style felt eyes and a bright bow tie. The pattern is approachable for intermediate crocheters and shows where to stuff, join, and sew for a neat finish. Perfect as a handmade gift or a collectible for FNAF fans.

Intermediate 5-7 Hours

Materials Needed for Bonnie Amigurumi Pattern

β€” Main Fabric

  • 01
    Hobby Lobby "I Love This Cotton" yarn - Color 252 Purple (main body)
  • 02
    Hobby Lobby "I Love This Cotton" yarn - Color 250 Amethyst (lighter purple for muzzle/inner ear)
  • 03
    Hobby Lobby "I Love This Cotton" yarn - Color 60 Red (bow tie and eye accent)
  • 04
    Felt sheet - White for eye highlights and backing
  • 05
    Felt sheet - Black for pupil and nose pieces
  • 06
    Felt sheet - Pink for eye accents

β€” Tools Required

  • 01
    Crochet hook size D/3.25mm (US D)
  • 02
    Polyester fiberfill for stuffing
  • 03
    Darning needle (yarn needle) for sewing pieces
  • 04
    Scissors
  • 05
    Stitch markers (used for leg join and round starts)
  • 06
    Felt cutting tools or Cricut (optional for anime eyes)

Progress Tracker

0% Complete

β€” Head :

Round 1 :

MR and place 6SC (6)

Round 2 :

[INC] x6 (12)

Round 3 :

[SC, INC] x6 (18)

Round 4 :

[SC1, INC, SC1] x6 (24)

Round 5 :

[SC3, INC] x6 (30)

Round 6 :

[SC2, INC, SC2] x6 (36)

Round 7 :

[SC5, INC] x6 (42)

Round 8 :

[SC3, INC, SC3] x6 (48)

Round 9-20 :

[SC] across (48)

Info :

TIP: I place eyes between rounds 13-14 two inches apart.

Round 21 :

[SC3, DEC, SC3] x6 (42)

Round 22 :

[SC5, DEC] x6 (36)

Round 23 :

[SC2, DEC, SC2] x6 (30)

Round 24 :

[SC3, DEC] x6 (24)

Round 25 :

[SC1, DEC, SC1] x6 (18)

Round 26 :

[SC1, DEC] x6 (12)

Round 27 :

[DEC] x6 (6)

Info :

Slip stitch off, and make sure you leave enough yarn to sew into last 6 stitches. Weave in tails

β€” Bow Tie :

Bow Tie (P1) :

Chain 25, attach first stitch to last with a slip stitch. [SC] around for four rounds. Slip stitch off, make a long tail (16') and wrap around the center as shown in video tutorial.

β€” Legs :

Round 1 :

MR, [SC] x5 inside ring and tighten the loop (5)

Round 2 :

[INC] x5 (10)

Round 3 :

[SC1, INC] x5 (15)

Round 4-5 :

[SC] across (15)

Round 6 :

[SC] across (15)

Infos :

Break the yarn and fasten off your work. The right leg is done. Repeat R1-6 with left leg as well, but this time do not fasten off. Place a stitch marker into the last stitch you made on the left leg. This is your new start for your rounds. Continue next to the body.

β€” Body :

Round 7 :

8SC in the stitches of the left leg, CH9 and join to the right leg with a SC (this counts as the 1st SC of the following SC), SC in the next stitches of the right leg, 9SC in the 9CH, 7SC in the stitches of the left leg. (48)

Round 8 :

[SC] across (48)

Round 9 :

[SC22, DEC] x2 (46)

Round 10 :

[SC] across (46)

Round 11 :

[SC21, DEC] x2 (44)

Round 12 :

[SC] across (44)

Round 13 :

[SC20, DEC] x2 (42)

Round 14 :

[SC] across (42)

Round 15 :

[SC19, DEC] x2 (40)

Round 16 :

[SC] across (40)

Round 17 :

[SC18, DEC] x2 (38)

Round 18 :

[SC] across (38)

Round 19 :

[SC17, DEC] x2 (36)

Round 20 :

[SC] across (36)

Round 21 :

[SC16, DEC] x2 (34)

Round 22 :

[SC] across (34)

Round 23 :

[SC15, DEC] x2 (32)

Round 24 :

[SC] across (32)

Round 25 :

[SC14, DEC] x2 (30)

Round 26 :

[SC] across (30)

Round 27 :

[SC3, DEC] x6 (24)

Info :

Break yarn and fasten off.

β€” Arms :

Round 1 :

MR with 6SC (6)

Round 2 :

[INC] x6 (12)

Round 3-11 :

[SC] across (12)

Info :

TIP: I stuff the tips of the hands up to round 5, but leave the rest of the arms empty.

β€” Eyes :

Round 1 :

With pink yarn, MR with 6SC (6)

Round 2 :

[INC] x6 (12)

Round 3 :

Change to white, [SC1, INC] x6 (18)

Info :

Slip stitch off. I have a tutorial on how to make "anime" eyes which will be linked at the end of this PDF.

β€” Nose :

Round 1 :

MR and place 5SC (5)

Round 2 :

[INC] x5 (10)

Round 3 :

[SC1, INC] x5 (15)

Info :

Repeat 1-3 but this time don't slip stitch off. Sew first piece down the side for 3 stitches on both pieces. Check out our tutorial for further instructions.

Round 3-5 :

[SC] around both pieces. (24)

β€” Outer Ear :

Round 1 :

MR with 6SC (6)

Round 2 :

[INC] x6 (12)

Round 3 :

[SC1, INC] x6 (18)

Round 4-17 :

[SC] around (18)

Round 18 :

[SC1, DEC] x6 (12)

Info :

Slip stitch off and attach to top of the head.

β€” Inner Ear :

Info :

Chain 13, skip first chain and [SC] inside 11 chains, INC2 in final chain, turn and [SC11, INC2] in the backs of the foundational chains. Slip stitch off and attach to the fronts of the ears.

Assembly Instructions

  • Place the two felt/handmade anime eyes between rounds 13-14 of the head, spacing them approximately two inches apart and secure with fabric glue or sew in place through felt backing.
  • Attach each outer ear to the top of the head by sewing through the base, positioning them symmetrically and angling slightly outward for a natural look.
  • Sew the inner ear pieces to the fronts of the outer ears before attaching the ears to the head, aligning centers for a tidy finish.
  • Sew the nose pieces together as instructed, then sew the muzzle to the head and sew the nose onto the muzzle; secure down the side for 3 stitches on both pieces as described.
  • Position and sew the arms to the sides of the body at the upper body rounds (after rounds creating the torso), using hidden whipstitch for a neat join.
  • Wrap the bow tie center with the long tail and secure it around the neck area, then sew or tack the bow to the front of the neck for stability.

Important Notes

  • πŸ’‘Use stitch markers to keep track of the last stitch when joining the legs and the start of rounds to avoid misplacement.
  • πŸ’‘Stuff the legs as you go to keep control of shaping and ensure the leg join sits neatly against the body.
  • πŸ’‘Hook size is less important than keeping stitches tight enough to prevent stuffing from showing; adjust tension accordingly.
  • πŸ’‘If you change yarn size, adjust your eye sizes and embroidery details to match the new scale and keep proportions correct.

This Bonnie amigurumi pattern makes a playful collectible perfect for fans and handmade gift-givers. The design blends simple shaping with fun details like anime-style eyes and a bright bow tie. Follow the step-by-step rounds and the video link for the eye templates to get a polished finish. 🧢🧡

You ask,

we answer.

FAQs

What size will the finished piece be?

The finished amigurumi measures approximately 9-12 inches tall depending on your yarn and tension; using the recommended yarn and hook produces a medium-sized collectible.

Can I use different yarn weights for this pattern?

Yes, you can use different yarn weights, but your finished size will change; adjust hook size and the felt eye template sizes accordingly to maintain the correct proportions.

Do I need prior crochet experience for this pattern?

This pattern is rated intermediate, so basic knowledge of single crochet, increases, decreases, and working in the round is recommended for best results.

How long does this project typically take to complete?

Most crocheters complete this project in about 5-7 hours, though time may vary based on experience level, customization, and how long you spend on eye and accessory details.

How should I attach the eyes securely?

Eyes made from felt can be glued and then tacked with a few stitches for extra security; if you use safety eyes check placement before closing the head and ensure they are fastened from the inside.