🧢 Beautiful ✨ Detailed πŸ’ Adorable

Bernat Pipsqueak Star Blanket (To Crochet) Pattern

Bernat Pipsqueak Star Blanket (To Crochet) Pattern
4.9β˜… Rating
12-15 Hours Time Needed
1.8K Made This
βœ‚οΈ

Intermediate Level

Ideal for those with basic crochet experience, featuring slightly more advanced stitches and techniques to expand your skills.

⏱️

Multi-Day Project

A rewarding 12+ hour journeyβ€”perfect for dedicated crafters who love detailed work.

πŸ€—

Soft Hug

Gentle, plush, and full of warmth, creating a sense of comfort and coziness wherever they find a home.

About This Bernat Pipsqueak Star Blanket (To Crochet) Pattern

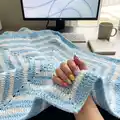
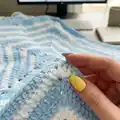
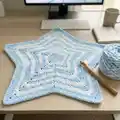
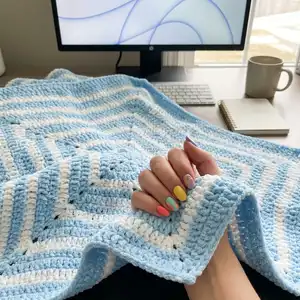
This pattern makes a star-shaped blanket approximately 40 inches (101.5 cm) point to point using Bernat Pipsqueak yarn. It features alternating rounds of two colors to create a soft textured star with clear rounds and color-change instructions. The pattern uses basic stitches like dc, hdc and sc, plus working in ch-2 spaces to form the star points.

Bernat Pipsqueak Star Blanket (To Crochet) Pattern crochet pattern - detailed view of completed project

Follow the step-by-step rounds and color changes to build the blanket from the center outward. The instructions include finishing notes and the exact yarn references for the recommended look.

Why You'll Love This Bernat Pipsqueak Star Blanket (To Crochet) Pattern

I absolutely love this pattern because it turns the fluffy, tactile Bernat Pipsqueak yarn into a striking star-shaped blanket that feels luxurious to the touch. I enjoy how the color changes create bold points and soft stripes without complicated stitchwork. Working this blanket is meditative β€” each round builds beautifully on the last and the structure is very satisfying. I also love that it produces a generous 40-inch piece that is still manageable to make over a few dedicated evenings.

Bernat Pipsqueak Star Blanket (To Crochet) Pattern step 1 - construction progress Bernat Pipsqueak Star Blanket (To Crochet) Pattern step 2 - assembly progress Bernat Pipsqueak Star Blanket (To Crochet) Pattern step 3 - details and accessories Bernat Pipsqueak Star Blanket (To Crochet) Pattern step 4 - final assembly and finishing

Switch Things Up

I love how easily this star blanket pattern takes on new personalities simply by changing colors; try three contrasting shades for a bold look or soft pastels for a nursery piece.

I often substitute yarn weights to change the blanket size and feel; using bulky yarn with a larger hook gives a chunky, cozy throw while a lighter yarn makes a delicate baby blanket.

I sometimes add a simple crocheted border after finishing to create a clean frame around the star points; a round of sc or a crab stitch can neatly finish edges.

I recommend experimenting with ombre or gradient yarns for a seamless color flow that changes across the rounds without frequent color joins.

You could embroider small stars or hearts on the flat sections between points for added detail and a personal touch.

If you want a reversible look, consider using matched textures on both sides by working a complementary edging that hides color changes internally.

I occasionally incorporate metallic or sparkly accent yarn held with the main color for a subtle shimmer in the points.

To make mini versions for gifts or keyrings, change to a sport or fingering weight yarn and a proportionally smaller hook, keeping the stitch patterns identical.

I like to block the finished blanket to open up the points and keep them sharp; pin out the star points to the desired dimensions and steam or wet block gently.

For a playful twist, add small tassels or pompoms at each outer point to give the blanket extra movement and charm.

Dont be afraid to mix textures: pair the plush Bernat Pipsqueak with a smooth cotton border for contrast and durability.

Try making coordinated items like a matching pillow or toy using the same color palette to create a lovely set.

Common Mistakes & How to Fix Them

βœ— Skipping the note about Ch 3 counting as dc can lead to incorrect stitch counts; always treat the starting ch-3 as a dc throughout the rounds. βœ— Failing to join the contrast color at the exact join point will misalign color transitions; make sure to join B or A with a sl st to the specified stitch so color changes fall in the right place. βœ— Not keeping track of the single crochet separators around the shell clusters will distort the star points; mark the starting sc of each repeat and count after every round to maintain symmetry. βœ— Pulling loops too tightly when making sc2tog or draw-up loops will affect the fabric drape; use consistent, moderate tension and practice the decrease to keep it even.

Bernat Pipsqueak Star Blanket (To Crochet) Pattern

Create a soft, textured star-shaped blanket using Bernat Pipsqueak yarn. This pattern guides you through color changes and gentle shaping to make a cozy 40-inch blanket you will reach for again and again. Perfect for gifting or keeping, the blanket showcases plush stitches and clear round-by-round instructions so you can follow along with confidence.

Intermediate 12-15 Hours

Materials Needed for Bernat Pipsqueak Star Blanket (To Crochet) Pattern

β€” Main Fabric

  • 01
    Bernat Pipsqueak (100 g / 3.5 oz; 109 m / 120 yds) - 3 balls of A and 2 balls of B
  • 02
    Alternative yarn total listed: 250 g / 8.8 oz; 274 m / 300 yds (pattern text lists this as an alternative quantity)
  • 03
    Contrast A (58730 or 59730 Silly Sea) - 259 m / 283 yds
  • 04
    Contrast B (58005 or 59005 Whitey White) - 208 m / 227 yds

β€” Tools Required

  • 01
    Crochet hook size 6.5 mm (U.S. K or 10 1/2) or size needed to obtain gauge

Progress Tracker

0% Complete

β€” Star Blanket :

Info :

Note: Ch 3 at beg of rnd counts as dc throughout.

Info :

Beg at center, with A, ch 5. Join with sl st to form ring.

Round 1 :

Ch 2 (does not count as st). 12 hdc in ring. Join with sl st to first hdc. 12 hdc.

Round 2 :

Ch 1. 1 sc in same sp as last sl st. *3 dc in next hdc. 1 sc in next hdc. Rep from * around to last hdc. 3 hdc in last hdc. Join B with sl st to first sc.

Round 3 :

With B, sl st in next dc. Ch 3. (2 dc. Ch 2. 2 dc) in next dc. 1 dc in next dc. *Miss next sc. 1 dc in next dc. (2 dc. Ch 2. 2 dc) in next dc. 1 dc in next dc. Rep from * 4 times more. Join A with sl st to top of ch 3.

Round 4 :

With A, sl st in next dc. Ch 3. 1 dc in next dc. *(2 dc. Ch 2. 2 dc) in next ch-2 sp. 1 dc in each of next 2 dc.** Draw up a loop in each of next 2 dc. Yoh and draw through all loops on hook - sc2tog made. 1 dc in each of next 2 dc. Rep from * 4 times more, then from * to ** once. Sc2tog over last 2 sts. Join with sl st to top of ch 3.

Round 5 :

Ch 3. 1 dc in each of next 3 dc. *(2 dc. Ch 2. 2 dc) in next ch-2 sp. 1 dc in each of next 4 dc.** Miss next st. 1 dc in each of next 4 dc. Rep from * 4 times more, then from * to ** once. Miss last st. Join B with sl st to top of ch 3.

Round 6 :

With B, sl st in next dc. Ch 3. 1 dc in each of next 4 dc. *(2 dc. Ch 2. 2 dc) in next ch-2 sp. 1 dc in each of next 5 dc. Sc2tog over next 2 dc. 1 dc in each of next 5 dc. Rep from * 4 times more, then from * to ** once. Sc2tog over last 2 dc. Join A with sl st to top of ch 3.

Round 7 :

With A, ch 3. 1 dc in each of next 6 dc. *(2 dc. Ch 2. 2 dc) in next ch-2 sp. 1 dc in each of next 7 dc.** Miss next st. 1 dc in each of next 7 dc. Rep from * 4 times more, then from * to ** once. Miss last st. Join with sl st to top of ch 3.

Round 8 :

Sl st in next dc. Ch 3. 1 dc in each of next 7 dc. *(2 dc. Ch 2. 2 dc) in next ch-2 sp. 1 dc in each of next 8 dc.** Sc2tog over next 2 dc. 1 dc in each of next 8 dc. Rep from * 4 times more, then from * to ** once. Sc2tog over last 2 dc. Join B with sl st to top of ch 3.

Round 9 :

With B, ch 3. 1 dc in each of next 9 dc. *(2 dc. Ch 2. 2 dc) in next ch-2 sp. 1 dc in each of next 10 dc.** Miss next st. 1 dc in each of next 10 dc. Rep from * 4 times more, then from * to ** once. Miss last st. Join A with sl st to top of ch 3.

Round 10 :

With A, sl st in next dc. Ch 3. 1 dc in each of next 10 dc. *(2 dc. Ch 2. 2 dc) in next ch-2 sp. 1 dc in each of next 11 dc.** Sc2tog over next 2 dc. 1 dc in each of next 11 dc. Rep from * 4 times more, then from * to ** once. Sc2tog over last 2 dc. Join with sl st to top of ch 3.

Round 11 :

Ch 3. 1 dc in each of next 12 dc. *(2 dc. Ch 2. 2 dc) in next ch-2 sp. 1 dc in each of next 13 dc.** Miss next st. 1 dc in each of next 13 dc. Rep from * 4 times more, then from * to ** once. Miss last st. Join B with sl st to top of ch 3.

Info :

Cont as established, (working 1 rnd B; 2 rnds A throughout) until work from center to outer point measures approx 20 ins [51 cm] ending with 2 rnds A. Fasten off.

Assembly Instructions

  • Fasten off after completing the final rounds and secure all color joins with a slip stitch as indicated in the pattern.
  • Weave in all loose ends neatly on the wrong side using a yarn needle, following the color changes to hide tails.
  • If desired, block the blanket gently to shape the star points and even out stitches, pinning points to measurements before drying.
  • When changing colors, join the new color with a sl st to the specified stitch to ensure the stripes and points align consistently.
  • Check each round count as you finish it to ensure the shell clusters and single crochet separators are in the correct positions for symmetry.

Important Notes

  • πŸ’‘Ch 3 at the beginning of a round counts as a double crochet throughout the pattern; do not count it as an extra stitch.
  • πŸ’‘Use the specified hook size or adjust to meet the gauge: 10 dc and 6 rows = 4 ins (10 cm).
  • πŸ’‘Join contrast colors with a slip stitch at the exact join point to keep the color pattern aligned across repeats.
  • πŸ’‘Measure from center to outer point as you work; stop when it measures approximately 20 ins (51 cm) for the size shown.

This cozy star blanket is a delightful project that transforms plush Bernat Pipsqueak yarn into a gentle statement piece. The textured rounds and color changes create soft, dramatic points that are perfect for snuggling. Make one for a baby shower, a thoughtful gift, or to brighten up your own living space. πŸ§ΆπŸ€—

You ask,

we answer.

FAQs

What size will the finished piece be?

The finished blanket measures approximately 40 inches (101.5 cm) from point to point when worked to the pattern's specified rounds and gauge.

Can I use different yarn weights for this pattern?

Yes, you can use different yarn weights but the final size and drape will change; adjust the hook size and check gauge to achieve the desired dimensions.

Do I need prior crochet experience for this pattern?

This pattern is rated intermediate, so it helps to be comfortable with dc, hdc, sc, working into chain-2 spaces, and simple decreases like sc2tog.

How long does this project typically take to complete?

Most crocheters complete this project in 12-15 hours, though actual time can vary depending on experience and pacing.