🧢 Beautiful ✨ Detailed πŸ’ Adorable

Ball of (almost) any size Amigurumi Pattern

Ball of (almost) any size Amigurumi Pattern
4.3β˜… Rating
2-3 Hours Time Needed
3.1K Made This
βœ‚οΈ

Intermediate Level

Ideal for those with basic crochet experience, featuring slightly more advanced stitches and techniques to expand your skills.

⏱️

Bite-Sized Project

Finishes in 2-4 hoursβ€”perfect for an afternoon of creative relaxation.

🎁

Tiny Treasure

Small, sweet, and gift-worthy creations that fit perfectly in the palm of your hand with detailed charm.

About This Ball of (almost) any size Amigurumi Pattern

This pattern shows you how to crochet a spherical ball (amigurumi style) in spirals, with a complete eight-row top and bottom section as a working example. It teaches the mathematical logic to scale the ball size up or down, explains how many middle rows are needed, and gives guidance on tension and stuffing for a smooth round finish. You can use any yarn you have on hand, though firmer yarns like cotton give the neatest spheres.

Ball of (almost) any size Amigurumi Pattern crochet pattern - detailed view of completed project

Included are the full top and bottom rounds for an eight-row circle plus instructions on how to extract fewer rows for smaller balls or add rows for larger ones. There are also tips for measuring your stitch unit, estimating yarn usage, and creative ideas for using finished balls.

Why You'll Love This Ball of (almost) any size Amigurumi Pattern

I absolutely love this pattern because it takes a problem I often met when making amigurumi heads and turns it into a simple, repeatable method. I enjoy how the math behind the rows gives you predictable results β€” you can make tiny beads or larger play balls by counting rows, not guessing. I also love that it helps you use up leftover yarn and experiment with different yarn weights and hooks. The clear eight-row example gives you a solid base and the explanations make it easy to adapt the size to your needs.

Ball of (almost) any size Amigurumi Pattern step 1 - construction progress Ball of (almost) any size Amigurumi Pattern step 2 - assembly progress Ball of (almost) any size Amigurumi Pattern step 3 - details and accessories Ball of (almost) any size Amigurumi Pattern step 4 - final assembly and finishing

Switch Things Up

I love experimenting with yarn and hook combinations to change the look and size of the ball; try thicker yarn and a larger hook for cozy, chunky balls or finer yarn and a small hook for tiny decorative beads.

I often change colors every row in the middle section to make striped spheres which look great as holiday baubles.

For a textured surface, swap some rows for a different stitch like HDC or a bobble stitch in the middle section, keeping the top and bottom shaping the same.

I sometimes insert a small bell or rattle inside before finishing for a baby-safe toy, making sure to secure it inside stuffing or a bead first.

If I want a weighted ball, I place a small bag of rice or plastic pellets inside a fabric pouch and then add stuffing around it so the ball keeps a stable weight and shape.

I like to cover wooden beads with a tiny ball version by reducing stuffing and stretching the crochet over the bead to make durable, pretty necklace beads.

To create a posable figure, I add wire to the interior of larger balls used as bodies or bases for limbs so I can bend and pose them slightly.

For a vintage look I use natural cotton in neutral colors and slightly larger hooks, then lightly felt the finished ball if the yarn allows to soften the stitches.

I sometimes use scrap yarn and make sets of graduated balls to stack into snowpeople or decorative sculptures, sewing them securely together at contact points.

I recommend trying placement of eyes or accessories before closing the last rows; small shifts in eye placement can dramatically change the personality of a head-shaped ball.

Common Mistakes & How to Fix Them

βœ— Skipping the magic ring start can leave a visible hole in the top of the ball; always start Row 1 with a magic ring and close it tightly before continuing. βœ— Using the yarns recommended hook size often makes the fabric too loose; go one hook size smaller to create a firmer fabric and a neater sphere shape. βœ— Stuffing the ball too firmly will distort the shape and create bumps; stuff gradually, distribute stuffing evenly, and avoid overfilling. βœ— Not offsetting increases on even-numbered increase rows can create a hexagon instead of a smooth circle; for even rows start with half the number of stitches before the first increase to offset it. βœ— Forgetting to count rows in the middle section will give a misshapen ball; make sure you have the same number of middle rows as rows in your top circle section. βœ— Pulling the yarn tail too tight when closing the last stitches can pucker the surface; weave the tail through front loops and pull gently, adjusting stuffing as you close.

Ball of (almost) any size Amigurumi Pattern

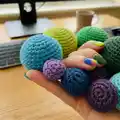
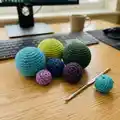
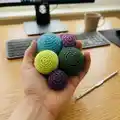
Make perfect crocheted spheres in almost any size with this flexible amigurumi ball pattern. You can create tiny beads, toy-sized balls, or larger soft spheres using simple increases, straight middle rows, and mirrored decreases. The pattern includes a full eight-row example plus clear guidance to scale up or down, and tips on tension, stuffing, and yarn estimation to get the size you want.

Intermediate 2-3 Hours

Materials Needed for Ball of (almost) any size Amigurumi Pattern

β€” Main Fabric

  • 01
    PaintBox DK cotton (DK/light worsted) - used for the main sample set; recommended with a smaller hook for a firm fabric
  • 02
    Catania (sport weight) - used for six-row samples; works well with a 2.5mm hook to create smaller balls
  • 03
    PaintBox cotton Aran (aran/worsted) - used with a 4mm hook for larger, chunkier six-row balls
  • 04
    Assorted leftover yarns of various weights to make different sized balls (amount depends on chosen size; see yarn estimation section)

β€” Tools Required

  • 01
    Crochet hook 3.5mm (recommended for PaintBox DK cotton sample)
  • 02
    Crochet hook 2.5mm (recommended for Catania sport weight samples)
  • 03
    Crochet hook 4mm (recommended for PaintBox cotton Aran samples)
  • 04
    Large-eye sewing needle (or smaller crochet hook) to finish ends and weave tails
  • 05
    Scissors
  • 06
    Measuring tape or ruler to measure stitch unit and circumference
  • 07
    Kitchen or digital scales to weigh yarn for yarn-usage estimation
  • 08
    Polyester stuffing (fibrefill) for filling the ball
  • 09
    Stitch marker to mark the start of rounds while working in spirals
  • 10
    Pins (optional) for positioning parts if using balls as heads or components

Progress Tracker

0% Complete

β€” Top Section for an eight-row circle ball :

Info :

Note - repeat just the section in the brackets just before the word repeat! The bracket at the end is the number of stitches you should now have in the row - it is always a multiple of six.

Row 1 :

6 dc into a magic ring.

Row 2 :

2dc into each dc (12)

Row 3 :

(dc, 2dc in next dc) repeat 6 times (18)

Row 4 :

1 dc, 2dc in next dc, (2 dc, 2dc in next dc) repeat 5 times, 1 dc (24)

Row 5 :

(3 dc, 2dc in next dc) repeat 6 times (30)

Row 6 :

2 dc, 2dc in next dc, (4 dc, 2dc in next dc) repeat 5 times, 2 dc (36)

Row 7 :

(5 dc, 2dc in next dc) repeat 6 times (42)

Row 8 :

3 dc, 2dc in next dc, (6 dc, 2dc in next dc) repeat 5 times, 3 dc (48)

β€” Middle section (any ball) :

Middle Row :

1dc in each dc to end - repeat until you have as many 'middle rows' as you have rows in your top (circle) section.

β€” Bottom Section for an eight-row circle ball :

Info :

Note: These row numbers count DOWN to the top of the ball, so for an eight row circle ball the next row is row 8. Read the notes, below, on stuffing before the hole in your ball gets too small.

Row 8 :

3 dc, dec, (6 dc, dec) repeat 5 times, 3 dc (42)

Row 7 :

(5 dc, dec) repeat 6 times (36)

Row 6 :

2 dc, dec, (4 dc, dec) repeat 5 times, 2 dc (30)

Row 5 :

(3 dc, dec) repeat 6 times (24)

Row 4 :

1 dc, dec, (2 dc, dec) repeat 5 times, 1 dc (18)

Row 3 :

(dc, dec) repeat 6 times (12)

Row 2 :

dec 6 times (6)

Row 1 :

Cut the yarn, leaving a long tail. Put the tail in a sewing needle, and thread through the front loop of each of the remaining 6 stitches going around the ring in the same direction you were working. Pull tight and finish the end, hiding it inside the ball.

β€” Stuffing :

Info :

Do not stuff the ball too firmly, it will distort the shape. Try to stuff evenly, if possible with small balls just use one piece of stuffing pushed in at perhaps the 18 stitch row (balls smaller than this may not need stuffing at all). If you need a lot of stuffing, try putting in a fairly large amount to start with and then spreading it out so that you can put the rest into the middle of the stuffing you've already put in - this tends to give a smoother, more even result. When you've finished off the ball, roll it in your hands for a while (or on a flat surface if it's too big for that) until it's as round as you can make it.

β€” The other 7 smallest sizes :

Info :

Yes, I said the first eight sizes were given in full. They are. Just take the first however many rows you want from the eight-row ball, the middle section, and the last same-number of rows, counting from the end. So for the tiniest ball with the yarn you have, just the first row, one middle row, and the last row. For the next size, the first two rows, two middle rows, and the last two rows. And so on for the first seven sizes.

β€” Larger Sizes :

Info :

OK, for larger sizes I think you can probably see how it goes. Every row of the top circle section you increase (2dc in next dc) six stitches, evenly spread around the ball. The number of stitches between the increases gets bigger by one stitch on each row.

Info :

If this is an odd number, start the row with that number of stitches, increase, then repeat that until the end of the row. For example, rows 3, 5 and 7 on the method above.

Info :

If it is an even number, then to put the increase in the middle of the space rather than in the same place as the increase on the previous row, you start with HALF that number of stitches, increase, then (the full number, increase) five times, then that half number again and you should be at the end of the row. For example, rows 4, 6 and 8 on the method above.

Info :

The middle is always the same - unshaped rows of the same number as the number of rows in your top circle.

Info :

Note: If you are getting very big, and your stitches are not quite the same height as width, you may need to change this a little - measure your circumference, do half the number of middle rows you should need, and check that the dome you have made is half that measurement from one edge to the other measured over the top of that dome.

Info :

The bottom circle works exactly the same way, except that instead of spacing your increases, as described above, you are spacing your decreases.

Info :

I hope you enjoy making your balls.

β€” Choosing the size of your ball :

Info :

To work out how to make a ball the size you want, you need to know the size of the stitch you get from your yarn with the hook you are using. I do this by making a little sample of crochet about 15 stitches wide and ten rows high and measure the width of six of the stitches in the middle (ish) of the last row. This is your Unit Measurement. One stitch is a sixth of this, but the measurement you just took is the one you need because all the ball circumferences are a multiple of six stitches.

Info :

Each size of ball has a circumference of the Unit Measurement multiplied by the number of rows in the top circle section.

β€” How much Yarn / How big a ball from my Yarn? :

Info :

You may want to know how much yarn you need for a ball, or how big a ball you can make from whatever amount of yarn you have left. To do this, you need to know either the weight or the length of yarn needed for (say) 100 stitches in your yarn. Make a trial piece 10 stitches by 10 rows, and either weigh it or undo it and measure how much yarn it took. If you've done the 15 x 10 piece above to try out the size of the stitches, take two-thirds of your result for that (because that was 150 stitches).

Info :

Now, each ball has 6 stitches in the first row, 2x6 in the second row, 3x6 in the third etc. up to N x 6, then has N rows of N x 6 stitches where N is the number of rows which defines the size of the ball, so that is N x N x 6 stitches. Plus of course the same size circle section at the base.

β€” Number of stitches in a ball :

Info :

The pattern includes a chart for the first 12 sizes showing number of rows in circle section, number of stitches in one circle section (A), number of stitches in middle section (B) and total number of stitches (2A+B). The first twelve values are: 1 => 6 stitches, middle 6, total 18; 2 => 18, 24, 60; 3 => 36, 54, 126; 4 => 60, 96, 216; 5 => 90, 150, 330; 6 => 126, 216, 468; 7 => 168, 294, 630; 8 => 216, 384, 816; 9 => 270, 486, 1026; 10 => 330, 600, 1260; 11 => 396, 726, 1518; 12 => 486, 864, 1836.

β€” Ideas for using balls :

Info :

Of course the most obvious thing is for soft things for young folk to throw around. Make sure larger ones for babies and toddlers are stitched up well so they can't get at the stuffing. For winter holidays you could make baubles - use yarns that shade, change colours every row, or do something elaborate with colour. Small balls in pretty or sparkly yarns can be used as beads for a graduated necklace, or cover wood/plastic beads as a base. Balls make decent heads for dolls or animals; you can make half or so of a ball as hair, or add shaping to the last row or two to make an oval body for a toy.

Assembly Instructions

  • Use finished balls as heads for amigurumi by sewing the neck opening to the body neck with a yarn needle, matching the last round of the head to the body opening and using a neat whipstitch.
  • Create a snowman or stacked decoration by making three different sized balls and sewing them together at the contact points, adding felt or crocheted accessories to secure and decorate the joins.
  • Turn small balls into beads by stretching them over wooden or plastic beads or by reducing stuffing and slipping over a bead before finishing the last row; secure the last row so the bead cannot fall out.
  • For baby-safe toys, stitch seams multiple times and hide ends well; position any sewn-on details firmly and avoid loose parts that could be pulled off by small hands.
  • When using balls as toy bodies, sew them to limbs and heads by aligning the joining rounds, pinning for placement if needed, and stitching through both edges with a durable yarn and secure knots.

Important Notes

  • πŸ’‘Work in amigurumi style spirals and use a stitch marker to mark the start of each round so you do not lose track.
  • πŸ’‘Use one hook size smaller than the yarn label suggests to make a firmer fabric and a smoother, neater ball.
  • πŸ’‘Do not stuff the ball too firmly as overstuffing will distort the intended spherical shape; add stuffing gradually and evenly.
  • πŸ’‘Measure your Unit Measurement (width of six stitches) with the chosen yarn and hook to calculate the target circumference accurately.
  • πŸ’‘When making larger balls check your dome measurement and adjust middle rows if stitch height and width differ significantly.

This flexible ball pattern helps you make anything from tiny beads to soft play balls with ease. It teaches a simple maths-based method so your results are predictable and repeatable. Use leftover yarns to create colourful sets or make tidy amigurumi heads and toy bodies. πŸ§ΆπŸŽ‰

You ask,

we answer.

FAQs

What size will the finished piece be?

The finished size depends on your yarn and hook; use the Unit Measurement method in the pattern to calculate circumference β€” for the sample with PaintBox DK and a 3.5mm hook a Unit Measurement was about 2.5cm giving a six-row circle a 15cm circumference.

Can I use different yarn weights for this pattern?

Yes, you can use different yarn weights; the pattern explains how to measure your stitch Unit Measurement and choose the number of rows for the circle to get the circumference you need β€” different yarns will change final size and may require different hook sizes.

Do I need prior crochet experience for this pattern?

This pattern is rated intermediate and assumes familiarity with crochet basics including magic ring, working in spirals, increases (2dc in next) and decreases; if you are comfortable with these, you should be able to follow the instructions.

How long does this project typically take to complete?

Most crafters can complete a small to medium sized ball in 2-3 hours, though larger sizes or multiple balls will take longer depending on yarn weight and complexity.