🧶 Beautiful ✨ Detailed 💝 Adorable

Baby Dino Amigurumi Pattern

Baby Dino Amigurumi Pattern
4.9★ Rating
8-10 Hours Time Needed
2.2K Made This
✂️

Intermediate Level

Ideal for those with basic crochet experience, featuring slightly more advanced stitches and techniques to expand your skills.

⏱️

All-Day Adventure

Requires 8-10 hours, ideal for a full day of immersive crocheting.

🧸

Cute Companion

An adorable friend to cherish, handcrafted with love to bring comfort and joy for years to come.

About This Baby Dino Amigurumi Pattern

This pattern makes a Baby Dino stacking toy with separate rings, a pole, tail, legs, arms, head and an egg-shaped storage shell. It uses two hook sizes and different yarn weights so the dino pieces nest inside the egg. The design includes optional decorative spots and embroidered nails for realistic detail.

Baby Dino Amigurumi Pattern crochet pattern - detailed view of completed project

Fully written rounds for every part and clear assembly notes are included. Photos and tips for using fishing line in the egg are provided to help you shape the pieces.

Why You'll Love This Baby Dino Amigurumi Pattern

I absolutely love this pattern because it combines playful stacking elements with a cuddly amigurumi design that kids adore. I enjoy the challenge of using two yarn weights to make pieces nest perfectly inside the egg. I particularly like adding the tiny embroidered nails and spots — they give the dino so much character. Sharing a pattern that helps others create a keepsake toy makes me really happy.

Baby Dino Amigurumi Pattern step 1 - construction progress Baby Dino Amigurumi Pattern step 2 - assembly progress Baby Dino Amigurumi Pattern step 3 - details and accessories Baby Dino Amigurumi Pattern step 4 - final assembly and finishing

Switch Things Up

I love how easy it is to customize the Baby Dino by changing colors and spot placement; try pastel palettes for a baby shower gift or bright contrasting colors for a playful look.

I often make a mini version by using thinner yarn and a smaller hook to create a keychain-sized dino that still stacks inside a tiny egg.

If you want a chunkier toy, use a thicker yarn and bigger hooks for a soft, cuddly version — adjust stuffing and stabilizing pieces accordingly.

I sometimes replace safety eyes with embroidered eyes for baby-safe toys; I recommend embroidery when making toys for very young children.

To add personality, try different nose shapes or eyebrow embroidery to change the dino's expression — subtle changes can create many moods.

I also like adding a little wire in the neck for posability; it helps the head stay upright but keep the wire ends well secured and covered for safety.

For the egg, you can swap fishing line for a cotton cord if you want a less rigid shape, but the fishing line gives a crisp egg curve I really like.

I sometimes make coordinating small blankets or a matching pacifier clip to create a themed baby set that pairs well with this toy.

Try different spot shapes or appliques, or use felt for contrasting textured spots; anchoring spots with velcro makes them removable and playful.

I enjoy sewing a small loop at the top of the egg so it can hang as nursery decor; it's a simple addition that changes how the piece is used.

Common Mistakes & How to Fix Them

✗ Skipping stitch markers during rounds with repeated increases or decreases; place a stitch marker at the start of each round to maintain your round count accurately. ✗ Not stuffing pieces gradually causes uneven shape and lumps; stuff little by little and shape as you go to maintain smooth curves. ✗ Using the same hook size for both yarns when the pattern calls for two sizes makes parts not fit; use the recommended 1.5 mm and 3 mm hooks with appropriate yarn weights. ✗ Sewing parts without pinning first can misalign attachments; pin or clip legs, arms and rings in place before sewing for symmetrical placement. ✗ Pulling the fishing line too tight or too loose when making the egg changes the shape; test tension on a scrap round to get an egg-like curve and adjust tension slowly. ✗ Forgetting to leave long tails for sewing will complicate assembly; always leave long tails when instructed to fasten off for easy joining and finishing.

Baby Dino Amigurumi Pattern

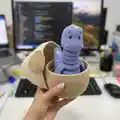
Make a charming Baby Dino stacking toy you can tuck into a soft crochet egg. This pattern guides you through each piece — rings, tail, legs, head and decorative spots — with clear rounds and assembly tips. Perfect for giving as a handmade gift or keeping as a playful nursery accent. You will enjoy creating a tactile, squishy stacking toy that is both cute and functional.

Intermediate 8-10 Hours

Materials Needed for Baby Dino Amigurumi Pattern

— Main Fabric

  • 01
    Blue - Alize Cotton Gold Fine 287 (1 ball 100 g - 66 m (as listed))
  • 02
    Ivory - Alize Cotton Gold 67 (1 ball 100 g - 330 m (as listed))
  • 03
    Beige - Alize Cotton Gold 262 (amount as needed for egg spots and shell)
  • 04
    Light blue - small amounts for spots and decorative marks
  • 05
    Polyfill for stuffing
  • 06
    1 mm diameter fishing line (for egg shaping)
  • 07
    Black yarn for embroidered eyes or safety eyes 0.6 mm (optional)

— Tools Required

  • 01
    Crochet hook size 1.5 mm (for small details and most dino parts)
  • 02
    Crochet hook size 3 mm (for egg/outer shell)
  • 03
    Scissors
  • 04
    Tapestry needle for sewing parts
  • 05
    Stitch markers
  • 06
    Polyester stuffing (polyfill)
  • 07
    Velcro (for attaching half spots to egg)
  • 08
    1 mm diameter fishing line
  • 09
    Safety eyes 0.6 mm (optional)

Progress Tracker

0% Complete

— POLE :

Round 1 :

6 sc in MR (6)

Round 2 :

6 sc (6)

Round 3 :

6 inc (12)

Round 4-5 :

12 sc (12)

Round 6 :

(1 sc; inc)*6 (18)

Round 7-9 :

18 sc (18)

Round 10 :

(2 sc; inc)*6 (24)

Round 11-44 :

24 sc (24) fill with stuffing

— BASE (make 2 parts) :

Info :

Start with blue color

Round 1 :

6 sc in MR (6)

Round 2 :

6 inc (12)

Round 3 :

(1 sc; inc)*6 (18)

Round 4 :

(2 sc; inc)*6 (24)

Round 5 :

FLO (3 sc; inc)*6 (30)

Round 6 :

(4 sc; inc)*6 (36)

Round 7 :

(5 sc; inc)*6 (42)

Round 8 :

3 sc; inc; (6 sc; inc)*5; 3 sc (48)

Round 9 :

(7 sc; inc)*6 (54)

Round 10 :

FLO(4 sc;inc;(8 sc;inc)*5;4 sc)(60)

Round 11 :

(9 sc; inc)*6 (66)

Round 12 :

5 sc; inc; (10 sc; inc)*5; 5 sc (72)

Round 13 :

(11 sc; inc)*6 (78)

Info :

Sew two parts of the base together in back loops of rounds 5, 10 and 13. Fill with stuffing as you go. After that sew the pole to the base in round 5.

— LARGE RING :

Info :

With blue yarn

Round 1 :

36 ch; slst in 1st ch (36)

Round 2 :

(5 sc; inc)*6 (42)

Round 3 :

3 sc; inc; (6 sc; inc)*5; 3 sc (48)

Round 4 :

(7 sc; inc)*6 (54)

Round 5 :

4 sc; inc; (8 sc; inc)*5; 4 sc (60)

Round 6 :

(9 sc; inc)*6 (66)

Round 7 :

5 sc; inc; (10 sc; inc)*5; 5 sc (72)

Round 8 :

(11 sc; inc)*6 (78)

Round 9-13 :

78 sc (78)

Round 14 :

(11 sc; dec)*6 (72)

Round 15 :

5 sc; dec; (10 sc; dec)*5; 5 sc (66)

Round 16 :

(9 sc; dec)*6 (60)

Round 17 :

4 sc; dec; (8 sc; dec)*5; 4 sc (54)

Round 18 :

(7 sc; dec)*6 (48)

Round 19 :

3 sc; dec; (6 sc; dec)*5; 3 sc (42)

Round 20 :

(5 sc; dec)*6 (36)

Info :

Sew round 20 with round 1, fill with stuffing as you go.

— LEGS (make 2) :

Round 1 :

6 sc in MR (6)

Round 2 :

6 inc (12)

Round 3 :

(1 sc; inc)*6 (18)

Round 4 :

(2 sc; inc)*6 (24)

Round 5 :

BLO 24 sc (24)

Round 6-8 :

24 sc (24)

Round 9 :

(10 sc; dec)*2 (22)

Round 10-13 :

22 sc (22)

Round 14 :

(9 sc; dec)*2 (20)

Round 15 :

20 sc (20)

Info :

Fill with stuffing, fold in half and make 10 sc, fasten off, leave a long tail for sewing.

— TAIL :

Info :

With blue yarn

Round 1 :

6 sc in MR (6)

Round 2 :

6 inc (12)

Round 3 :

12 sc (12)

Round 4 :

(2 inc; 4 sc)*2 (16)

Round 5-7 :

16 sc (16)

Round 8 :

1 sc; 2 inc; 6 sc; 2 inc; 5 sc (20)

Round 9-11 :

20 sc (20)

Round 12 :

2 sc; 2 inc; 8 sc; 2 inc; 6 sc (24)

Round 13-15 :

24 sc (24)

Round 16 :

3 sc; 2 inc; 10 sc; 2 inc; 7 sc (28)

Round 17-19 :

28 sc (28)

Round 20 :

4 sc; 2 inc; 12 sc; 2 inc; 8 sc (32)

Round 21-23 :

32 sc (32)

Round 24 :

5 sc; 2 inc; 14 sc; 2 inc; 9 sc (36)

Round 25-27 :

36 sc (36)

Round 28 :

6 sc; 2 inc; 16 sc; 2 inc; 10 sc (40)

Round 29-31 :

40 sc (40)

Round 32 :

7 sc; 2 inc; 18 sc; 2 inc; 11 sc (44)

Round 33-35 :

44 sc (44) fasten off, fill with stuffing, sew to the large ring.

Info :

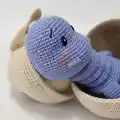
Sew legs and tail to the large ring, like in the pictures (pin it before sewing). Embroider with white yarn nails on the feet.

— MIDDLE RING :

Info :

With blue yarn

Round 1 :

36 ch; slst in 1st ch (36)

Round 2 :

(5 sc; inc)*6 (42)

Round 3 :

3 sc; inc; (6 sc; inc)*5; 3 sc (48)

Round 4 :

(7 sc; inc)*6 (54)

Round 5 :

4 sc; inc; (8 sc; inc)*5; 4 sc (60)

Round 6 :

(9 sc; inc)*6 (66)

Round 7-11 :

66 sc (66)

Round 12 :

(9 sc; dec)*6 (60)

Round 13 :

4 sc; dec; (8 sc; dec)*5; 4 sc (54)

Round 14 :

(7 sc; dec)*6 (48)

Round 15 :

3 sc; dec; (6 sc; dec)*5; 3 sc (42)

Round 16 :

(5 sc; dec)*6 (36)

Info :

Sew round 16 with round 1, fill with stuffing as you go.

— ARMS (make 2) :

Info :

With blue yarn

Round 1 :

6 sc in MR (6)

Round 2 :

6 inc (12)

Round 3 :

(1 sc; inc)*6 (18)

Round 4 :

BLO 18 sc (18)

Round 5-8 :

18 sc (18)

Round 9 :

(7 sc; dec)*2 (16)

Round 10-14 :

16 sc (16)

Round 15 :

(6 sc; dec)*2 (14)

Round 16-20 :

14 sc (14)

Round 21 :

Fold in half and make 7 sc, fasten off, leave a long tail for sewing.

Info :

Embroider white nails. Make "dimples" in the arms. Sew arms to the small ring as you can see in the pictures.

— SMALL RING :

Info :

With blue yarn

Round 1 :

36 ch; slst in 1st ch (36)

Round 2 :

(5 sc; inc)*6 (42)

Round 3 :

3 sc; inc; (6 sc; inc)*5; 3 sc (48)

Round 4 :

(7 sc; inc)*6 (54)

Round 5-9 :

54 sc (54)

Round 10 :

(7 sc; dec)*6 (48)

Round 11 :

3 sc; dec; (6 sc; dec)*5; 3 sc (42)

Round 12 :

(5 sc; dec)*6 (36)

Info :

Sew round 22 with round 1, fill with stuffing as you go.

— NECK RINGS (make 3) :

Info :

With blue yarn

Round 1 :

30 ch; slst in 1st ch (30)

Round 2 :

(4 sc; inc)*6 (36)

Round 3 :

(5 sc; inc)*6 (42)

Round 4-6 :

42 sc (42)

Round 7 :

(5 sc; dec)*6 (36)

Round 8 :

(4 sc; dec)*6 (30)

Info :

Sew round 8 with round 1, fill with stuffing as you go.

— HEAD :

Info :

With blue yarn

Round 1 :

6 sc in MR (6)

Round 2 :

6 inc (12)

Round 3 :

(1 sc; inc)*6 (18)

Round 4 :

(2 sc; inc)*6 (24)

Round 5 :

(3 sc; inc)*6 (30)

Round 6 :

(4 sc; inc)*6 (36)

Round 7 :

(5 sc; inc)*6 (42)

Round 8 :

(6 sc; inc)*6 (48)

Round 9-15 :

48 sc (48)

Round 16 :

7 inc; 41 sc (55)

Round 17-18 :

55 sc (55)

Round 19 :

3 sc; inc; (1 sc; inc)*4; 43 sc (60)

Round 20-21 :

60 sc (60)

Round 22 :

(BLO 4 sc); 11 sc; (BLO 4 sc); 41 sc (60)

Round 23-25 :

60 sc (60)

Round 26 :

3 sc; dec; (1 sc; dec)*4; (10 sc; dec)*3; 7 sc (52)

Round 27 :

52 sc (52)

Round 28 :

7 dec; 7 sc; dec; (9 sc; dec)*2; 7 sc (42)

Round 29 :

(5 sc; dec)*6 (36)

Round 30 :

(4 sc; dec)*6 (30)

Round 31 :

(3 sc; dec)*6 (24) fill with stuffing

Round 32 :

BLO 24 sc (24)

Round 33-35 :

24 sc (24)

Round 36 :

(2 sc; dec)*6 (18)

Round 37-38 :

18 sc (18)

Round 39 :

(1 sc; dec)*6 (12)

Round 40 :

12 sc (12)

Round 41 :

6 dec (6) fasten off, leave a tail to make eye tightening in the end.

— NOSTRILS (make 2) :

Info :

In round 22 we left front 4 loops, now crochet in these loops with blue yarn

Row 1 :

1 sc; 2 inc; 1 slst (6) fasten off, weave in tails.

— SPOTS :

Info :

SPOTS (make 3 of each size: R1; R1-2; R1-3). With light blue yarn

Round 1 :

6 sc in MR (6)

Round 2 :

6 inc (12)

Round 3 :

(1 sc; inc)*6 (18)

Info :

fasten off, leave a tail for sewing.
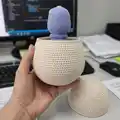
— EGG :

Info :

With ivory yarn using 3 mm crochet hook

Info :

Crochet the egg with fishing line. First, burn the tip of the fishing line with a lighter so that a ball forms at the end. It will not let the fishing line slip out of crocheting. From the second round apply a fishing line and crochet so that fishing line lays under the stitches.

Bottom Round 1 :

6 sc in MR (6)

Bottom Round 2 :

6 inc (12)

Bottom Round 3 :

(1 sc; inc)*6 (18)

Bottom Round 4 :

(2 sc; inc)*6 (24)

Bottom Round 5 :

(3 sc; inc)*6 (30)

Bottom Round 6 :

(4 sc; inc)*6 (36)

Bottom Round 7 :

(5 sc; inc)*6 (42)

Bottom Round 8 :

(6 sc; inc)*6 (48)

Bottom Round 9 :

(7 sc; inc)*6 (54)

Bottom Round 10 :

(8 sc; inc)*6 (60)

Bottom Round 11 :

(9 sc; inc)*6 (66)

Bottom Round 12 :

(10 sc; inc)*6 (72)

Bottom Round 13 :

(11 sc; inc)*6 (78)

Bottom Round 14 :

(12 sc; inc)*6 (84)

Bottom Round 15 :

(13 sc; inc)*6 (90)

Bottom Round 16-29 :

90 sc (90) FO.

Top Round 1 :

6 sc in MR (6)

Top Round 2 :

6 inc (12)

Top Round 3 :

(1 sc; inc)*6 (18)

Top Round 4 :

(2 sc; inc)*6 (24)

Top Round 5 :

(3 sc; inc)*6 (30)

Top Round 6 :

30 sc (30)

Top Round 7 :

(4 sc; inc)*6 (36)

Top Round 8 :

36 sc (36)

Top Round 9 :

(5 sc; inc)*6 (42)

Top Round 10 :

42 sc (42)

Top Round 11 :

(6 sc; inc)*6 (48)

Top Round 12 :

48 sc (48)

Top Round 13 :

(7 sc; inc)*6 (54)

Top Round 14 :

54 sc (54)

Top Round 15 :

(8 sc; inc)*6 (60)

Top Round 16 :

60 sc (60)

Top Round 17 :

(9 sc; inc)*6 (66)

Top Round 18 :

66 sc (66)

Top Round 19 :

(10 sc; inc)*6 (72)

Top Round 20 :

72 sc (72)

Top Round 21 :

(11 sc; inc)*6 (78)

Top Round 22 :

78 sc (78)

Top Round 23 :

(12 sc; inc)*6 (84)

Top Round 24 :

84 sc (84)

Top Round 25 :

(13 sc; inc)*6 (90)

Top Round 26-34 :

90 sc (90) FO

Info :

The shape of the detail will depend on the tension of the fishing line. At the end of each round, tighten the fishing line a little so that you get the shape of an egg and not a flat circle. After you finish the top and the bottom of the egg, cut the fishing line, leave a short end. Gently burn the end of the fishing line and quickly press it to the crocheting. Melted fishing line will stick to the yarn. Crochet few more sc to close the line and complete with a slst, cut the yarn, leave a tail for sewing. Sew the top and the bottom of an egg.

— LARGE SPOT (round) :

Info :

With beige yarn

Round 1 :

6 sc in MR (6)

Round 2 :

6 inc (12)

Round 3 :

(1 sc; inc)*6 (18)

Round 4 :

(2 sc; inc)*6 (24)

Round 5 :

(3 sc; inc)*6 (30)

Round 6 :

(4 sc; inc)*6 (36)

Round 7 :

(5 sc; inc)*6 (42)

Round 8 :

(6 sc; inc)*6 (48) fasten off, leave long tail for sewing.

— MEDIUM SPOT (round) :

Info :

With beige yarn

Round 1 :

6 sc in MR (6)

Round 2 :

6 inc (12)

Round 3 :

(1 sc; inc)*6 (18)

Round 4 :

(2 sc; inc)*6 (24)

Round 5 :

(3 sc; inc)*6 (30)

Round 6 :

(4 sc; inc)*6 (36) fasten off, leave long tail for sewing.

— SMALL SPOT (round) :

Info :

With beige yarn

Round 1 :

6 sc in MR (6)

Round 2 :

6 inc (12)

Round 3 :

(1 sc; inc)*6 (18)

Round 4 :

(2 sc; inc)*6 (24) fasten off, leave long tail for sewing.

— LARGE SPOT (oval) :

Info :

Make with beige yarn

Round 1 :

6 sc in MR (6)

Round 2 :

6 inc (12)

Round 3 :

1 sc; 2 inc; 4 sc; 2 inc; 3 sc (16)

Round 4 :

1 sc; 4 inc; 4 sc; 4 inc; 3 sc (24)

Round 5 :

4 sc; 2 inc; 10 sc; 2 inc; 6 sc (16)

Round 6 :

4 sc; 4 inc; 10 sc; 4 inc; 6 sc (24)

Round 7 :

8 sc; 2 inc; 16 sc; 2 inc; 8 sc (16)

Round 8 :

8 sc; 4 inc; 16 sc; 4 inc; 8 sc (24) fasten off, leave long tail for sewing.

— MEDIUM SPOT (oval) :

Info :

With beige yarn

Round 1 :

6 sc in MR (6)

Round 2 :

6 inc (12)

Round 3 :

1 sc; 2 inc; 4 sc; 2 inc; 3 sc (16)

Round 4 :

1 sc; 4 inc; 4 sc; 4 inc; 3 sc (24)

Round 5 :

4 sc; 2 inc; 10 sc; 2 inc; 6 sc (16)

Round 6 :

4 sc; 4 inc; 10 sc; 4 inc; 6 sc (24)

Round 7 :

(6 sc; inc)*6 (48) fasten off, leave a long tail.

— SMALL SPOT (oval) :

Info :

With beige yarn

Round 1 :

6 sc in MR (6)

Round 2 :

6 inc (12)

Round 3 :

1 sc; 2 inc; 4 sc; 2 inc; 3 sc (16)

Round 4 :

1 sc; 4 inc; 4 sc; 4 inc; 3 sc (24)

Round 5 :

(3 sc; inc)*6 (30) fasten off, leave a long tail.

Assembly Instructions

  • Sew two parts of the base together in the back loops of rounds 5, 10 and 13, filling with stuffing as you go; after sewing, attach the pole to the base in round 5 and secure firmly.
  • Sew round 20 of the large ring to round 1 and stuff the ring as you go; attach legs and tail to the large ring, pinning them in place before sewing for even spacing.
  • Sew the middle and small rings together as instructed and attach arms to the small ring; fold and stitch the arm openings where indicated and leave tails for sewing.
  • Attach the neck rings to each other and then to the body; slide neck rings and head onto the pole in order before securing placements with a few stitches.
  • Insert safety eyes in R15 (6 sc apart) or embroider eyes after completing the head; embroider nostrils and attach small spot decorations and velcro pieces as shown.

Important Notes

  • 💡Use stitch markers at the beginning of each round to keep track of rounds and avoid miscounts.
  • 💡Stuff pieces gradually and evenly; overstuffing can distort shape while under-stuffing will flatten parts.
  • 💡When working the egg with fishing line, test and maintain consistent tension so the egg keeps a rounded shape rather than flattening.
  • 💡Pin and check placement of legs, tail, arms and spots before sewing to ensure symmetry and correct spacing.

Your Baby Dino is complete and ready to stack into its cozy egg shell! 🧶 This set makes a delightful handmade gift for little ones or a charming decor piece for nurseries. 🐣 Enjoy the satisfaction of creating something playful and tactile by hand — congratulations on finishing your Baby Dino! 🎉

You ask,

we answer.

FAQs

What size will the finished piece be?

The finished stacking toy fits inside the crochet egg and the completed dino measures approximately the size shown in photos when using the recommended yarns and hooks; exact size depends on yarn and tension.

Can I use different yarn weights for this pattern?

Yes, the pattern intentionally uses two different yarn weights and hook sizes; using different weights will change final dimensions, so adjust hook sizes accordingly.

Do I need prior crochet experience for this pattern?

This pattern is rated intermediate and assumes familiarity with working in the round, increases and decreases, front/back loop techniques, and simple assembly.

How long does this project typically take to complete?

Most crocheters finish this project in about 8-10 hours, though time can vary with experience and how much detailing (spots, embroidery) you add.