🧢 Beautiful ✨ Detailed πŸ’ Adorable

Baby Alien Amigurumi Pattern

Baby Alien Amigurumi Pattern
4.3β˜… Rating
5-7 Hours Time Needed
2.7K Made This
βœ‚οΈ

Intermediate Level

Ideal for those with basic crochet experience, featuring slightly more advanced stitches and techniques to expand your skills.

⏱️

Weekend Treat

Takes 5-7 hours, making it an enjoyable project to finish over a couple of days.

🐰

Whimsical Buddy

Playful characters full of personality, designed to spark imagination and become cherished playtime favorites.

About This Baby Alien Amigurumi Pattern

This pattern creates a small, seated Baby Alien amigurumi with long floppy ears, tiny arms and feet, and a removable cozy scarf. You will crochet the body from the head down and switch yarn colors for the torso and scarf details. The instructions include full round counts and helpful notes to place safety eyes and sew pieces neatly. Perfect as a gift or to decorate your handmade collection.

Baby Alien Amigurumi Pattern crochet pattern - detailed view of completed project

The pattern uses medium weight (worsted) yarn and a small 2.5mm hook for a compact, sturdy doll. Clear abbreviations, materials and assembly steps are included so you can finish with neat details like blush inside the ears.

Why You'll Love This Baby Alien Amigurumi Pattern

I absolutely love this pattern because it turns simple stitches into an irresistibly cute chibi character. I enjoy how the removable scarf adds personality and makes styling playful and easy. The long ears give this little alien character and charm that you can customize with blush or embroidery. I also love that the pattern is compact enough to finish in a weekend but detailed enough to teach shaping and color switching. Sharing a small, well-constructed amigurumi feels so rewarding and this pattern delivers that joy.

Baby Alien Amigurumi Pattern step 1 - construction progress Baby Alien Amigurumi Pattern step 2 - assembly progress Baby Alien Amigurumi Pattern step 3 - details and accessories Baby Alien Amigurumi Pattern step 4 - final assembly and finishing

Switch Things Up

I love customizing this pattern by changing the scarf color or adding stripes to give the alien unique outfits.

I sometimes swap the soft green for a pastel or variegated yarn to create a very different moodβ€”lighter colors make the doll feel softer and more baby-like.

To make a larger version, I change to a bulkier yarn and a larger hook; this increases the size while keeping the same shaping logic.

I also enjoy embroidering tiny mouths or freckles to give each alien its own expression and personality.

Try using safety eyes of different sizes or placing them slightly closer or further apart to alter the cute factor.

I like adding a little wire armature inside the arms if I want them to be poseable for display purposes.

For gift tags, I crochet a tiny star or heart and sew it onto the scarf for a personalized touch to match the recipient.

Add tiny accessories like a crocheted cup or mini blanket to make a themed set for holidays or birthdays.

If you want extra texture, switch to a slightly fuzzy yarn for the body to create a plush, velvety finish.

I sometimes finish the ear interiors with a soft pink embroidery or light blush for subtle detail that makes the face pop.

Common Mistakes & How to Fix Them

βœ— Skipping stitch markers during increases and decreases leads to losing track of round starts; place a marker at the first stitch of each round and move it up as you go to maintain accurate stitch counts. βœ— Overstuffing the body can make the doll unable to sit upright and distort the shape; stuff gradually and a bit less when approaching the base so the piece sits flat. βœ— Forgetting to switch yarn color cleanly at the round transition causes visible jogs; change colors on the last yarn-over of the previous stitch and weave tails in neatly to conceal the join. βœ— Placing safety eyes without counting rows can result in uneven spacing; place pins or safety eyes between rounds 10-11 spaced out by 8 stitches to match the pattern placement. βœ— Pulling yarn too tight when closing small rounds creates puckering and mis-shaping; maintain gentle, even tension and use a yarn needle to close holes slowly to preserve shape.

Baby Alien Amigurumi Pattern

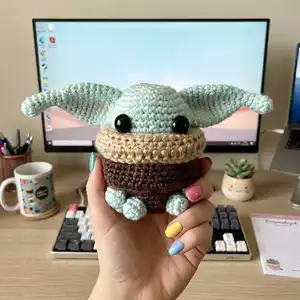
Make an adorable chibi Baby Alien amigurumi using this complete step-by-step crochet pattern. You will work from the head down to create a cute seated alien with long ears, tiny feet, and a removable scarf. The pattern includes materials, abbreviations, full round-by-round instructions, scarf edging and assembly details so you can finish a charming handmade gift.

Intermediate 5-7 Hours

Materials Needed for Baby Alien Amigurumi Pattern

β€” Main Fabric

  • 01
    Caron Simply Soft Yarn - Soft Green (Medium - Weight 4) for Head, Ears, Feet, Arms main portions
  • 02
    Caron Simply Soft Yarn - Taupe (Medium - Weight 4) for Torso and Scarf main color
  • 03
    Caron Simply Soft Yarn - Bone (Medium - Weight 4) for Scarf edging

β€” Tools Required

  • 01
    2.5 mm crochet hook
  • 02
    Fiberfill stuffing
  • 03
    Black 15 mm safety eyes (2 pieces)
  • 04
    Tapestry needle
  • 05
    Blush makeup & small make-up eyeshadow brush or q-tip
  • 06
    Scissors
  • 07
    Stitch markers (recommended)

Progress Tracker

0% Complete

β€” Body :

Info :

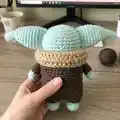
Crochet with soft green yarn. The body is crocheted from head down. Stuff as you go with fiberfill, but make sure when you get to the bottom of the body not to overstuff so it can sit upright.

Round 1 :

6 sc in magic ring [6]

Round 2 :

(inc) repeat 6 times [12]

Round 3 :

(sc in next, inc) repeat 6 times [18]

Round 4 :

(sc in next 2 st, inc) repeat 6 times [24]

Round 5 :

(sc in next 3 st, inc) repeat 6 times [30]

Round 6 :

(sc in next 4 st, inc) repeat 6 times [36]

Round 7 :

(sc in next 5 st, inc) repeat 6 times [42]

Round 8-13 :

sc in all 42 st [42] (Between RND 10-11, spaced out by 8 st between each other, insert 15mm safety eyes)

Round 14 :

(sc in next 5 st, dec) repeat 6 times [36]

Round 15 :

(sc in next 4 st, dec) repeat 6 times [30]

Round 16 :

(sc in next 3 st, dec) repeat 6 times [24]

Round 17 :

(sc in next 2 st, dec) repeat 6 times [18]

Round 18 :

(sc in next 2 st, inc) repeat 6 times [24], then switch to the taupe colored yarn

Round 19 :

(sc in next 3 st, inc) repeat 6 times [30]

Round 20 :

(sc in next 4 st, inc) repeat 6 times [36]

Round 21-27 :

sc in all 36 st [36]

Round 28 :

sc in all 36 st blo [36]

Round 29 :

(sc in next 4 st, dec) repeat 6 times [30]

Round 30 :

(sc in next 3 st, dec) repeat 6 times [24]

Round 31 :

(sc in next 2 st, dec) repeat 6 times [18]

Round 32 :

(sc in next 1 st, dec) repeat 6 times [12]

Round 33 :

(dec) repeat 6 times [6]

Info :

Fasten off with a sl st and hide the yarn tail

β€” Arms :

Info :

Make two. Start with the soft green colored yarn.

Round 1 :

6 sc in magic ring [6]

Round 2 :

(inc) repeat 6 times [12]

Round 3-5 :

sc in all 12 st [12], then switch to the taupe colored yarn

Round 6-10 :

sc in all 12 st [12]

Info :

Fasten off with a sl st and keep a long tail to sew on upper torso later. Stuff with a little bit of fiberfill just to fill the soft green hands portion.

β€” Feet :

Info :

Make two. Crochet with the soft green colored yarn.

Round 1 :

6 sc in magic ring [6]

Round 2 :

(inc) repeat 6 times [12]

Round 3 :

sc in all 12 st [12]

Info :

Fasten off with a sl st and keep a long tail to sew on lower torso later. Stuff with a little bit of fiberfill just to fill the soft green feet portion.

β€” Ears :

Info :

Make two. Crochet with the soft green colored yarn.

Round 1 :

6 sc in magic ring [6]

Round 2-7 :

sc in all 6 st [6]

Round 8 :

(sc in next, inc) repeat 3 times [9]

Round 9 :

(sc in next 2, inc)x2, sc in next 3 st [11]

Round 10 :

(sc in next 3, inc)x2, sc in next 3 st [13]

Round 11 :

(sc in next 4, inc)x2, sc in next 3 st [15]

Round 12 :

(sc in next 5, inc)x2, sc in next 3 st [17]

Round 13-18 :

sc in all 17 st [17]

Info :

Fasten off with a sl st and keep a long tail to sew on the head later.

β€” Scarf :

Info :

Crochet with taupe yarn.

Round 1 :

Ch 42 [42]

Round 2 :

Join ends by making a sc making sure not to twist the loop and continue to sc until the end of the round [42]

Round 2-19 :

sc in the next 42 st [42]

Info :

Do not fasten off. The length of my scarf was around 3 inches and the width was almost 4.5 inches. You should have ended up with a shape that resembles a cup cozy. Fold in the top portion of the scarf in half making the scarf layers twice thick.

Info :

Put your hook through a stitch of the outer edge of the scarf and pull the loop from the inner edge through to the outer edge stitch.

Info :

Now continue stitching both edges together until you get to the end. Fasten off with a sl st and keep a medium sized tail. With the tail hide it in between the two sewn folds. The scarf will not be sewn onto the doll. You should be able to take it on and off of the doll.

β€” Scarf Edge :

Info :

Now it is time for the bone colored edging on the scarf. With the bone colored yarn, pull a loop through the top edge of the scarf and ch 1

Round 1 :

Sc in all 42 st [42]

Round 2 :

hdc in all 42 st flo [42]

Round 3 :

hdc in all 42 st [42]

Round 4 :

hdc in the next 12 st, dc in the next 18 st, hdc in the next 12 st [42]

Info :

Fasten off with a sl st and keep a long tail. Sew the bone colored flap to the taupe scarf to keep the flap down. Where you see the double crochet on the edge, that marks the front of the torso so when placing it on the alien make sure that portion is facing the front.

β€” Assembly :

Info :

Starting with the arms, you can measure where you want to place them by putting on the scarf and seeing where you want the arms to stick out.

Info :

Once you figure out where you want to place the arms, which should be on either side of the torso, take the scarf off and sew on the arms where you measured you wanted them.

Info :

Put the scarf back on and now measure where you want to place the ears. The ears should sit right above the scarf and on either side of the head. I used pins to help me figure out a good placement for them. Sew on each ear.

Info :

For the feet, sew them onto the bottom torso of the alien right up front.

Info :

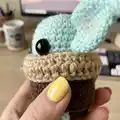
Take a medium length of soft green yarn and make a nose on the alien’s face by sewing on top of two holes in between the eyes.

Info :

With the blush on your make-up brush or q-tip lightly place pink coloring on the inside of each ear.

Assembly Instructions

  • Attach arms by first putting the scarf on and marking where the arms should stick out, then remove the scarf and sew each arm securely on either side of the torso where marked.
  • Sew ears to the head so each ear sits right above the scarf on either side of the head; use pins first to ensure symmetrical placement before stitching each ear in place.
  • Sew feet to the bottom front of the torso so the alien sits upright; position both feet close together at the front and secure with a tight whipstitch.
  • Sew the bone colored flap of the scarf to the taupe scarf to keep the flap down, making sure the section with the double crochet faces the front of the torso.
  • Create a small nose by threading a medium length of soft green yarn through two holes between the eyes and tying/securing it to form a tiny nose detail.

Important Notes

  • πŸ’‘Use stitch markers to mark the beginning of each round to keep track while working increases and decreases.
  • πŸ’‘Insert the 15 mm safety eyes between rounds 10-11 spaced 8 stitches apart for proper placement and symmetry.
  • πŸ’‘Stuff gradually while constructing the body to avoid overstuffing the base so your figure can sit upright.
  • πŸ’‘Fold and seam the scarf edges carefully and hide the sewing tail between layers to keep the scarf removable and neat.

This adorable Baby Alien is a delightful chibi amigurumi perfect for gifting or collecting. 🧢 The little removable scarf and long ears let you style and personalize every time you play. ✨ Enjoy making this cute companion and share the handmade love! 🐰

You ask,

we answer.

FAQs

What size will the finished piece be?

The finished baby alien amigurumi is about 10.16 cm (4 inches) tall and 10.16 cm (4 inches) wide at the torso when made with the recommended yarn and hook size.

Can I use different yarn weights for this pattern?

Yes, you can use different yarn weights but this will change final size; choose an appropriate hook for your yarn and expect a larger or smaller finished doll.

Do I need advanced crochet experience for this pattern?

This pattern is rated intermediate; you should be comfortable with basic amigurumi techniques like magic ring, increases, decreases and sewing pieces together for the best results.

How long does this project typically take to complete?

Most crocheters complete this project in about 5-7 hours, though time may vary depending on experience level and how much time you spend on finishing details.