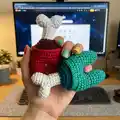
About This Among Us Crewmate Amigurumi Pattern
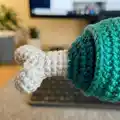
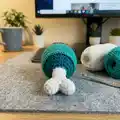
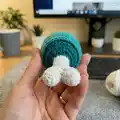
This pattern creates a small Among Us crewmate amigurumi complete with a bone topper and split legs. You will crochet two legs joined together to form the body and make a two-bump bone that sews into the back. The pattern uses worsted weight yarn and a 3.25mm hook for a tight, neat finish.

Clear round-by-round instructions are provided for each piece, plus photo references for assembly and finishing. Perfect for gifting or making a small desk companion.
Why You'll Love This Among Us Crewmate Amigurumi Pattern
I absolutely love this pattern because it transforms simple amigurumi techniques into a recognizable, playful character with minimal pieces. I appreciate how the joined-leg construction creates that classic Among Us silhouette with very little sewing. The little bone topper adds a fun finishing touch and lets you personalize color choices. It is satisfying to complete quickly, yet still offers opportunities to practice shaping and joining rounds.
Switch Things Up
I love customizing the colors of this crewmate to make unique characters; try pastel shades for a soft look or neon colors for a bold effect.
You can change the finished size by switching yarn weight and hook size — bulky yarn and a larger hook make a chunky version, while fingering yarn and a small hook make a tiny keychain buddy.
I often swap the bone for other small accessories like a tiny flag, scarf, or backpack to create custom themes and characters.
Try embroidering a small mouth or visor highlight to give your crewmate more personality and expression before closing the opening permanently.
For a poseable version, consider adding thin craft wire into the legs before stuffing to allow slight shaping and holding a position.
If you want a set, make several crewmates in matching or complementary palettes and vary the topper or accessory for each one.
I sometimes add felt details glued or stitched onto the visor area for a crisp, clean look if I prefer not to embroider directly onto the stitches.
Experiment with decorative stitches on the body such as a slip-stitch ridge or surface crochet to create texture or a tiny emblem.
Use safety eyes for a quick finish or embroider eyes for a safer child-friendly toy depending on the recipient.
I like finishing with blocking or gentle steam to even out stitches and give a neat polished appearance to the final toy.
For gifting, package a small crewmate with a handmade tag and care instructions — it makes the project feel truly special and ready to delight.
Common Mistakes & How to Fix Them
✗ Skipping stitch markers at the start of rounds leads to miscounted stitches; place a marker at the first stitch of every round to keep your rounds aligned.
✗ Not stuffing evenly causes lumps or flattened sections in the legs and body; stuff gradually and shape with small amounts of fiberfill as you go for smooth contours.
✗ Working with loose tension can let stuffing show through the stitches; use a slightly smaller hook or tighten your tension so the fabric remains dense.
✗ Joining the two legs incorrectly will distort the leg split opening; chain the specified 3, attach carefully and count stitches when joining to ensure even distribution.
✗ Fastening off too soon before securing ends can cause unraveling during assembly; weave in ends securely and leave long tails for sewing where needed.